The Norn User's Guide
Norn 0.9.12 · 10 November 2026
Norn is a writing studio for novelists. It holds your cast, your world, your plot boards, your outline and your actual prose in one place, so the character you invented in chapter two is still one click away in chapter forty.
This guide covers everything the app can do. Read it front to back if you're new, or jump to the part you need — each chapter stands on its own. It's written for the Mac; on an iPad, chapter 23 says what's different, and on an iPhone, chapter 24.
Contents
- Start here
- The Library
- Getting around a book
- The Overview page
- Characters
- The Character Map
- Building the world
- Plots
- Contents, your book's outline
- The Manuscript
- Notes
- Brainstorms
- The Compendium
- Writing goals, the timer and your stats
- Getting your work out of Norn
- Keeping your work safe
- Settings
- Keyboard shortcuts
- The menu bar, item by item
- Troubleshooting and FAQ
- The Writer's Kit
- Syncing with iCloud
- Norn on iPad
- Norn on iPhone
- Learn Norn
1. Start here
What Norn actually is
Think of Norn as three tools that happen to know about each other.
The first is a worldbuilding database — characters, cultures, factions, religions, polities, ethnicities, locations, creatures and invented vocabulary, all cross-referenced. The second is a story planner — swimlane plot boards, Unplotted Scenes, an outline, story beats and character arcs. The third is a word processor built for drafting a novel, with a Contents list that is your outline.
The glue is what makes it worth using. Type a character's name into your prose and it becomes a live chip that follows renames. Give a faction a "tendency trait" and every member inherits it. Make a scene on a plot board and it takes its place in the manuscript, in timeline order.
What you need
A Mac running macOS 26.4 or later, or an iPad running iPadOS 26.4 or later (see chapter 23). That's it. Norn works entirely offline and never asks you to sign in.
Your first ten minutes
- Launch Norn. The Library window appears — your shelf of books.
- Click New Book. A book window opens on the Overview page.
- Type a title and an author name.
- Press ⌘5 to jump to Characters and add someone with the + button.
- Press ⌘7 for Plots, make a plot, then click an empty cell on the board to create your first scene.
- Press ⌘9 for the Manuscript. Your scenes are already in Contents, in timeline order; gather them into acts and chapters if you like.
- Click a scene and start writing.
To learn by doing, chapter 25 has six short lessons, and seven more for when you have time, with a book of examples to try them on.
You don't have to work in that order. Plenty of writers start with a Brainstorm map (⌘3) and let structure emerge. Others open the Manuscript on day one and backfill the world later. Norn doesn't enforce a process.
Tip of the Day
Help ▸ Tip of the Day… (on an iPad or iPhone, also the Library's "…" menu) shows a short tip: something Norn can do, and where to find it. Next and Previous move through the tips, and on a Mac so do ← and →. Learn More opens this guide at the section about it, and the guide's Back returns you to where you were. Close puts the tip away (Done on an iPad or iPhone); on a Mac, Return or Esc does too, and on an iPad with a keyboard, Esc. From the menu, the tip you saw last comes back first, so you can read it again.
On a Mac or an iPad, a tip also appears when Norn opens, at most once a day. It never appears the very first time you open Norn on a device, or while your Library is empty. Turn Show tips at launch off in the tip itself or in Settings ▸ General (it's the same switch). An iPhone shows tips only from the menu. Each device keeps its own place in the tips and its own switch; neither syncs.
2. The Library
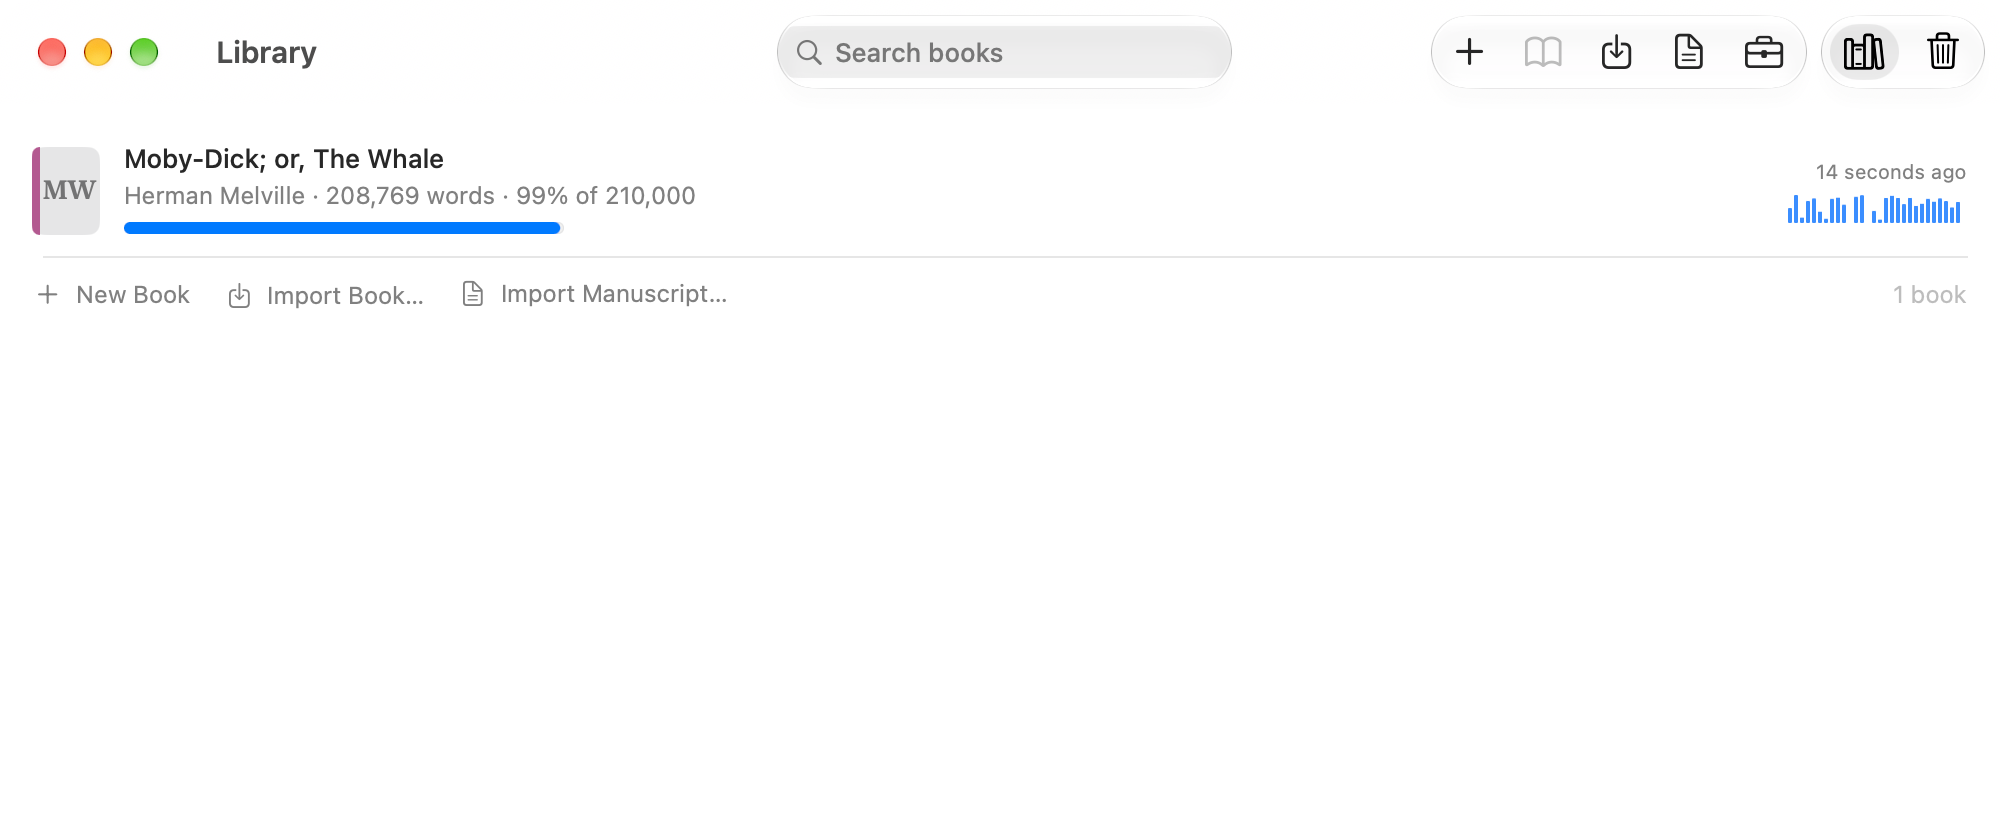
The Library window is Norn's front door. Every book you own lives here, listed newest-edited first.
What each row shows
Every book is a rich row rather than a spreadsheet line:
- A cover tile — for now a quiet placeholder with the title's initials and a colored spine, the color stable per book (the same idea as character chips).
- The title ("Untitled" until you name it) and the author from the Overview page.
- The drafted word count — and, once you've set a manuscript target in Writing Goals, a thin progress bar with the percentage toward it (e.g. "87,690 words · 18% of 500,000").
- A small 30-day sparkline of your writing activity, one bar per day. It only appears once the book has recorded writing days.
- Last edited as relative time, e.g. "3 hours ago" — the last time you changed the book. Opening it, and Norn keeping its writing log (your words per day, timer sessions), don't count.
- For a book made by Norn 0.9.6 or earlier, Made by an older Norn (format 1.24.0) — this version can't open it; see Books made by an older Norn.
- With Sync with iCloud on, how the book stands with iCloud — "Up to date, last synced 3:04 PM", "Sending to iCloud — 40%", "Made by an older Norn — not syncing on this device". A book that's in iCloud but not on this Mac yet shows as "In iCloud — arriving" until it's here.
Below the last row sit quiet New Book, Import Book… and Import Manuscript… shortcuts and the book count, so you always know the list is complete.
A search field in the center of the toolbar filters the list by title or author — in the library and in the Trash.
Buttons along the top
- New Book creates a fresh book and opens it right away. It starts with the traits in your Writer's Kit, and with whatever you've chosen there under New Books — your name, a beat sheet, some categories, and, if you've ticked Create plot with these beats, a plot with a scene for each beat.
- Open opens whatever's selected. Double-clicking a row does the same thing, so does pressing Return.
- Import Book… brings a
.nornarchive into your library. The panel says it plainly: originals are never modified. The book's own scene types and character styles go into your Writer's Kit, as the book had them, so the book looks the same here and on your other devices. One whose name you already use comes in retired. If its settings differ from yours, a line in the Library says so: Choose… lets you keep yours, use the book's or keep both, one by one, and Keep Mine leaves everything as it is. - Import Manuscript… brings a Word (
.docx) or RTF file in as a new book — see Bringing in a manuscript. - Writer's Kit (the briefcase) opens the Writer's Kit window, as Norn ▸ Writer's Kit… does.
- The Books / Trash switch on the right flips between your shelf and the trash.
Bringing in a manuscript
Import Manuscript… (in the Library, or File ▸ Import Manuscript…) turns a manuscript you wrote elsewhere — a Word .docx, or an .rtf from TextEdit, Pages or Scrivener — into a new book. It never touches a book you already have, and the file itself is only read.
You can also start from the file itself. On a Mac, right-click a .docx or .rtf in the Finder and choose Open With ▸ Norn, or drop it on Norn's icon in the Dock; on an iPad or iPhone, share it from Files or Mail and choose Open in Norn. Norn never makes itself the default app for Word or RTF files, so double-clicking one still opens Word, Pages or TextEdit. Either way the file comes to the same preview in the Library, and nothing is made until you choose Import.
Norn reads the file first ("Reading…"), then shows what it would make before making anything:
- Book title — from the file's own title, else a title at the very top of the file (Word's Title style), else the file's name. Change it here if you like. That opening title stays in the Front Matter document; it doesn't become a chapter.
- Split into chapters at: — only the choices the file has: Heading 1, Heading 1 and 2 (parts and chapters) (parts become folders with their chapters inside), Heading 2, Page breaks, Lines that start with “Chapter”, or Don’t split. Norn picks the first that gives more than one chapter.
- Split chapters into scenes at scene breaks — on when the file has any. A line holding nothing but break marks —
#,***,* * *,⁂or~~~— counts as a scene break. - The list of chapters it would make, each with its scenes and words, so a wrong split shows before anything exists, and a summary such as "24 chapters, 71 scenes, 92,140 words".
Click Import and the book opens. Each chapter is a folder in Contents, titled with its heading (the heading becomes the title rather than staying in the text); each scene is a document — "Scene 1", "Scene 2" and so on. Text before the first chapter becomes a document called Front Matter. With Don’t split, the whole file is one document named after the book. The chapters and scenes are manuscript documents, not outline scenes: link them to planned scenes later if you want.
What comes in: every word of the text, paragraphs and line breaks, headings (from Word's Heading styles — RTF has no headings, so an RTF splits at page breaks, "Chapter" lines or scene breaks), block quotes, bulleted and numbered lists, alignment, bold, italic, underline, strikethrough, small caps, superscript and subscript, links, curly quotes as they are, the file's comments as Norn comments on the same words (a reply is added to the comment it answers), and its footnotes and endnotes as Norn footnotes and endnotes. Text in a table comes in as paragraphs. A font or size that differs from the rest of the text — a letter set in a script face — keeps its face and size; the file's ordinary font and size don't come along, so the book takes Norn's own look. If most of the text is justified, that's taken as the file's look and dropped; Editor Settings has its own justify choice.
What doesn't come in: pictures, shapes and text boxes, headers and footers, and colours. The preview says what was left out — "Not brought in: 3 images, 12 comments." — so nothing goes quietly. A comment is left out only when it has no words or isn't attached to any text. A file with tracked changes comes in with them accepted — insertions kept, deletions gone — and the preview says "Tracked changes were accepted."
The words you bring in don't count as today's writing: day one of the new book starts from the imported text, just as words arriving from another device don't count. A split you don't like costs nothing — move the book to the Trash and import again with another choice.
Norn can't read a password-protected file ("This file is protected with a password."), a Word 97 .doc, Pages' own format or a file with no text in it. Save it from Word or Pages as .docx first.
Right-click a book
You get Open, Rename…, Duplicate, Export Archive… and Move to Trash.
Duplicate makes a genuinely independent copy — new identity, its own snapshot history, " copy" appended to the title. Useful before a risky restructure.
Export Archive… writes a standalone .norn file wherever you like. The archive carries the definitions of the scene types and character styles the book uses, so they arrive with it in another Norn. Your library copy stays put. This is the file you'd hand to a collaborator, drop in Dropbox or stash on an external drive. The same export sits in a book's own window: File ▸ Export…, then The whole book and Book Archive (.norn), so you don't have to come back here to make a backup.
The Trash
Moving a book to the Trash is reversible — nothing is deleted yet. Right-click a trashed book for Restore to Library or Delete Permanently…. There's also an Empty Trash… button along the bottom of the trash view.
Both permanent deletions ask first, and they say what they mean: "This book will be gone for good — this can't be undone." With sync on they add that the book is also removed from iCloud, and that copies already on your other devices stay in their Trash — see Trash and deleting across devices.
One window per book
Open a book that's already open and Norn brings its existing window forward instead of spawning a second one. Two windows editing the same book is a data-loss story waiting to happen, so the app simply doesn't allow it.
On a Mac, a book's window opens where that book's window was when you last closed it, at the same size: filled, tiled or in full screen included. (Full screen that distraction-free turned on isn't kept; the window opens as a window.) The Library, User's Guide and Writer's Kit windows come back where you left them too. If that place is no longer on any display you have connected, the window opens on one that is, moved and if need be made smaller to fit.
Where books live
Your books sit in an app-private folder:
~/Library/Application Support/Norn/Library/<book-id>/That location is deliberate. Live databases and per-file cloud sync are a bad marriage — a sync client copying a database mid-write is how books get corrupted. Keeping the library out of iCloud Drive and Dropbox removes that risk entirely.
The practical consequences are worth knowing:
- Time Machine backs it up, along with everything else in your home folder.
- Cloud services don't, unless you point them there yourself. Norn's own Sync with iCloud is different: it never copies the database file — it sends your book's contents one entry at a time and builds each device's own copy (chapter 22).
- For offsite copies, use Export Archive… on a rhythm that suits you, or point Norn's snapshot folder at a synced location (see Settings).
On an iPad the Library lives in Norn's own storage there, and it's part of the iPad's backup — see iCloud Backup and restoring an iPad.
3. Getting around a book
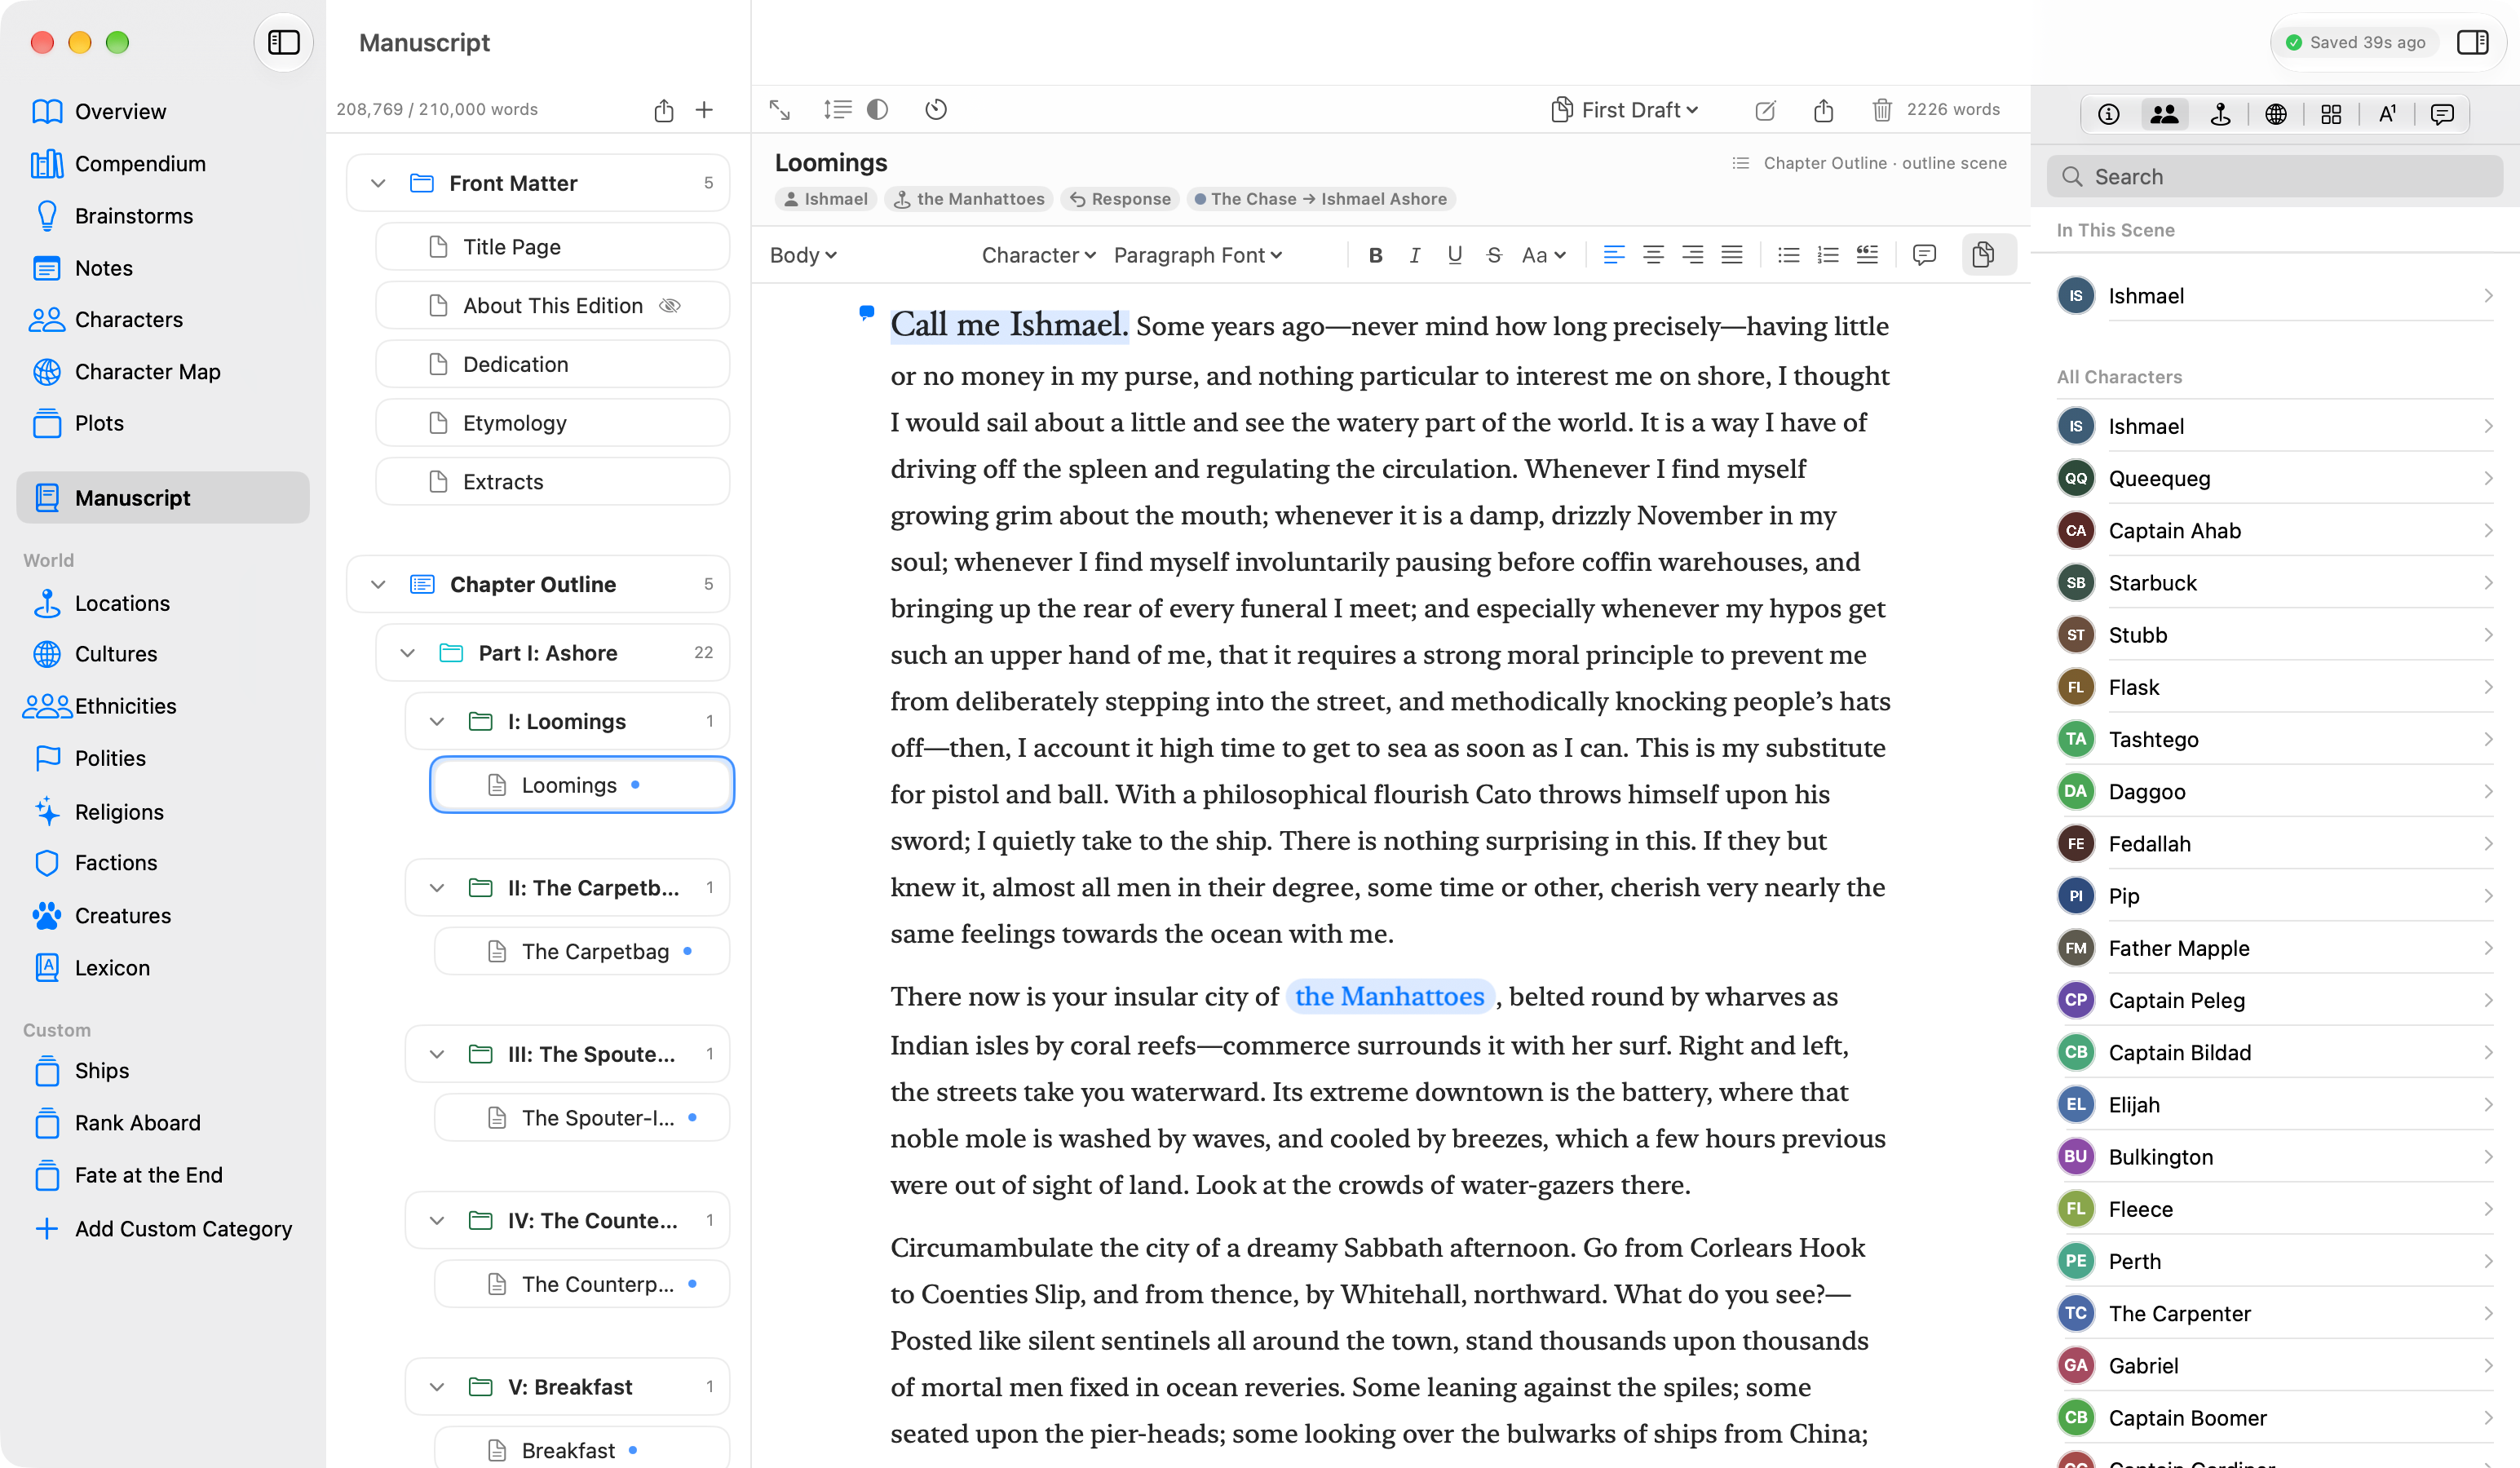
The three panes
A book window is split into three columns.
┌──────────────┬──────────────────┬───────────────────────────┐
│ Sidebar      │ List             │ Editor                    │
│              │                  │                           │
│ Which        │ Which item       │ The thing you're          │
│ section?     │ in that section? │ actually editing          │
└──────────────┴──────────────────┴───────────────────────────┘
Pick a section on the left, pick an item in the middle, edit it on the right. The Overview page skips the middle column since there's nothing to list.
The sidebar, top to bottom
| Section | Shortcut | What it's for |
|---|---|---|
| Overview | ⌘1 | Book details, goals, writing stats |
| Compendium | ⌘2 | Read-only wiki of everything in the book |
| Brainstorms | ⌘3 | Mind maps |
| Notes | ⌘4 | Markdown scratch space |
| Characters | ⌘5 | Your cast |
| Character Map | ⌘6 | The relationship graph |
| Plots | ⌘7 | Swimlane boards and Unplotted Scenes |
| Manuscript | ⌘9 | Contents — your outline — and the prose |
⌘8 opens Unplotted Scenes, at the top of Plots.
Below those, under a World heading: Locations, Cultures, Ethnicities, Polities, Religions, Factions, Creatures and the Lexicon. Below that, a Custom heading holds any categories you invent, plus a button to add one.
The same destinations live in the menu bar under Book ▸ Navigate and World ▸ Navigate, which is handy when your hands are already up there.
The Navigator layout
Prefer a single sidebar? Turn on View ▸ Use Navigator Layout. The three columns collapse into two: one sidebar with icon rows across the top and the current section's list beneath, plus a much wider editor.
View ▸ Mini Rail (⌥⌘M) squeezes that sidebar down to a narrow strip of item titles when you want maximum room for prose. It only works while the Navigator layout is on.
Both settings are app-wide, so every open book switches together. Nothing about your book changes — only the furniture.
The Reference Inspector
While you're on Plots or the Manuscript, a toolbar button on the right (the panel icon) opens the Reference Inspector: a read-only reference panel you can consult without losing your place.
Five tabs across the top:
- Information — a card for the scene you currently have selected: POV, cast, synopsis, setting, beat, tags, linked scenes, threads, notes. An Edit Scene… button opens the real editor if you need to change something. In the Manuscript the card also holds the scene's Outline Note, the one field here you can type in, and, when it is out of order, its Ordering Issues (see chapter 9).
- Characters — searchable, with the current scene's cast pinned at the top under "In This Scene."
- Locations — same idea, with the scene's setting pinned.
- World — cultures, ethnicities, polities, religions, factions and creatures, chosen from a menu.
- Custom — your own categories.
In the Manuscript the same row has two more icons at its end: References, the list of your footnotes and endnotes, and Comments, the list of your comments on the scenes you're writing. Which of those two you chose is remembered for the window.
Apart from the Outline Note, everything in the five reference tabs is look-but-don't-touch by design. It's there so checking a character's eye colour mid-sentence doesn't turn into an accidental edit. The panel's visibility is remembered across sections and across launches.
Lists, search and deleting
Every list pane carries a slim header bar with a + button at its right edge for making a new item, and most pair it with a permanent search field in the same bar — Characters, every World facet kind, custom categories, the Character Map and the Compendium all filter as you type. Plots is the exception: its magnifying glass toggles a cross-plot scene search instead (see chapter 8).
Deleting follows a preference you control (Settings ▸ General ▸ Confirm before deleting). By default Norn asks only when you're deleting several things at once. Some deletions always ask no matter what the preference says — deleting a plot, deleting a custom category, deleting from an editor's trash button — because those cascade.
4. The Overview page
Overview is the book's front page. On a wide window it lays out in two columns.
Book holds Title, Author and Synopsis. The title here is what shows in the Library, in exports and in your window title.
Counts is a read-only census: characters, locations, one line per facet kind, custom categories and plots.
Writing Stats and Writing Goals fill the right column. Both are covered in chapter 14.
That's all Overview does now. The book-management actions that used to live here moved to the menu bar, where they're reachable from any pane: File ▸ Duplicate Book…, File ▸ Restore from Snapshot…, File ▸ Export…, Book ▸ Manage Beats…, Book ▸ Manage Custom Traits…, World ▸ Export / Import World Data…
5. Characters
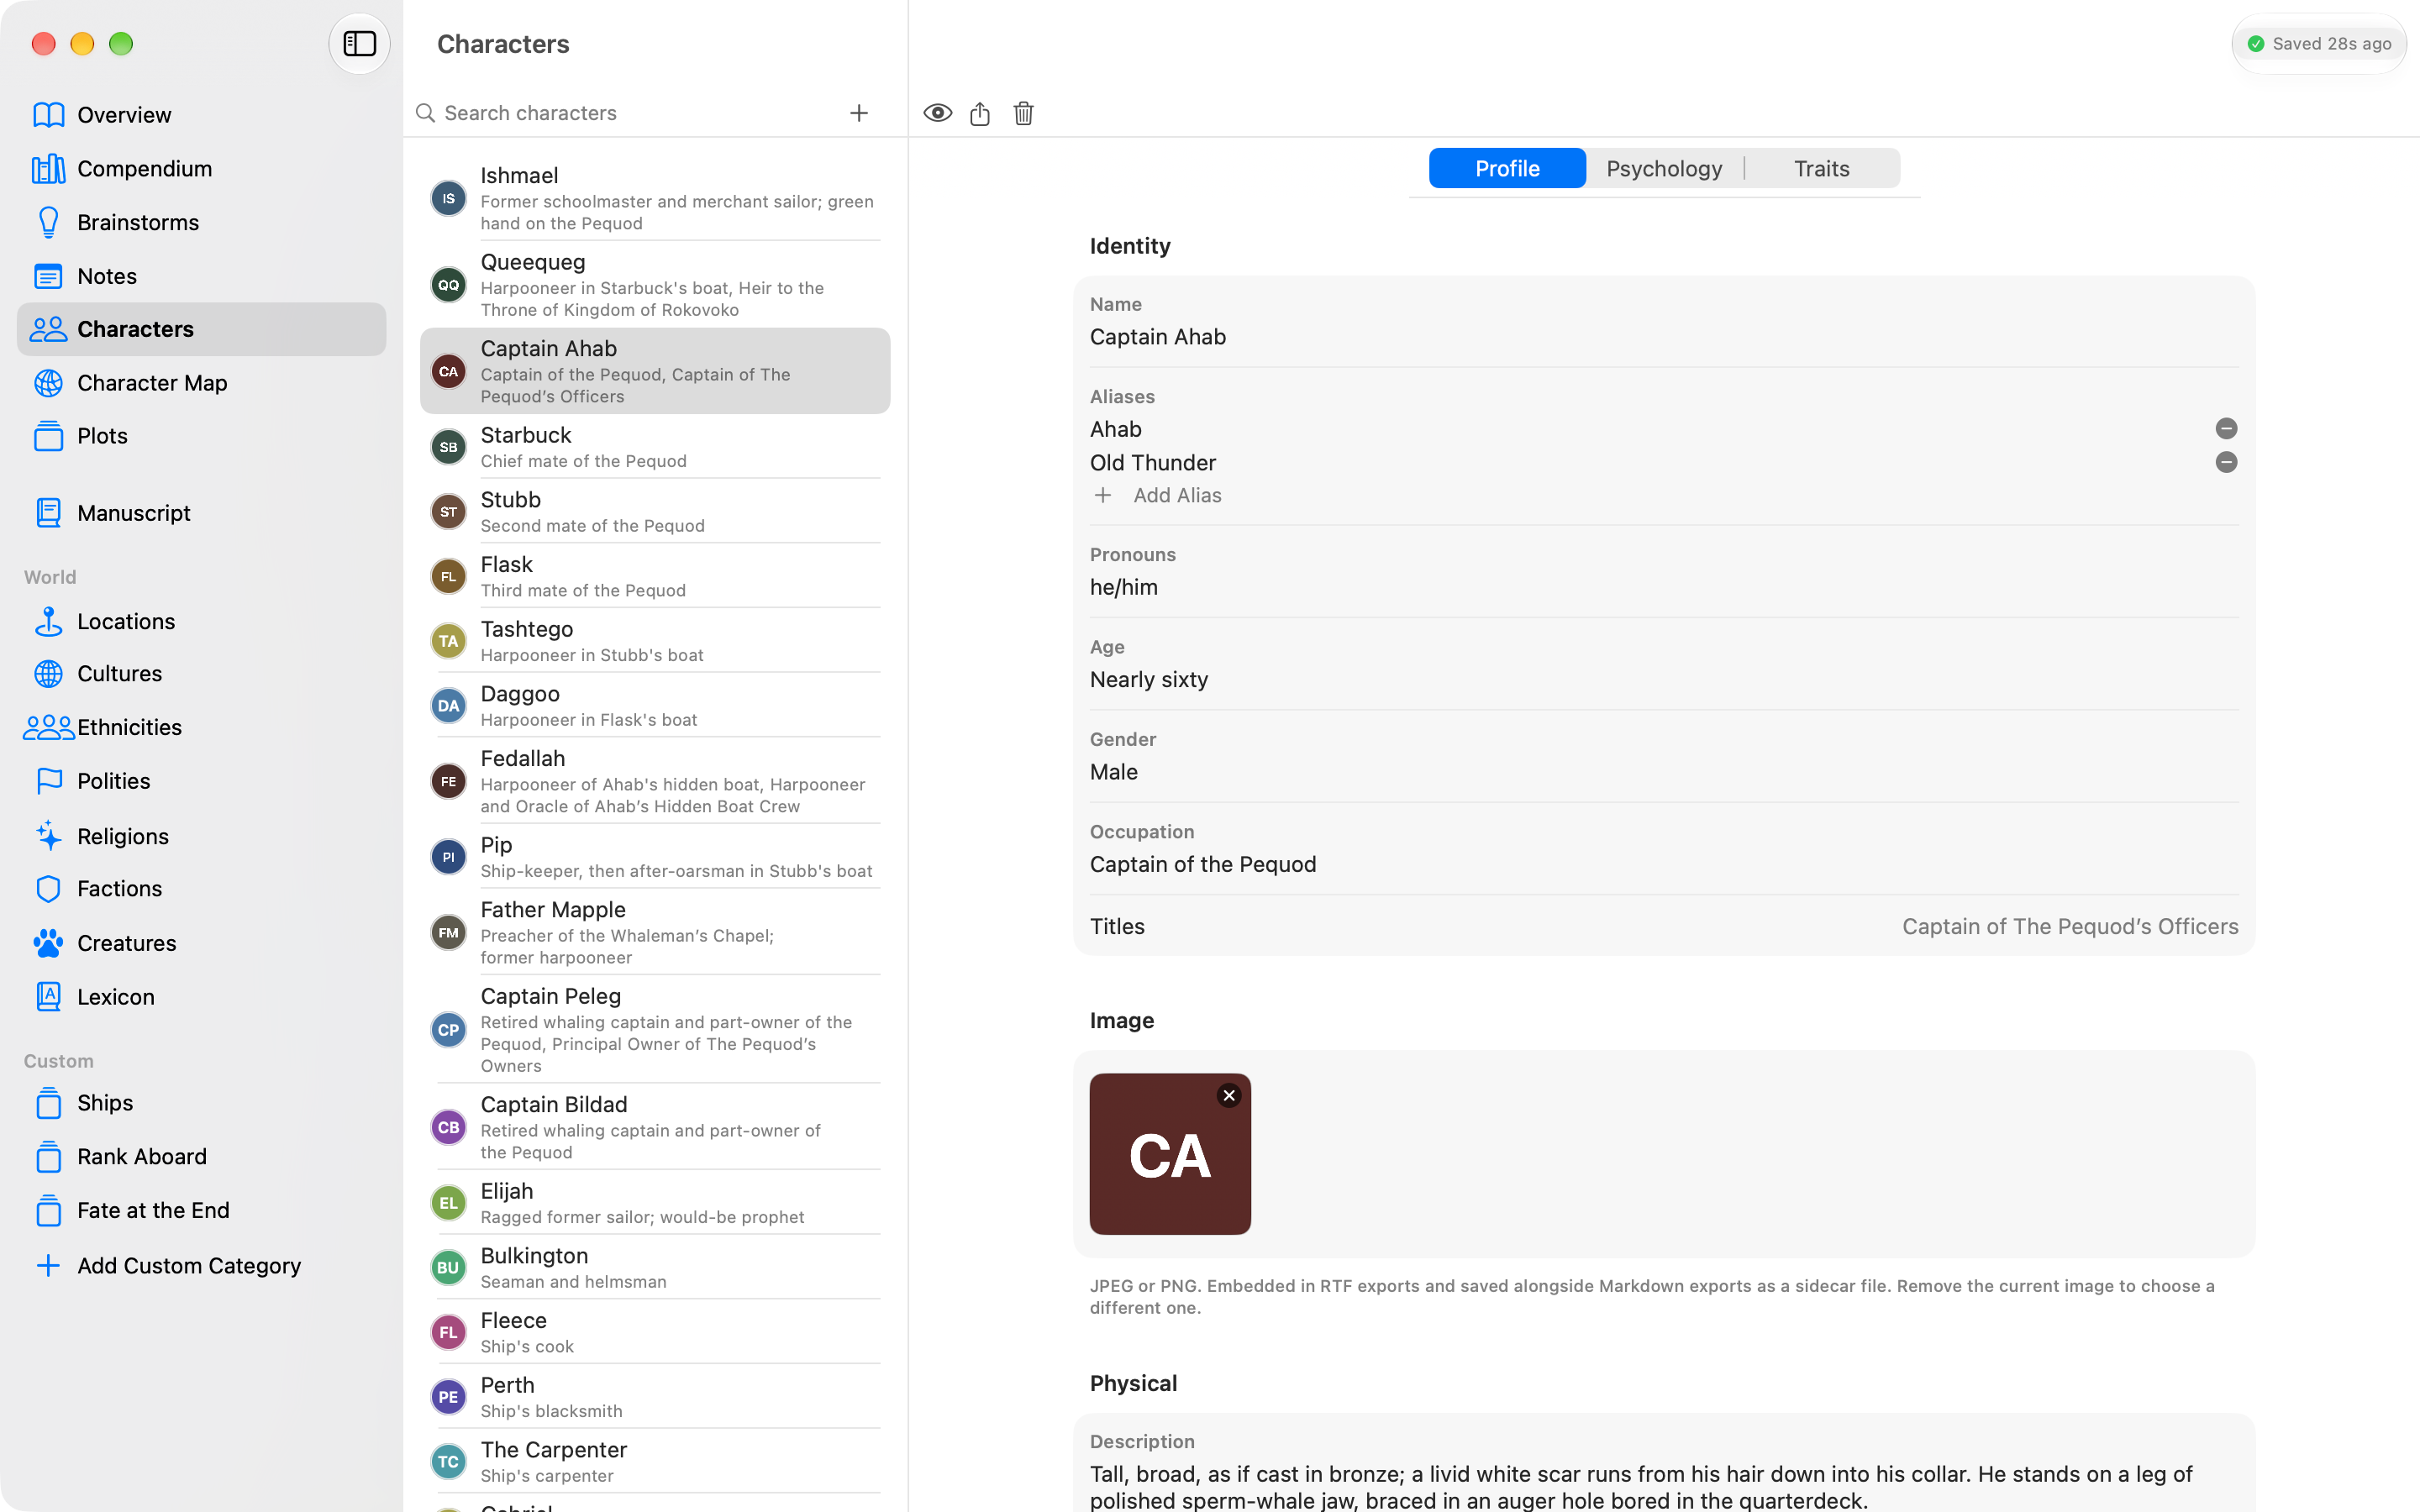
Characters are the heart of Norn, and the character editor is the deepest screen in the app. Don't let that intimidate you — only the name is required. Everything else is there when you want it.
The list
Press ⌘5. The + button makes a new character and selects it immediately.
Search filters by name. Underneath each name, a dim caption shows the character's occupation and any leadership titles they hold, rendered as "King of Veshmar."
Drag rows to reorder them. One quirk worth knowing: reordering is disabled while a search is active, because dragging a filtered list can't reliably map back to the real order. Clear the search box and the drag handle comes back.
Three tabs
The editor splits into Profile, Psychology and Traits. Switching characters always lands you back on Profile.
Above the tabs sit three buttons: an eye to preview the printable character sheet, a share menu to export this character as Markdown or RTF, and a trash to delete them.
Profile
Identity — name, aliases, pronouns, age, gender, occupation. Age is free text on purpose, because "ageless" and "roughly four hundred" are real answers in fantasy.
Aliases deserve a paragraph. Each alias is a stable entry, not just a string, and that has a lovely consequence: if you write "Eddie" into your prose as a live token and later rename that alias to "Ed," every chip in the manuscript updates itself. Delete the alias instead and those chips fall back to the character's canonical name. Nothing breaks either way.
Titles appears here too, but you can't type in it — it's derived. Assign a character as the leader of a faction, religion, polity or custom category and their title shows up automatically.
Images holds one picture, JPEG or PNG, up to 1 MB. It shows in RTF exports and travels alongside Markdown exports as a sidecar file. To swap it, remove the current one first.
Physical is a single description field. Some writers use two lines. Some use two pages.
World is where a character joins the world you built. Five pickers are always on show — Cultures, Ethnicities, Polities, Religions, Factions — and each pick becomes a removable chip with an affinity dial attached. Custom categories stay hidden until you add them with + Add Category, keeping the form quiet for characters who don't need them.
Affinity is the clever bit. It answers "how strongly?" and the labels change to suit the thing:
| Tier | Religion | Faction | Polity | Ethnicity | Culture |
|---|---|---|---|---|---|
| core | Devout | Inner circle | Native | Strongly identifies | Immersed |
| active | Practicing | Active member | Connected | Identifies | Engaged |
| casual | Nominal | Fringe | Casual | Weakly identifies | Casual |
| distant | Lapsed | Lapsed | Displaced | Distanced | Outsider |
| opposed | Hostile | Opposed | Opposed | Disowns | Rejecting |
Underneath they're the same five values, which is what lets inherited traits work uniformly. A lapsed priest and an outsider to a culture are the same tier wearing different clothes.
Relationships is computed, never typed. Norn works out who's linked to whom from three sources: shared faction membership, shared facets in any custom category you've flagged "Include in Relationships," and explicit connections. The Manage Connections… button opens the editor for the third.
A connection is stored one-sided and the inverse comes free. Say Aldric is Mira's parent and Mira automatically shows Aldric as her child. Eighteen kinds ship with the app — parent, child, sibling, spouse, partner, ex, grandparent, grandchild, aunt or uncle, niece or nephew, cousin, mentor, protégé, friend, rival, enemy, ally, and "other" with a label you write yourself.
Notes is free text, no structure imposed.
Psychology
Four prompts open the tab: Motivations, Fears, Strengths, Flaws.
Character Arcs are built from components you name yourself — a label, and what goes under it, in whatever order you want them.
Add Character Arc asks which way to start. The menu lists the arc presets in your Writer's Kit — Norn ships nine: Corruption Arc, Disillusionment Arc, Fall Arc, Flat Arc, Ghost / Lie / Want / Truth / Need, Goal / Motivation / Conflict, Redemption Arc, Relationship Arc, and Wound / Fear / Flaw / Strength. Ghost / Lie / Want / Truth / Need lays out the five-beat shape straight away: the Ghost is the wound in the past, the Lie is what the wound taught them to believe, the Want is what they chase because of it, the Truth is what the story reveals, and the Need is what they actually require. Custom… opens a small window to name the arc and list its parts before it appears.
Each component of a preset shows a hint in grey until you type over it. The hint belongs to the name: rename the component and the hint goes, because it was written for the old name.
Whichever you pick, what you get afterwards is the same. A preset's components are ordinary components: rename them, move them with the chevrons, remove the ones you don't use, and add your own with Add Component. Nothing remembers which way an arc started.
A character can carry several arcs at once — a main arc and a subplot, say.
Arcs written in an earlier version of Norn come across untouched, as five components named Ghost, Lie, Want, Truth and Need.
Death Stake names what a character stands to lose: Physical Death, Professional Death or Psychological Death, plus details. One per character, entirely optional.
Hooks answer "why will a reader follow this person?" Five kinds: Injustice, Skill, Personality, Progression and A Worthy Cause. Add as many as you like.
Traits
Manual Traits are the ones you type. Each gets a polarity: positive, negative or neutral.
Inherited Traits arrive on their own. When you attach a tendency trait to a faction ("members of the Order tend to be Reckless"), every member whose affinity falls inside that trait's range picks it up. The source is always labelled, so you can see that "Disciplined" came from the Order rather than from you.
Don't want one? Click the eye beside it. The trait moves to a Suppressed block, struck through, and stops appearing in exports. It's still there for everyone else in that faction — suppression is per character. Click the eye again to bring it back.
If two facets contribute the same trait with the same polarity, Norn shows it once and lists the sources. Same name with opposite polarity stays as two entries, because a character read as loyal by their own faction and disloyal by their enemies is a real tension, not a bug.
The trait library gives the picker something to offer. Each book has its own, and a new book starts with a copy of the traits in your Writer's Kit — sixty built in, twenty-four positive, twenty-four negative and twelve neutral, plus any you've added there.
The picker has two parts. The first is this book's library. The second, From Writer's Kit, lists every trait in your Kit that this book doesn't have — the same name with the same polarity counts as having it, and the comparison is exact, capitals included. Pick one from there and it's copied into the book and applied in one step; one Undo takes both back.
Add & Pick, at the bottom, makes a brand-new trait for this book. Also add to Writer's Kit is ticked by default, so the trait is waiting in your next book too. Untick it for a trait that only makes sense here.
Manage the book's library from Book ▸ Trait Library ▸ Manage Custom Traits…, where you can search and edit, and:
- Save to Writer's Kit (the tray button on a row) copies one of this book's traits to your Kit. It's greyed out, with the reason, when the Kit already has it.
- Add All from Writer's Kit brings in every Kit trait this book lacks.
- Restore Built-in Traits adds any of Norn's own sixty whose name this book doesn't already have, whatever its polarity. It restores the built-ins, not your Kit's list.
Removing a library entry never strips it from characters who already have it. And a book's traits are its own: editing, renaming or deleting a trait in the Kit never changes a book.
Four Selves splits traits into how the character is perceived at four distances:
- Reputed Self — what strangers have heard.
- Social Self — what colleagues see day to day.
- Inner Self — who they are alone.
- Hidden Self — secrets, including ones they keep from themselves.
Anything unplaced sits in Unsorted. A trait can belong to several selves at once — the menu on each row toggles membership, and "Clear all selves" resets it.
Contradictions pair opposing traits the character holds simultaneously. Generous and miserly. Brave and cowardly. The top row is the Core Contradiction and gets highlighted; drag a different pair to the top to promote it.
The character sheet
Click the eye in the header for a read-only, print-styled rendering of everything above. Sections you've excluded from exports don't appear, and empty sections take up no space at all, so a lightly-sketched character produces a short clean page rather than a form full of blanks.
To get it out of the app, use the share menu: Export as Markdown… or Export as RTF…. Markdown writes a .md plus an images folder beside it. RTF embeds the picture in one file, ready for Word or Pages.
6. The Character Map
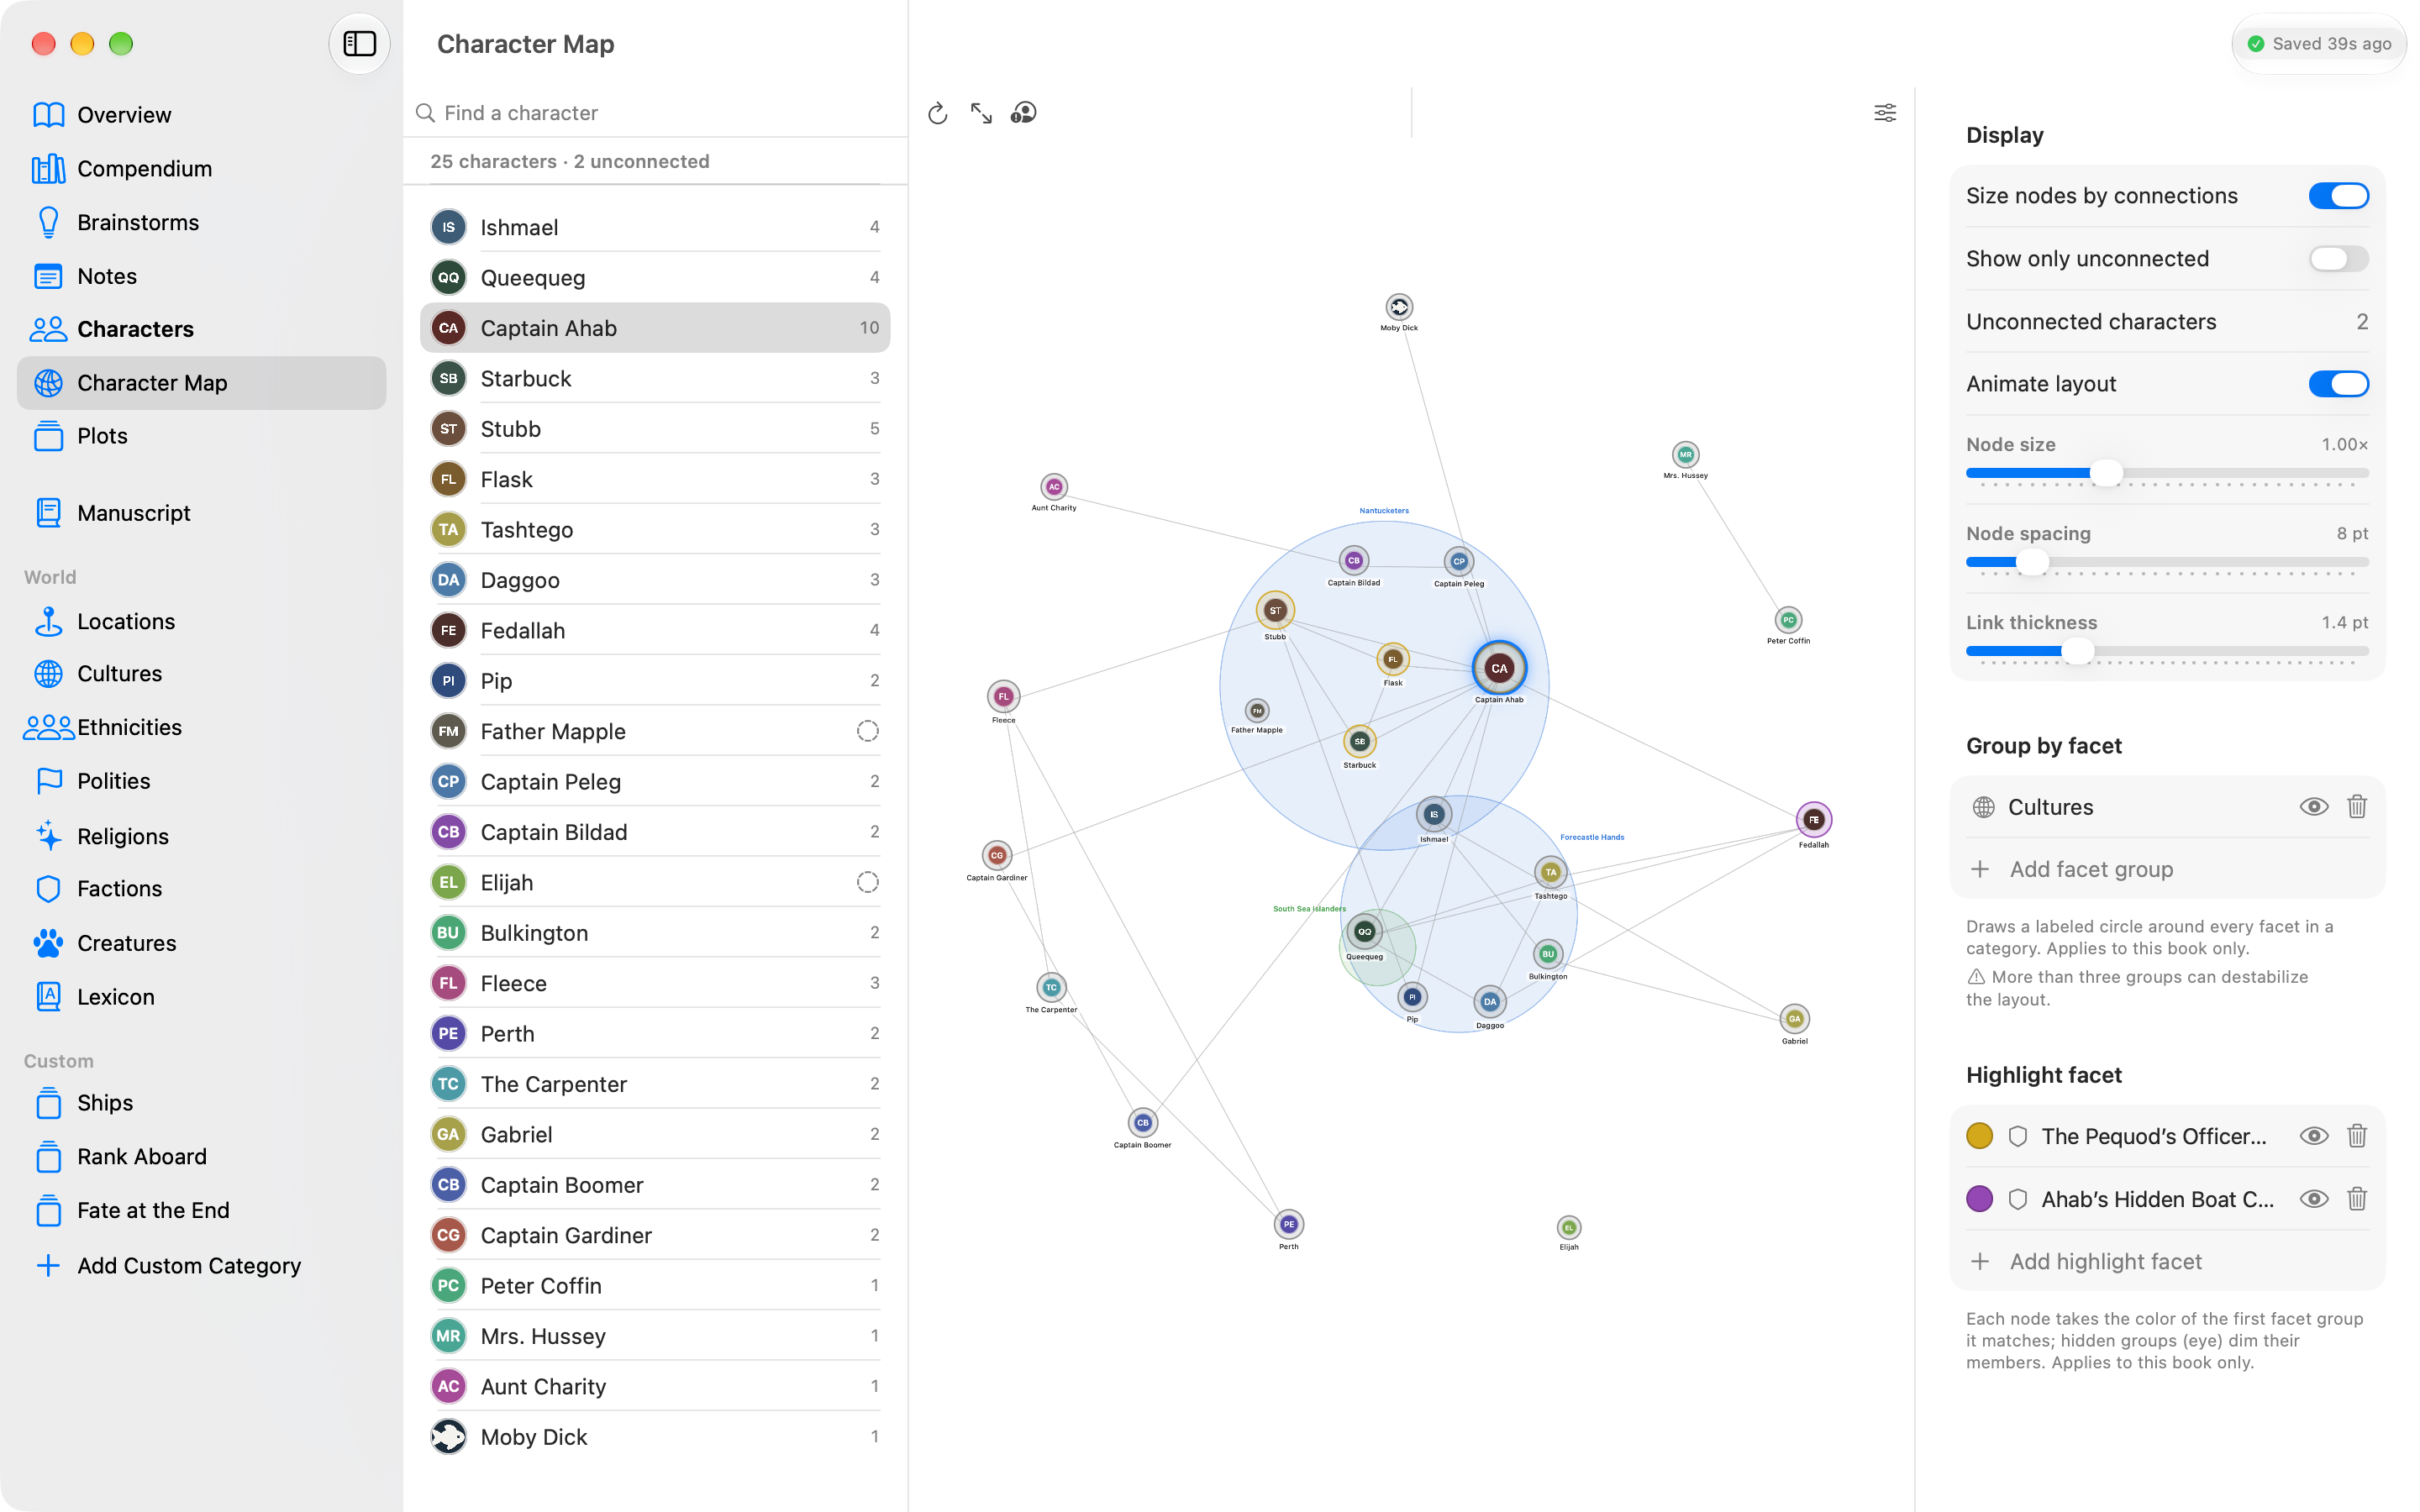
Press ⌘6. The middle pane lists your cast with a connection count beside each name and a dashed circle for anyone with no relationships yet. Click to select, double-click to open their editor.
The canvas on the right draws the relationship graph — the same connections the Relationships section computes. Drag a node to move it, drag empty space to pan, pinch to zoom.
The header controls
- Reset the layout re-runs the simulation from scratch.
- Zoom to fit frames everything.
- The person badge filters down to unconnected characters only, which is a fast way to spot who you've forgotten to tie into the story.
- The sliders icon shows or hides the controls column.
The controls column
Display holds toggles for sizing nodes by their number of connections and showing only unconnected characters, plus sliders for node size, node spacing and link thickness. "Animate layout" decides whether you watch the graph settle or simply arrive settled.
Group by facet draws a labelled circle around every facet in a category — one ring per faction, say. Members get pulled inside their ring, non-members get pushed out. This is real physics rather than a decorative overlay, so it genuinely reorganises the map. Keep it to three groups or fewer; past that the layout starts fighting itself, and the panel warns you.
One behaviour to expect: while any grouping is active, the relationship lines stop pulling. Group membership decides position and the edges are drawn on top as reference. Otherwise a well-connected character would get dragged out of their own ring by everyone they know.
Highlight facet tints characters who match a specific facet — every Riverlander in teal, every member of the Order in amber. Ten colours to choose from. Each node takes the colour of the first group it matches, so order matters. The eye toggle beside a group dims its members rather than hiding them, and a node that matches any visible group stays bright.
What's saved and what isn't
Your groupings, colours, toggles and display sliders are saved with the book. Node positions aren't. The map re-computes each time you open it, which means it always reflects your current cast rather than a stale arrangement. The layout is deterministic, so the same relationships produce the same picture.
The four force sliders — center, repel, link strength, link distance — live in Settings ▸ Character Map and apply to every book at once. Display defaults there apply only to books that haven't customised their own.
7. Building the world
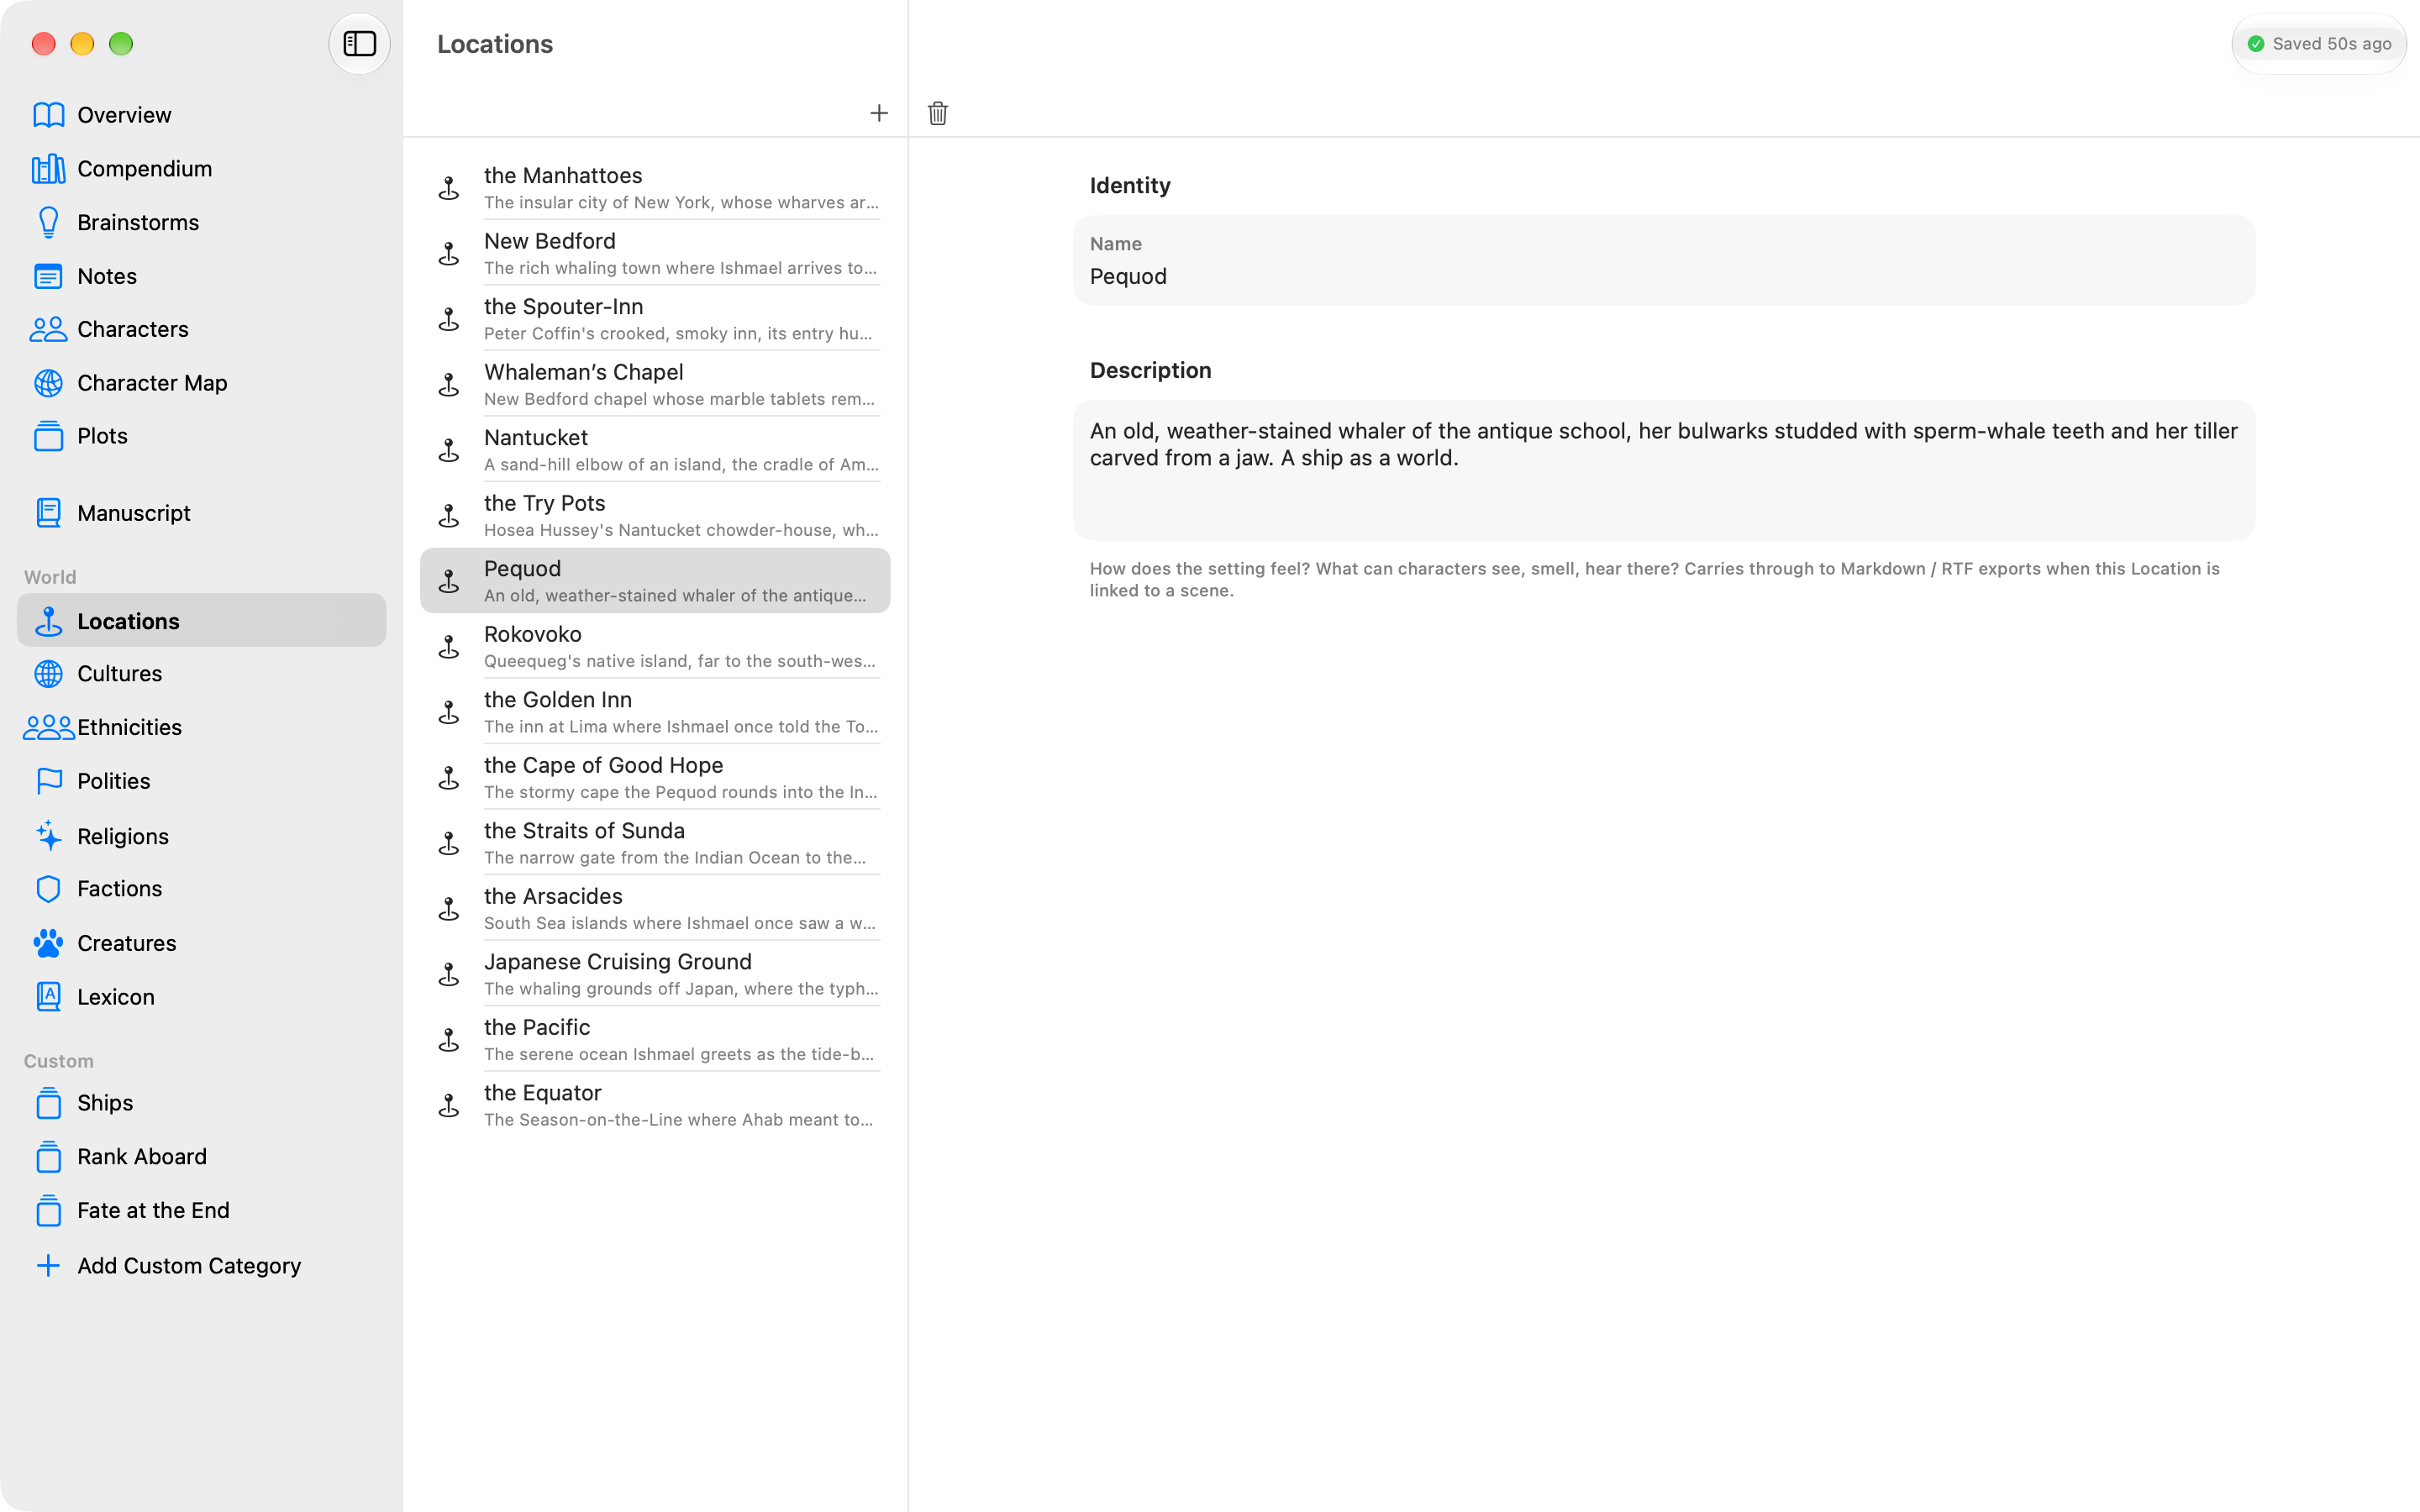
Norn splits worldbuilding into six kinds of thing: facets (five flavours plus your own), locations, creatures, lexicon words, and the Compendium that reads them all back to you.
Facets
A facet is any group a character can belong to. Five kinds ship built in:
| Kind | Icon | Typical use |
|---|---|---|
| Cultures | globe | Riverlands, Hill Clans |
| Ethnicities | people | Highborn, Sea-folk |
| Polities | flag | Kingdoms, city-states, empires |
| Religions | sparkles | The Pale Flame |
| Factions | shield | The Order, the Thieves' Guild |
Each editor gives you a name, a short description and a long description. Polities add a Demonym field — what its people are called. Polities, religions and factions get an image slot for a flag or emblem. Tags go in a comma-separated field.
Tendency traits are the reason facets earn their keep. Add "Reckless" to a religion and decide which affinity tiers inherit it. Three presets cover most cases:
- Always applies — everyone, even the opposed.
- Active members only — core and active tiers.
- Opposed only — an anti-tendency, like "Resentful of the temple," that appears solely on characters who reject the faith.
Leave the tier list empty and the trait sits dormant without being deleted.
Leaders can be assigned on polities, religions, factions and custom categories. Pick a character, type a title like "High Priestess," and that character's Identity panel shows "High Priestess of the Pale Flame." Assigning a leader also enrols them as a member.
Archive or delete? Archiving hides a facet from lists and pickers while keeping it fully attached to every character who has it — traits keep flowing, chips still render (with a strikethrough). Deleting removes it everywhere: every character's reference, every suppressed-trait entry pointing at it, any lexicon origin link, and any live chips in your prose fall back to plain text. Archive when something's retired. Delete when it was a mistake.
Custom categories
The escape hatch. Add "Magic Affinity" or "Social Class" or "Hogwarts House" from the sidebar's Custom section and it behaves like a built-in facet kind, with two switches of its own:
- Allow multiple selections per character — off means picking a second option replaces the first.
- Include in Relationships — off by default. Turn it on for categories that genuinely connect people ("Crew"), leave it off for ones that merely describe them ("Magic Affinity").
Deleting a category takes its items with it and clears them from every character, so the confirmation spells that out.
If you build the same category in book after book, Save as Template in the category's settings stores its name, its two switches and the names of its items in your Writer's Kit. From then on New Category from Writer's Kit appears beside Add Custom Category and creates it, items and all, in one click.
Locations
Locations are deliberately simple in version 1: a name and a description. Scenes can point at one, or just carry a free-text setting label for a place you'll never revisit.
Delete a location and Norn does something quietly thoughtful. Scenes that pointed at it and had no setting text of their own get the deleted name copied into their free-text field, so your plot board doesn't suddenly go blank where "The Drowned Chapel" used to be.
Creatures
Flora, Fauna, Monster, Sentient Species or Other. Each entry carries a name, a scholarly name ("Latin, arcane or scholarly form"), alternate names as chips, a one-line summary, an image, and then four sections of detail: Appearance (size, lifespan, physical description), Habitat (habitat, range), Behavior (behaviour, diet, life cycle) and Lore (folklore, ecological role).
Creatures can be archived like facets, and each one exports on its own to Markdown or RTF from the editor's share menu.
The Lexicon
Your invented vocabulary. Each Word holds:
- Headword — the word itself. Duplicates are allowed, because homographs are real.
- Pronunciation — free-form, however you like to write it.
- Word Origin — prose about where it came from.
- Origin link — an optional pointer to a culture or ethnicity, the Lexicon's one structured cross-reference.
- Definitions — as many as you need, each with a part of speech (noun, verb, adjective and so on, plus "Other" with your own label).
Words sort alphabetically and can't be dragged into a different order, because a glossary's order is the alphabet. The list's share menu exports the whole Lexicon as a single Glossary document in Markdown or RTF — there's no per-word export, which is the right call for something that's only useful as a set.
Words show up elsewhere too. The Compendium renders the entire Lexicon as one "Glossary" page, and you can drop a word into your prose as a live token like any other entity.
8. Plots
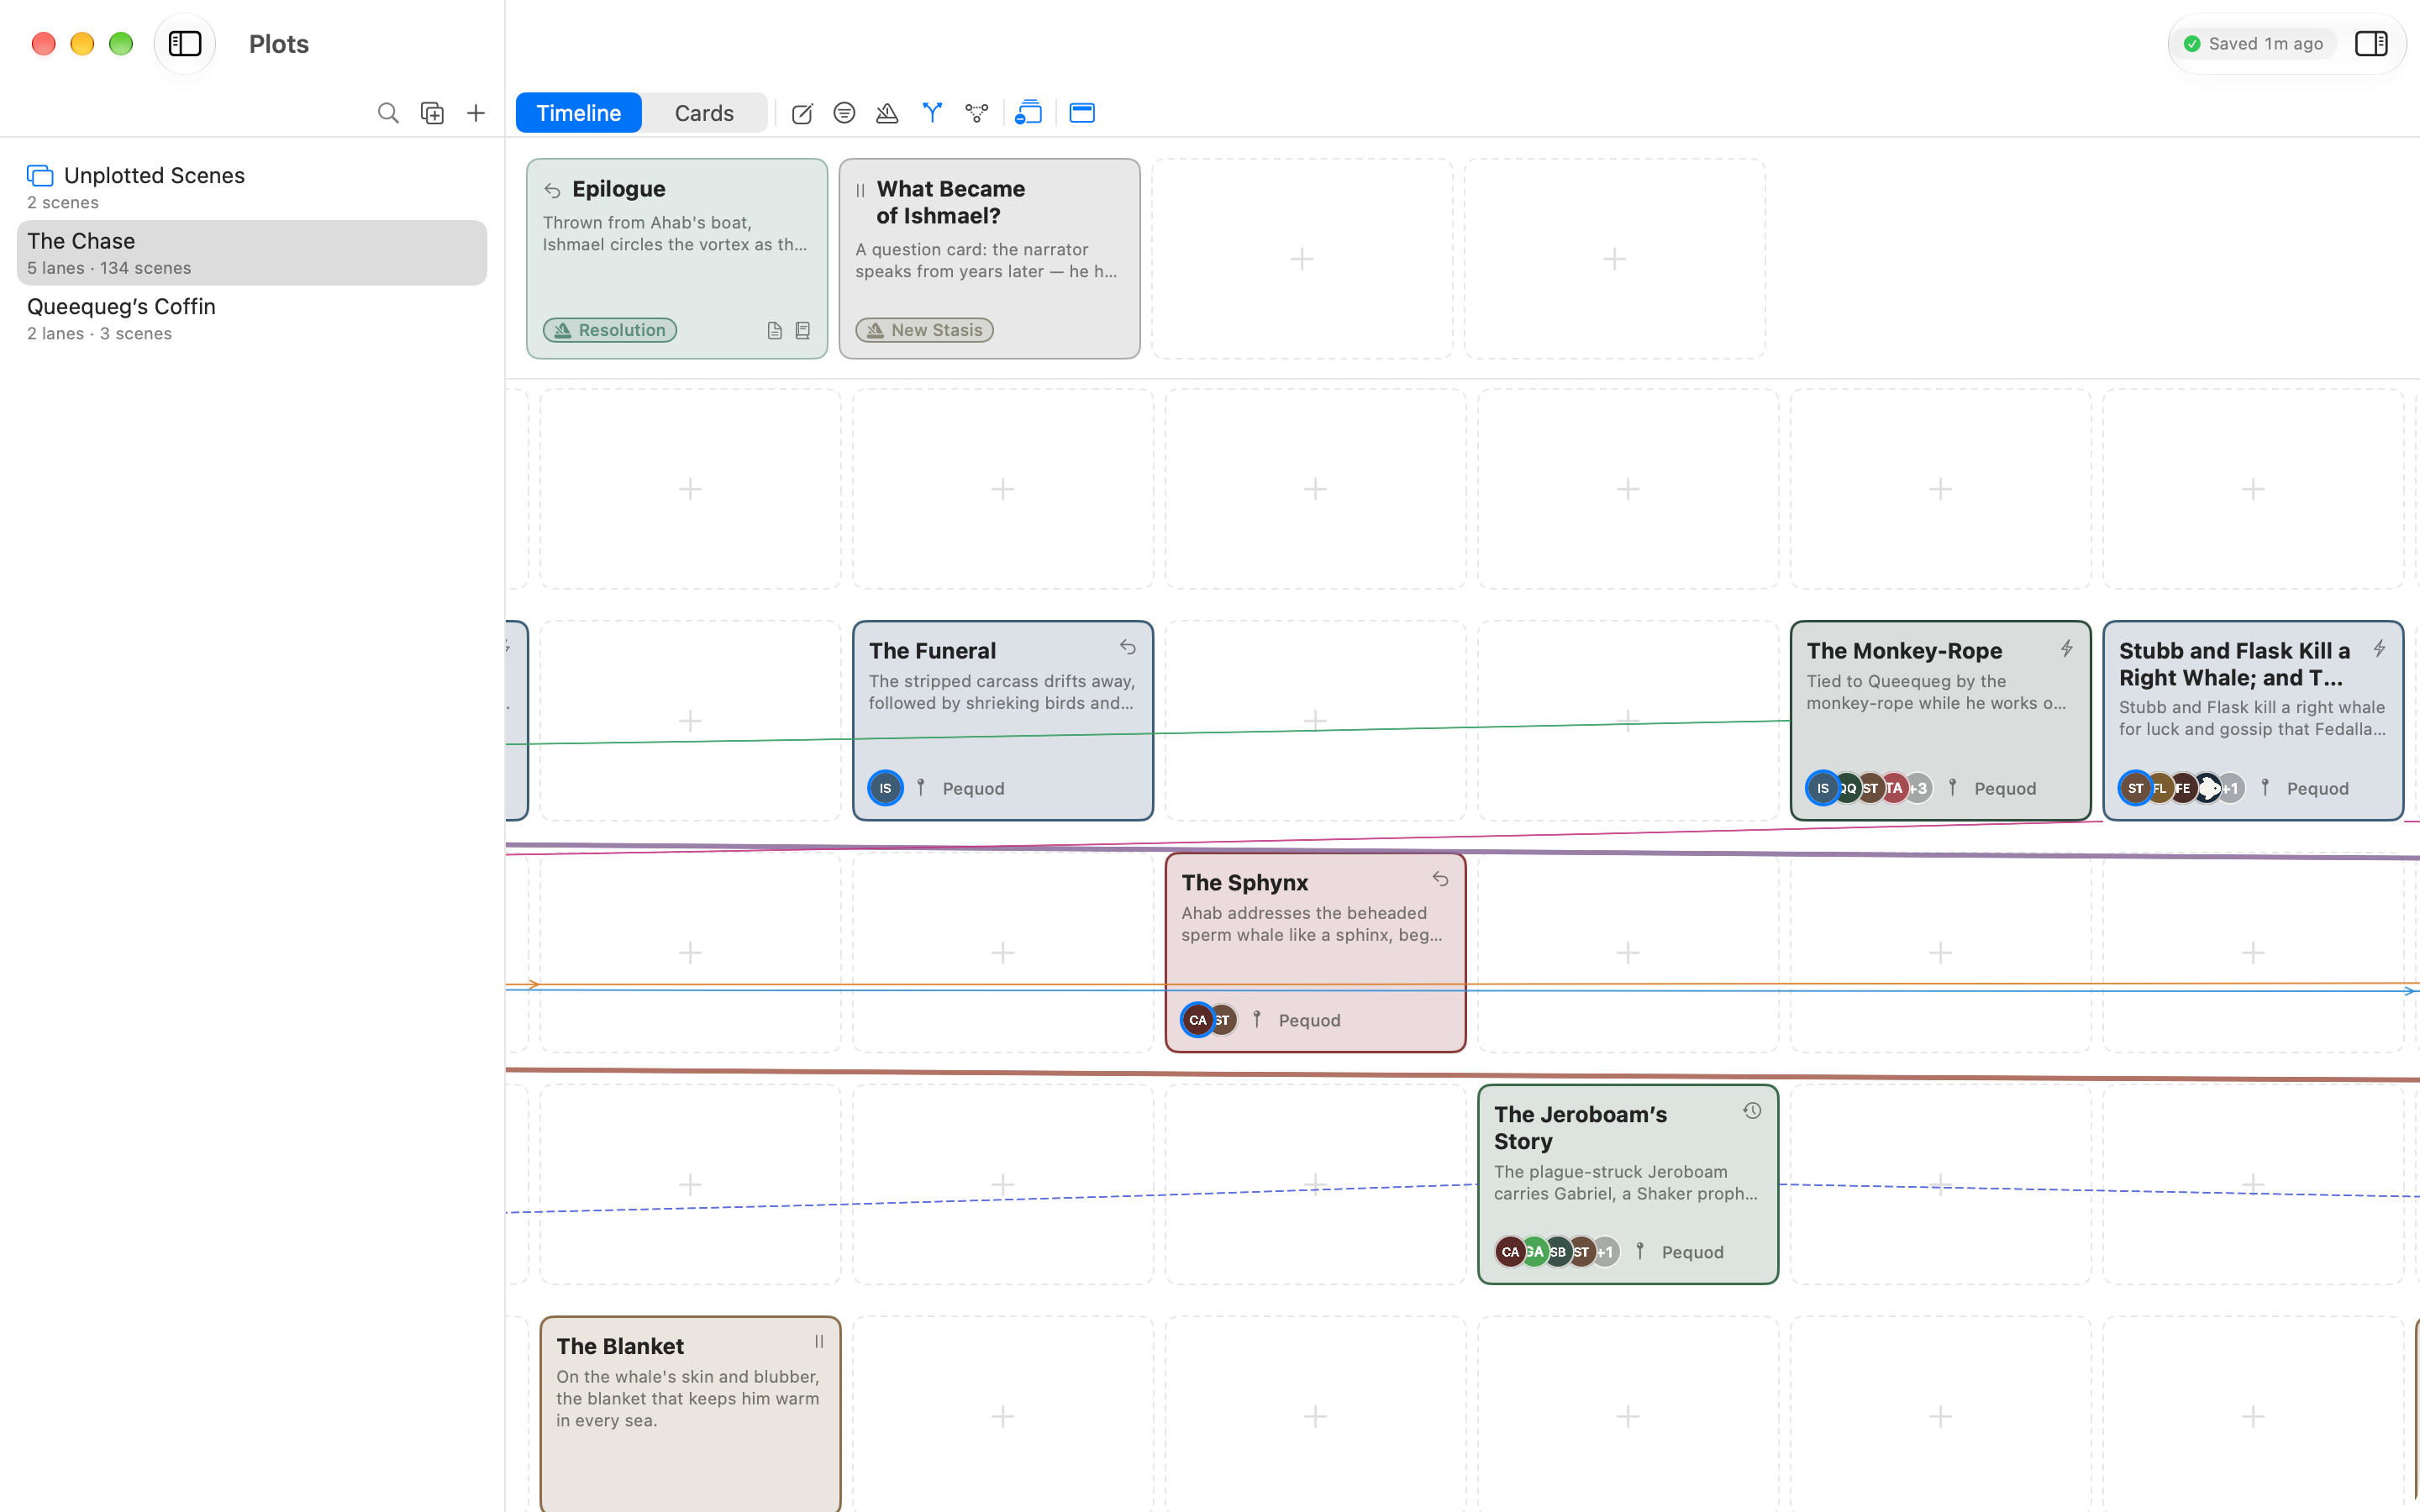
A plot in Norn is a board of horizontal lanes cut by numbered columns. Lanes are your threads — "Act One," "The Mystery," "Mira's arc." Columns are narrative position: two cards in the same column happen at the same moment, whichever lanes they're in. That board is the plot's Timeline; Cards shows the same scenes as a grid. A switch at the top of a plot, Timeline | Cards, changes between them.
Press ⌘7 to get there.
Every scene in the book lives here — on a lane, or among the Unplotted Scenes, the scenes on no plot yet. A lane is optional: you can write a whole book without making a plot, and every scene you make waits in Unplotted Scenes until you place it.
The plots list
At the top sits a fixed row, Unplotted Scenes, with how many it holds ("12 scenes"). ⌘8 takes you straight there from anywhere in the book.
+ creates a plot with a single lane called "Main." Each row shows a summary like "3 lanes · 24 scenes." Drag rows to reorder, right-click for Duplicate and Delete.
Duplicating gives you "Name (variant)" with every lane, scene, thread and same-plot link copied. Links that cross to another plot can't come along, so if any exist Norn tells you exactly which ones before you commit. This is how you try a structural rewrite without gambling the original. The copy's scenes aren't in the manuscript: they wait in Not in Manuscript.
The magnifying glass (⌘F) opens a scene search. It looks through titles, summaries, notes, locations and tags across every plot in the book and the Unplotted Scenes, shows each hit with a "Plot › Lane" breadcrumb, and jumps you straight there.
Working the board
Add a scene by clicking any empty cell — a card appears and its editor opens. Cancel and the stub disappears, so exploratory clicking leaves no litter. Each lane also has a + at its right end that drops a scene after the last one. A scene made on the board joins the manuscript too — see New scenes join the manuscript.
Move a scene by dragging it anywhere, including into another lane. Drop it onto an occupied cell and the occupant, plus anything contiguous to its right, shifts one column over to make room.
Select several the way Finder trained you: click to select, ⌘-click to toggle, ⇧-click to extend. Shift-selection here works as a rectangle across lanes and columns rather than a single reading order, which suits a grid. Drag any card in the selection and the whole group travels, landing contiguously from the drop point.
Lanes carry a name field, a drag handle and a ⋯ menu holding eight colours, Move Up, Move Down, Add Beat Sheet as Scenes… and Delete Lane. Deleting a lane deletes its scenes, so if that would strand a thread's starting scene Norn asks first.
Along the top:
- The pencil opens the selected scene's editor.
- The funnel filters by character, tag and scene type — and, for a type with a choice field, by the choice. Non-matching cards dim to a whisper instead of vanishing, so you keep your sense of the whole board. In Timeline, the same menu holds Show Scene Type Fields, which makes every card taller and prints the scene's filled-in fields on it.
- The metronome menu holds Manage Beats…, which opens the beats manager, and Add Beat Sheet as Scenes… (see Beats).
- The branching arrow shows or hides scene-link arrows.
- The threads menu manages narrative through-lines.
- Resolve overlaps appears only if two cards ever end up stacked in one cell, or a card has no place on the grid. Clicking it gives every such card a free column — and spreads every stacked cell in the plot in the same click. Nothing is moved until you click.
- The panel with its top third filled (Show Unplotted Scenes) pins a row of your Unplotted Scenes above the board, in the list's order, and this Mac, iPad or iPhone remembers the choice. The row scrolls sideways on its own; on an iPhone held sideways it's smaller and shows titles only. Drag a card onto a cell to place it, and any card already there moves right. Drag cards along the row to reorder them. + opens the new-scene sheet. Double-click a card to open it, or right-click (touch and hold) for its menu. Drag one card or several up from the board and they land where you drop them, as one Undo; Norn asks first only if any of them is in a thread.
What's on a card
Title, a colour-coded beat chip, the scene type's icon if the scene has a type, a link badge like "↗2 ↙1" counting outgoing and incoming links, the summary, pills for links that cross to another plot, and a footer with cast thumbnails — the POV character wears an accent ring — plus the location.
Cards inherit their lane's colour unless you override them.
A card's right-click menu also has Reveal in Contents, Open in Editor and Move to Unplotted Scenes — see Between the board and Contents and Moving a scene back to Unplotted Scenes.
Cards
Cards shows the plot's scenes as one grid in Timeline order: column by column, top lane first within a column. Your Mac, iPad or iPhone remembers which view you chose, for every plot. Cards keep a readable width, so the number across follows the window. Scenes in the same row of the grid grow to the tallest. A small colour on each card shows its lane.
Each card has its title, summary, Edit Scene, its POV on a line of its own, its scene type below that, and every field of that type at full length. A scene with no type yet shows a menu to choose one; once it has a type, the card shows the type as a label, and you change it in Edit Scene. Empty fields show their prompt, and choice fields are small menus. A scene with no type shows no fields.
Type on the card. Click a title, a summary or a field and type; there's no sheet. Tab moves to the card's next field that takes text, and ⇧Tab goes back; Tab stays within the card. Edit ▸ Undo takes back one whole field's edit once you've left the field. Edit Scene opens the scene editor for everything else, including Discard.
Move a card with its small handle: drop it between two cards. It stays on its own lane, and Timeline shows the same new order. It takes an empty cell on its lane if one keeps the order. Otherwise a column opens and later cards on every lane shift together. Clicking in text selects text and doesn't move the card. ⌘-click and ⇧-click select cards, on their text too. On an iPad or iPhone, Move Earlier and Move Later are in the card's ⋯ menu, which otherwise holds what a Timeline card's menu holds.
New adds a card right after the selected one, on its lane, with its title selected ready to type over. It starts with the selected card's scene type. With nothing selected, it goes at the end of the first lane shown. The new scene joins the manuscript straight away and follows its card, and one Edit ▸ Undo takes back the card and its row together. If the selected card is off the Timeline, the new one is too. A plot with no lanes offers Add Lane instead.
Show some lanes. A lane menu beside New, only in Cards, hides the cards of the lanes you turn off. The funnel still dims, as it does in Timeline. The lane menu isn't saved, and clears when you change plot. Reveal in Plot clears it if the card it's looking for is hidden.
Stacks and cards off the Timeline. Two scenes stacked in one Timeline cell both show as cards. A drop never adds to a stack. Dropped between two stacked cards, a card lands after the stack. Cards with no place on the Timeline show at the end of the grid, and Resolve overlaps places them. A card moved next to one gets a real column, which puts it before them.
Threads. Moving a card leaves its thread order as it was. To put a thread back in step with the board, use Sort by Timeline Column in the thread's editor.
The scene-link arrows, thread lines, Show Scene Type Fields, the column numbers, adding and editing lanes, and the Unplotted Scenes row belong to Timeline and don't show in Cards.
The scene editor
In Timeline, double-click a card. In Cards, click Edit Scene on it. You get:
| Field | Notes |
|---|---|
| Title | Shared with any linked manuscript document — rename either and both change |
| Summary | The one- or two-sentence pitch |
| Cast | Chips, added from a menu of your characters |
| Point of View | Picking someone outside the cast adds them to it |
| Location | A real location or free text, with an "Add to Locations" button to promote it |
| Beat | With a live preview chip, plus buttons to create or manage beats |
| Scene Type | What kind of scene this is, and the fields that kind asks for — see below |
| Tags | Free-form: "setup," "climax," "subplot: A" |
| Links | Every link in and out, with notes, and a button to add one |
| Threads | Which threads this scene belongs to, and its role in each. Hidden for an unplotted scene, which is in no thread |
| Notes | Working notes, dialogue snippets, whatever |
| Card Color | Eight swatches plus Reset to inherit the lane's colour. An unplotted scene has no lane, so it's grey unless you pick one: Not on a lane. Pick a colour for this card. |
Scene types. A scene type says what kind of scene this is — an Action, with a Goal, a Conflict and an Outcome; a Response, with a Reaction, a Dilemma and a Decision (Dwight Swain's scene and sequel); a Flashback; an Interlude. Pick one and its fields appear under the picker for you to fill in. Types and their fields are defined in your Writer's Kit, so you can add your own — and a field can be free text or a choice from a list.
A scene has one type at a time. Switch to another and the first one's answers are kept, out of sight; switch back and they return. To copy them into the new type's fields, open Show values from other types in the scene editor: on a Mac, select any part of a value and copy it; on an iPad or iPhone, touch and hold a value and choose Copy. What you typed into a field that has since been retired stays visible on the scene, marked as retired, until you clear it.
A scene's type and answers show up in the Reference Inspector, in the scene's header, in search, and in every export of an outline or a manuscript scene. They are stored in the book with their names, so a book reads correctly on a device whose Kit has never heard of the type.
New scenes join the manuscript
A scene you make on the board doesn't have to be filed by hand. Its editor opens with a switch under the summary, Insert into Manuscript in Timeline Order, turned on to begin with: Adds the scene to the manuscript after the scene before it on this plot's timeline, and moves it when you move its card, until you move it yourself in Contents. Unchecked, it goes at the end.
It acts when you close the editor with Done. Cancel still deletes the new card, and nothing joins the manuscript.
With the switch on, Norn looks along this plot's timeline for the scene just before the new one that's already in the manuscript, and puts the new scene right after it, in the same chapter or act. "Before" means an earlier column; in the same column, the lane nearer the top comes first; in the same lane, the card further left. Scenes with no column count after every column. Scenes of other plots never count, since each plot's columns are its own.
- If no scene of the plot comes before it, the new scene goes right before the next one that's in the manuscript.
- If no scene of this plot is in the manuscript yet, it goes at the end of the outline.
- If the scene before it is in the outline twice, the first place counts.
With the switch off, the scene goes at the end of the outline, and stays where it is. Undo takes it back in two steps: the first Edit ▸ Undo takes the scene out of the manuscript, and the second takes back the scene itself.
Following the board
A scene that joined the manuscript with the switch on keeps following its card. Move the card — drag it to another column or lane, Move to… on an iPad or iPhone, a drag or Move Earlier / Move Later in Cards, or Resolve overlaps — and its row in Contents moves to match, by the same rule, after the scene now before it. It can move into another chapter or act. In Cards, only the row of the card you moved follows; cards that shift to make room keep their rows. In Contents, a small glyph marks these rows: Follows its card on the timeline. Move it in Contents to keep it where you put it.
- If no other scene of the plot is in the manuscript, the row stays where it is rather than jumping to the end.
- Move several cards at once and their rows keep the board's order.
- Only moves you make on this device move rows. A move made on another device arrives with that device's move in Contents; nothing is worked out again on opening a book.
- One Edit ▸ Undo puts back both the card and its row.
What stops it. Moving that row yourself in Contents — dragging it, Move Up, Move Down, Move to Top, Move to Bottom, Move to… or Add to New Chapter… — stops it following for good, so your order is never overwritten. Undo the move and it follows again. Moving the card to Unplotted Scenes stops it too, since a card has no timeline to follow.
What doesn't. Moving other rows around it, moving or renaming its chapter, Delete Folder… moving it up a level, and Insert Scene Before or Insert Scene After next to it: those change your structure, not this row, and it carries on following.
Scenes made any other way never follow: New Scene… in Contents, Add Scenes from Plots…, Insert Scene Before / After, Restore to Manuscript and Unplotted Scenes.
Unplotted Scenes
Unplotted Scenes (⌘8, or the first row of the plots list) holds the scenes on no plot; any of them may still be in the manuscript. They come from New Scene… in Contents with None — Unplotted Scenes chosen, from the + here, and from Move to Unplotted Scenes.
The cards sit in a grid (a list on an iPhone) in an order you set by dragging. Each shows its title, the scene type's icon, the beat chip, a mark when the scene is in the manuscript (In the manuscript) and a dot when it has prose. With none, the view says No Unplotted Scenes: Scenes you make without a lane wait here until you place them on a plot.
Double-click a card to open its editor, as on the board. Its right-click menu has Place on Lane… (greyed out until the book has a plot), Reveal in Contents, Open in Editor, Link to scene… and Delete Scene.
+ makes a new card. Its editor has the same switch, Insert into Manuscript, turned on to begin with: Adds the card at the end of the manuscript. Unchecked, it waits in Not in Manuscript. A card has no timeline, so it never follows anything.
Placing a card on a lane
Place on Lane… opens Place “The Ball” on a Lane: choose the Plot, the Lane and the Column — After the last card unless you pick one — then Place. The card leaves Unplotted Scenes for that lane. Its place in the manuscript doesn't change.
You can't yet move a scene from one plot to another.
Moving a scene back to Unplotted Scenes
On the board, a card's Move to Unplotted Scenes takes it off its lane. Norn asks first: Move “The Ball” to Unplotted Scenes? — It leaves its lane and 2 threads. Its place in the manuscript and its text don't change. Choose Move to Unplotted Scenes. The scene loses its column and its threads, and if its row was following the card, it stops. One Undo puts it all back.
Between the board and Contents
The board and Unplotted Scenes link to the manuscript both ways:
- Reveal in Contents, on a card's menu, opens the Manuscript with the scene's row selected — in the outline, or in Not in Manuscript — just as if you'd clicked it there, so the editor and the Reference Inspector show the scene. On an iPhone, or in a narrow iPad window, it stops at the Contents list with the row selected.
- Open in Editor does the same and, on an iPhone or in a narrow iPad window, goes on to the scene's draft. A scene in Not in Manuscript with no draft yet has nothing to open, so there it stops at the Contents list with the row selected, as Reveal in Contents does.
- Reveal in Plot, on a row's menu in Contents (and on the Reference Inspector's "Plot › Lane" line), opens the plot with the card selected and scrolled into view. For an unplotted scene it reads Show in Unplotted Scenes.
Beats
A beat is a named, coloured story-structure marker — "Inciting Incident," "Midpoint," "All Is Lost." Beats belong to the book rather than to one plot, and a scene carries at most one.
Book ▸ Beats ▸ Manage Beats… (or the metronome on the board) opens the manager, where you can add, rename, recolour, reorder and delete. Add from Preset… drops in a whole structure at once:
- 8-Step Story Circle — 8 beats
- 9-Point Story Structure — 9 beats
- 15-Beat Sheet — fifteen beats, after Blake Snyder
- Fichtean Curve — 4 beats
- Freytag's Pyramid — 5 beats
- Hero's Journey (Classic) — 17 beats
- Hero's Journey (Modern) — 12 beats
- Heroine's Journey — 10 beats
- Kishōtenketsu — 4 beats
- Seven-Point Structure — 7 beats
- Six-Stage Plot Structure — 6 beats
- Three-Act Structure — 8 beats
Presets are seeds, not templates. Once they're in, rename and recolour them freely.
The list of presets is the Beat Sheets pane of your Writer's Kit, so you can edit those twelve or add your own. Save as Beat Sheet… goes the other way: it copies this book's beats, names and colours, into the Kit under a name you give it.
On the board the beat's name appears once in the column ruler at the top and each card shows only the coloured chip. That keeps a busy board readable while the name stays a glance away.
A beat sheet as scenes
Add Beat Sheet as Scenes… lays a whole beat sheet onto a plot as scenes, one per beat. It's on the board's metronome menu in Timeline and in Cards, on Book ▸ Beats while a plot is open (on an iPad or iPhone, in the … menu's Book section), and on a lane's ⋯ menu in Timeline, where that lane is already chosen. Pick a beat sheet (the same list as Add from Preset…, less any sheet with no beats) and a lane, then Create. If none of your beat sheets has any beats, the command is greyed out. It's also greyed out while another sheet or dialog is open on the board.
- Each scene is titled with its beat's name — "Midpoint" — and carries that beat. Everything else on it is empty.
- The book's own beats are used where the names match exactly. Any beat the book doesn't have yet is added, as Add from Preset… adds it, after your existing beats.
- The scenes go in the sheet's order, one column each, starting right after the lane's last card. Nothing already on the plot moves. A card on another lane may share a column with one of them, as it can with any card.
- On a plot with no lanes there's no lane to pick: Create first adds a lane, just as Add Lane does, and puts the scenes on it.
- Afterwards the new scenes are selected and the board scrolls to the first, in Timeline and in Cards.
- Each scene joins the manuscript in Timeline order, the way a new card does, and moves with its card until you move it in Contents.
- One Edit ▸ Undo takes it all back: the scenes, their places in the manuscript, any beats it added, and the lane if it made one.
Threads
A thread is a through-line you curate by hand: the missing dagger, Mara's debt. It needs a start scene, takes any number of linking scenes and optionally has an end. No end means Unresolved, and Norn draws the line dashed with a small open ring trailing off the last card — a visual loose end you can't help but notice.
Thread lines draw thin, in their own eight-colour palette that's deliberately unlike the lane and link palettes. If two threads share a path they fan apart slightly so you can still tell them apart. Small chevrons along each segment show which way the thread is running.
Open a thread from the Threads menu in either board's header bar. The dialog takes a name, a colour, and a Thread Note — a private scratch line about what the thread is doing, which you'll see again when you hover the thread in that menu.
Below that sit the scenes. Choose a Start Scene, then build the Linking Scenes list: search for a scene by title or by what its summary says, and it joins the end of the list. Drag the ☰ handle to reorder, press ⌘↑ / ⌘↓ to move the selected row, or hit Sort by Timeline Column to snap the whole list back to board order. The × on a row drops that scene. An End Scene closes the thread, or leave it empty to keep the thread Unresolved.
The order is yours. Norn draws the line through your linking scenes in exactly the order you arrange them — so a thread is free to double back to an earlier column if that's how the through-line actually runs. Nothing is committed until you press Done; Cancel leaves the thread exactly as it was.
Scene links
Links express causality between scenes and work across plots. Three kinds, each with a forward and reverse reading:
| Kind | Forward | Reverse |
|---|---|---|
| Causes | Causes | Caused by |
| Must precede | Must precede | Must follow |
| Foreshadows | Foreshadows | Pays off |
Create one from a card's right-click menu or from the scene editor's Links section. Within a plot they draw as curved colour-coded arrows that route around the cards in between. Across plots they show as a clickable "↗ Other Plot" pill instead, since an arrow to somewhere off-screen helps nobody.
Remove a link from the scene editor's Links list.
9. Contents, your book's outline
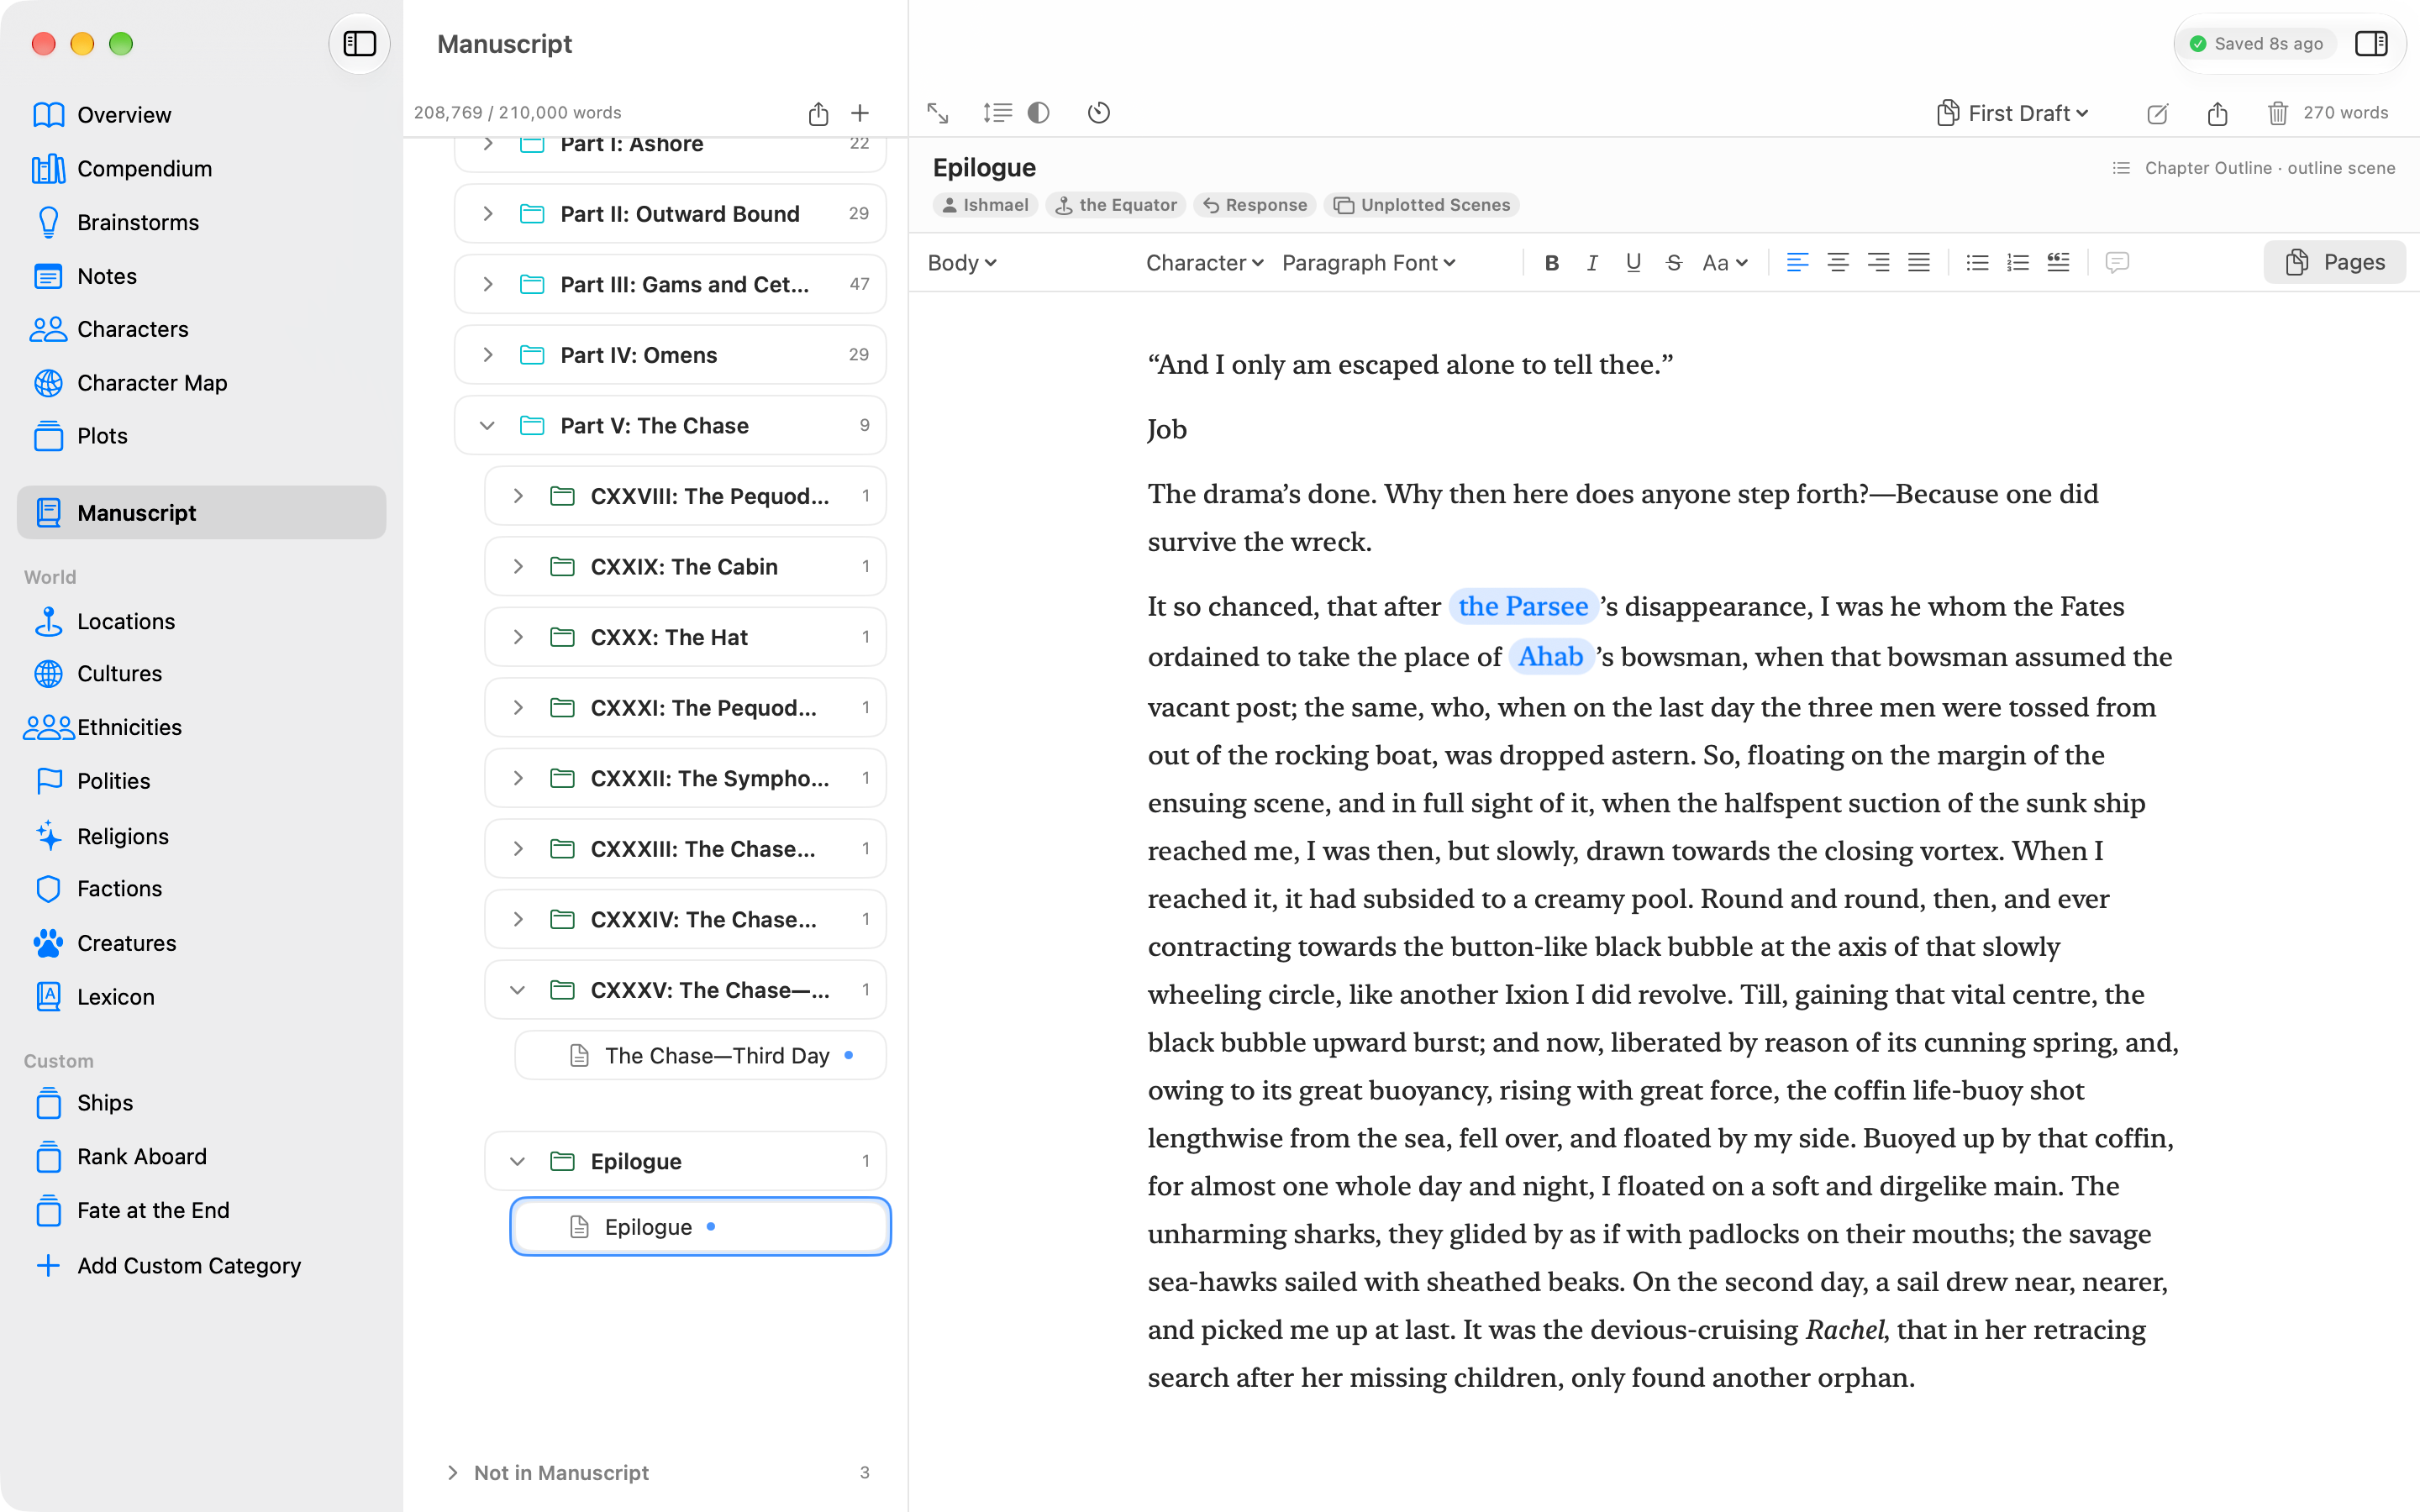
Contents is the column beside the Manuscript's editor — press ⌘9. It is your book's outline and its manuscript in one place: acts, chapters and scenes in the order a reader meets them, the documents that aren't scenes, and the scenes waiting outside the book.
Earlier versions of Norn had a separate Outlines section, and a book could hold several outlines. That's gone. A book has one outline, and it lives here. ⌘8 now opens Unplotted Scenes in Plots.
Contents is your outline
From top to bottom, Contents holds:
- The outline row, called "Outline" until you rename it. Every book has exactly one, made with the book. Its acts, chapters and scenes sit beneath it in reading order.
- Manuscript-only documents and folders, beside the outline row — front matter, an epigraph, an author's note, anything that isn't a scene.
- Not in Manuscript, a small section at the very bottom for scenes that are in the book but not in the manuscript. It appears once there's something in it. See Not in Manuscript.
In a new book, Contents holds just the empty outline row; right-click it, or use the + menu above Contents, to add an act, a chapter or a scene. If Contents is ever completely empty — no outline row and no documents, which only damage can cause — it says Your book's outline and manuscript live here. Add a scene, a chapter or a document to begin., with New Scene…, New Chapter, New Document and New Folder buttons. The first two make the outline row again.
Click the outline row for its details: Outline Name, Outline Summary, and a line counting what's inside. Underneath, Norn reminds you: Contents is your book's outline: acts, chapters and scenes in reading order.
Rows tell you what they are: an outline icon, folders for acts and chapters, a document icon for scenes and documents. Beside a title sit small marks only:
- a dot for a scene that has prose in it, and a "+N" badge for a scene with extra drafts;
- an orange warning mark when the scene is out of order — see Ordering Issues; hover it for what's wrong;
- a mark on a scene that is in the manuscript twice;
- a glyph on a scene that follows its card on the board;
- a mark on a manuscript-only item left out of the book — see Include in Book.
Everything else about a scene — its POV, location, scene type and plot — is in its header when you open it: see Chips in the scene's header.
Acts, chapters and scenes
Three kinds of row live in the outline: Acts, Chapters and Scenes. Acts sit at the top of the outline. Chapters sit at the top or inside an act. Scenes go anywhere in the outline. Chapters don't nest inside chapters.
Folder titles number themselves. Leave a title blank and you get "Act II" or "Chapter 3", derived from position and reflowing whenever you reorder; the folder's details say Leave empty to auto-number (“Chapter 3”). Type your own title — "Prologue", "Chapter 7: The Fall" — and it shows as you typed it and steps out of the numbering. Clear it and the numbering comes back.
Both kinds of row can carry a note. A folder's is the Note field in its details. A scene's is its Outline Note, which you type straight into the Reference Inspector's Information tab while the scene is selected: Transitions, beats, anything the scene card doesn't say — "show this out of order", "hard cut from the previous chapter".
A scene row is a pointer, not a container. Its title, summary, POV, cast, location, beat and tags all live on the scene, the same scene its card on the plot board shows. Edit Scene… on the row's right-click menu opens the scene editor; change it here and the board shows the change too. Contents doesn't show summaries — they're in the Reference Inspector, or hold ⌥⌘ to peek at it.
Versions
A scene's prose belongs to the scene. It is the same wherever the scene appears, and it goes where the scene goes: out of the manuscript into Not in Manuscript, and back again. Prose is made lazily: a scene costs nothing until you type its first character.
Every scene starts with one version of its text, called First Draft. The version menu at the top of the scene's editor shows the name of the version on screen. Open it to see every version of the scene, newest first, each with its word count — Revision 1 — 2,140 words — with a check beside the one on screen and a lock beside each one you can't type in: older versions and conflict copies. On an iPhone it sits at the left of the second row at the top of the editor, with the writing timer's clock and the word count at the right; a long name is cut short there.
Revise… starts a new version. Norn asks for its name, filled in with the next number:
Revise “The Door” — First Draft will be locked, and its text copied into a new version for you to edit. Name: Revision 1
Revise copies everything exactly — words, styles, fonts, chips, links, footnotes, endnotes and comments — into the new version, and you carry on writing there. Revise is in the menu only while the newest version is on screen, and is greyed out until the scene has some text: Write something in this scene before revising it.
A stitched chapter, act or manuscript shows each scene's newest version. Once a scene has more than one version, its name follows the scene's title — The Door · Revision 1. To see an older version, or to compare, open the scene itself: Revise… and Compare with: are in a single scene's editor only. A Find result, comment or Edit Here in an older version opens that scene's own editor on it. Distraction-free writing names the version in its footer, after the scene's title; going distraction-free from an older version shows that version, locked, with its banner.
Older versions are locked. Choose one in the version menu to read it. It opens read-only, with First Draft is locked. Revise and edit the newest version. above the text, and can't be changed: not by typing, pasting, Replace All, Curl Old Quotes or Replace Font. Only the newest version can be typed in, and only it counts toward the word count, prints, exports and shows in Pages. Find searches older versions only with Include Older Versions and Conflict Copies on. You can still select and copy text in an older version (Edit ▸ Copy, or Copy on an iPhone or iPad), and paste it into the newest.
Rename Version… renames the version on screen, locked or not. It changes the version's name only, never the scene's title. Clear the name and it shows as First Draft or Revision 2 again. Two versions can have the same name.
Delete Version… deletes the version on screen, locked or not, as long as the scene keeps another. Norn always asks first. Deleting the newest says, for example, This deletes Revision 2 (2,140 words). Revision 1 becomes the version you edit. You can undo this with Edit ▸ Undo. — the version before it is unlocked and is the one you type in from then on. Deleting an older version says Nothing else changes. Edit ▸ Undo brings it back. On an iPhone, or an iPad with no keyboard, the confirmations say Undo instead of Edit ▸ Undo. Norn doesn't make a snapshot first: Undo is the way back. A scene's only version can't be deleted.
Conflict copies — the other device's text, kept when a scene was changed on two devices before they synced (Conflict copies) — are listed under Conflict Copies in the version menu, after the versions, each with a lock: First Draft from MacBook, Oct 16 — 1,204 words. Choose one to read it. It opens read-only, with This is a conflict copy of First Draft from MacBook. Compare it, copy from it, or detach it to edit. above the text. You can select and copy its words and paste them into the newest version. While a conflict copy is on screen, the version menu has two more items below the conflict copies:
- Detach as a Document — Makes this conflict copy an ordinary document you can edit. The scene and its versions don't change. It moves to the bottom of the manuscript-only documents in Contents, keeping its title and text.
- Delete Conflict Copy… — asks first: This deletes the conflict copy of First Draft from MacBook (1,204 words). First Draft doesn't change. You can undo this with Edit ▸ Undo.
Revise is never offered on a conflict copy, and it isn't counted in any word count.
A book from before versions may have a scene with two drafts at once. The later ones show after it in the version menu as First Draft (2), First Draft (3), with a lock: they open read-only with the same banner as an older version, and can be copied from, renamed or deleted with Delete Version….
Compare with: sits beside the version menu once a scene has a second version or a conflict copy. It starts at None. Choose another version — the others are listed newest first, then the conflict copies under Conflict Copies, for example First Draft from MacBook, Oct 16 — and the editor shows the version on screen compared with it: words added later on a green highlight, words removed on a red highlight and struck through, where they were. Green always means added later, whichever version is on screen; a conflict copy counts as older than the version it was kept from. An added or removed chip, footnote marker or scene break is marked the same way. A footnote or endnote whose text changed has its marker highlighted in amber, and VoiceOver calls it "changed". Formatting changes aren't marked, and neither are spaces or empty lines. When nothing is marked, the editor says so above the text — No differences: Revision 1 and First Draft have the same text. — and adds Formatting changes aren't shown. when only the formatting differs.
A comparison can't be typed in. Find, spelling, comments, the word count, focus dimming and Keep Line Centered are off while it shows; you can still select and copy. A bar above the text says so, naming both versions. To go back to writing, click Done in that bar, press Esc, or choose None. (On the iPhone: tap Done or choose None.) Choosing another version, going distraction-free or leaving the scene ends the comparison too. With Differentiate Without Color on (System Settings ▸ Accessibility ▸ Display), added words are underlined as well and a changed note's marker has a dotted outline; with Increase Contrast on, the highlights are stronger. VoiceOver reads a summary first, says "added" or "removed" as it reads each change, and lists them in its Changes rotor. On an iPhone, Compare with: sits beside the version menu, on the second row at the top of the editor.
Each scene can have up to 20 versions; Settings ▸ Editor ▸ Version limit per scene sets the limit, from 10 to 50. Conflict copies don't count. At the limit, Revise… says, for example, “The Door” Has 20 Versions — Maximum versions: 20, set in Settings ▸ Editor.: delete a version first, or raise the limit. Norn never deletes a version by itself, and lowering the limit deletes nothing; a scene over it can't be revised until it is below it.
Undo. Revise clears Undo: what you did before revising can't be undone afterwards. Revise itself can be undone with Edit ▸ Undo (on an iPhone, or an iPad with no keyboard, Undo) until you type in the new version. After that, Undo takes back your typing only. Delete Version, Delete Conflict Copy and Detach as a Document can each be undone with Edit ▸ Undo (or Undo). Deleting the newest version can be undone only until you type in the version that became current, as with Revise.
A scene row's right-click menu in Contents has a Versions submenu when the scene has more than one version or conflict copy. It lists them as the version menu does; choose one to open it. A +1 beside a scene row counts its conflict copies and other drafts: 1 conflict copy of this scene. Right-click and choose Versions to see them.
A scene can appear in the outline twice. Its text prints at the first place only, and the second row carries a mark: This scene is in the manuscript more than once. Its draft prints at the first place only. The integrity check lists it too.
Rearranging
Drag any row. Dropping on a row inserts before it at that row's level. Two extra targets make appending easy: a zone just below a folder's last child, and one below the whole list. Drag a folder and everything in it comes along.
⌘-click toggles a row into the selection, ⇧-click extends a range, and dragging a selected row carries the whole selection.
Right-click a row for Move Up (⌥⌘[), Move Down (⌥⌘]), Move to Top and Move to Bottom, all within the row's current parent, and Add to New Chapter…, which wraps the selected scenes in a fresh chapter where they stand.
Folders collapse with their chevron and remember it.
Moving a scene's row yourself — dragging it, or any of the menu moves above — also stops it following its card on the board.
Adding scenes
Right-click the outline row or a folder for New Act, New Chapter, New Scene… and Add Scenes from Plots….
The + menu above Contents has the same four, then New Document and New Folder. Its outline items go where the selected row's own menu would put them:
- A scene selected: New Scene… and Add Scenes from Plots… put the new scenes right after it; New Chapter goes after it, or after its chapter when it is in one.
- A chapter selected: new scenes go inside it, at its end; New Chapter goes right after it.
- An act selected: new chapters and scenes go inside it, at its end.
- New Act goes after the act the selected row is in (or after the row itself, at the top level).
- No row selected, or the outline row: everything goes at the end of the outline.
New Document and New Folder make manuscript-only items, at the bottom of the manuscript-only rows.
New Scene… makes a scene where you chose in the outline. Under Plot (Optional), the plot picker starts at None — Unplotted Scenes: The scene waits in Unplotted Scenes until you place it on a lane. Pick a plot and a lane instead and the card goes on that lane, one column past its last card. A book with no plots yet says This book has no plots yet. The scene waits in Unplotted Scenes. — you never need a plot to write a scene.
Add Scenes from Plots… lists every scene in the book, grouped by plot and lane, with your Unplotted Scenes in a group of their own, and checkboxes. Scenes already in the outline show "Already added." A plot filter, a select-all button that respects it, and a Timeline order toggle (board-column order rather than lane order) help with big books.
Insert Scene Before and Insert Scene After, on a scene's right-click menu, make a new scene called "New Scene" right next to it, and select it so you can rename it and start writing:
- In the outline, right before or after the scene, in the same chapter.
- On the board, in the same lane, right before or after it. If the scene has a place on the timeline, Norn opens a new column there, in that plot only: every scene of the plot from that point on moves one column right, and the new scene takes the gap. Other plots don't move.
- A scene with no column gets a neighbour with no column. Next to an unplotted scene, the new scene is unplotted too, right beside it. Next to a "Missing Scene" row, the new scene is an unplotted scene.
One Edit ▸ Undo Insert Scene takes all of it back, columns included.
Scenes you make on a plot board join the outline by themselves, in timeline order — see New scenes join the manuscript.
Chips in the scene's header
Open a scene and its header, under the title, carries small chips, so you can see where the scene stands without leaving the page. A stitched chapter, act or manuscript shows the same chips beside each scene's heading.
| Chip | What it shows |
|---|---|
| POV | A figure and the scene's POV character (POV: Edmond Dantès) |
| Location | A pin and the scene's location (Location: The Harbour) |
| Scene type | The scene type's icon and name |
| Plot → Lane | The lane's colour dot and "Plot → Lane", or Unplotted Scenes for a card |
| Links | A link glyph and how many scene links it has; an orange triangle when one of them is out of order |
| Timeline | A clock and how many scenes it disagrees with on the board |
Hover a chip for what it means, or click it for the same words in a popover — a link chip in order says, for instance, 3 scene links in the manuscript. Order is consistent.
A scene that follows its card on the board has a small glyph on its row in Contents: Follows its card on the timeline. Move it in Contents to keep it where you put it.
Ordering Issues
Norn quietly checks your running order for two kinds of disagreement:
- A link that points backwards (the link chip's orange triangle): a scene link points backwards — scene B "must precede" A, yet A comes first in the manuscript.
- A timeline disagreement (the timeline chip): the manuscript's order disagrees with where those scenes sit on their plot board's columns. Scenes sharing a column never conflict, since the same column means the same moment. Unplotted Scenes have no timeline, so they're left out.
A scene with either carries an orange warning mark on its row in Contents; hover it, or the scene's chips, and Norn lists which links or scenes it means. The same list is in the Reference Inspector, under Ordering Issues.
Both are diagnostics, not errors. Sometimes telling a story out of order is the whole point. Fix them by moving rows, or leave them.
Scenes that follow their card
A scene you make on a plot board with Insert into Manuscript in Timeline Order on (see chapter 8) keeps following its card: when you move the card on the board, its row moves in Contents to match, after the scene before it on that plot's timeline. It can move into another chapter or act.
As soon as you move that row yourself in Contents, it stops following, for good, and stays where you put it. Your order in Contents is never overwritten. More on how following works is in Following the board.
Not in Manuscript
At the bottom of Contents, collapsed until you open it and with a count beside it, sits Not in Manuscript — whenever there's anything to list: Scenes that aren't in the manuscript. They're left out of the book. Drag one into the manuscript, or right-click to restore it.
It lists:
- scenes you took out of the manuscript, with their drafts;
- scenes that were never in it — an unplotted scene made with Insert into Manuscript off, the scenes of a duplicated plot;
- drafts whose scene was deleted, marked Missing Scene.
Each row shows the title and the drafted dot, sorted by plot, then lane, then Unplotted Scenes. Open a row's draft and its header has the scene's chips — POV, location, scene type, and its plot and lane or Unplotted Scenes — but no ordering warnings, since it has no place in the manuscript. Nothing here ever goes into the book, a print or an export of the manuscript. Find in Manuscript still searches it, but the book's word count doesn't count it.
To put a scene back, drag it into the outline, or right-click it and choose Restore to Manuscript. Restore places it by the board's timeline, after the scene before it on its own plot and in that scene's chapter — not necessarily the chapter it left, which may now be empty. An unplotted scene, or a scene whose plot has nothing in the manuscript, goes at the end of the outline. Its draft comes back with it.
Removing and deleting
Nothing you remove here destroys prose. Only "Delete Document…" removes words, and its confirmation says so.
- Remove from Manuscript…, on a scene's menu, asks first: Remove “The Ball” from the Manuscript? — The scene stays in Plots and keeps its draft, in Not in Manuscript at the bottom of Contents. It won't be in the book until you put it back. Choose Remove.
- Delete Folder… deletes an act or chapter and moves its contents up a level.
- Delete Folder and Everything in It… takes the folder and everything in it out: Delete “Act II” and Everything in It? — Its scenes and their drafts move to Not in Manuscript. Choose Delete Folder and Everything in It.
- Delete a scene in Plots and its row stays in the outline as an orange Missing Scene placeholder, its draft still under it, waiting for you to remove it or bring the scene back. That's deliberate: silently vanishing rows would be worse.
This is a change from earlier versions, where removing a scene from the outline turned its prose into an ordinary document that was still in the book. Now the draft stays with the scene, and it's left out of the book until the scene is back in the manuscript.
Include in Book
Any manuscript-only folder or document can be left out of the book: untick Include in Book in its right-click menu (or a folder's details). It then carries a mark, Not included in book, and it — with everything in a folder — is skipped by Print, Pages and every export of the manuscript. Exporting that folder on its own (This folder in the Export sheet) still works, and Find in Manuscript still searches it.
Between Contents and Plots
A scene row's right-click menu has Reveal in Plot, which opens its plot with the card selected and scrolled into view. For an unplotted scene it reads Show in Unplotted Scenes. The Reference Inspector's "Plot › Lane" line does the same. Going the other way, a card's menu on the board or in Unplotted Scenes has Reveal in Contents and Open in Editor — see chapter 8.
The header above Contents
Along the top of Contents: your word count (shown as "42,310 / 80,000 words" if you've set a manuscript goal), a share button that opens the Export sheet set to The whole manuscript, an export menu with Export Outline as Markdown…, Export Outline as RTF… and Export Outline as OPML (Scrivener)… (see chapter 15), and the + menu (see Adding scenes).
The word count counts the current version of each scene in the manuscript, and nothing else. Older, locked versions, conflict copies, and every other document aren’t counted.
Moving a scene out of the manuscript or back, or deleting a draft so another becomes current, changes the total but not today’s words. Words typed while a scene is out of the manuscript never count, even after it comes back.
Text the count leaves out — a document, an extra draft, a conflict copy, a Not in Manuscript scene, a folder of documents — shows its size marked “not counted”.
10. The Manuscript
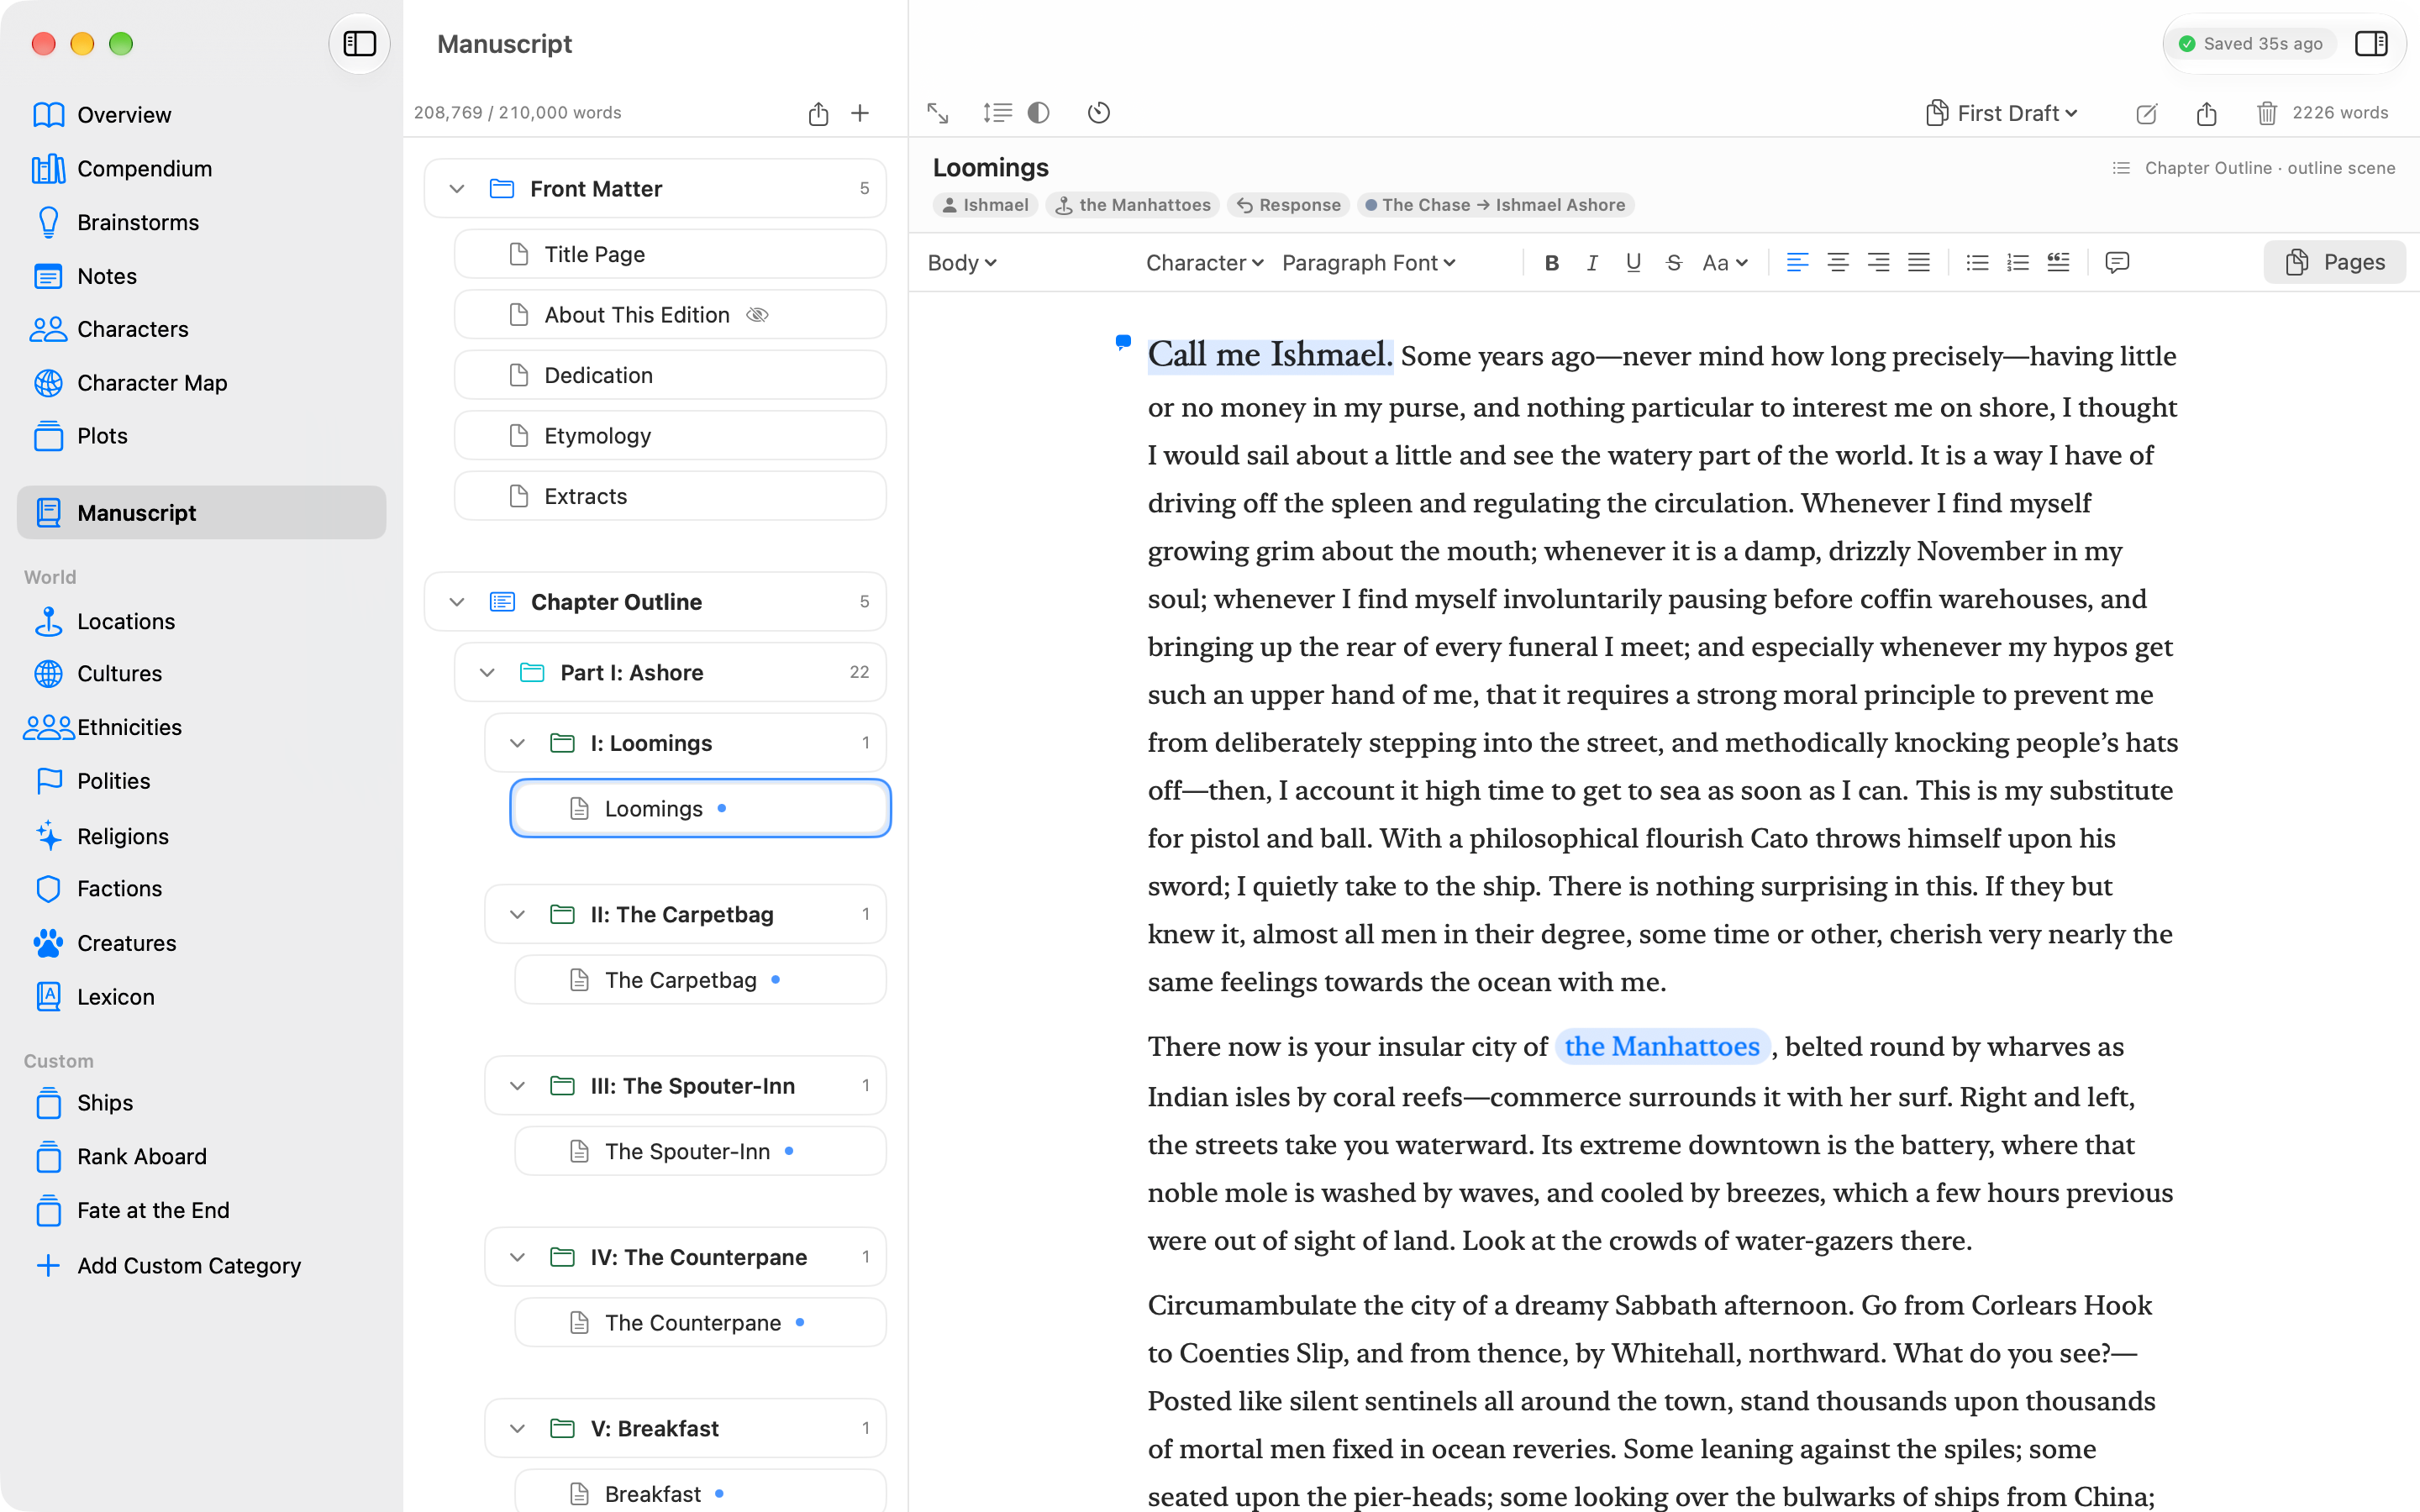
Press ⌘9. This is where the book gets written. Contents is on the left; click a row to write in it.
Writing a chapter, an act, or the whole book at once
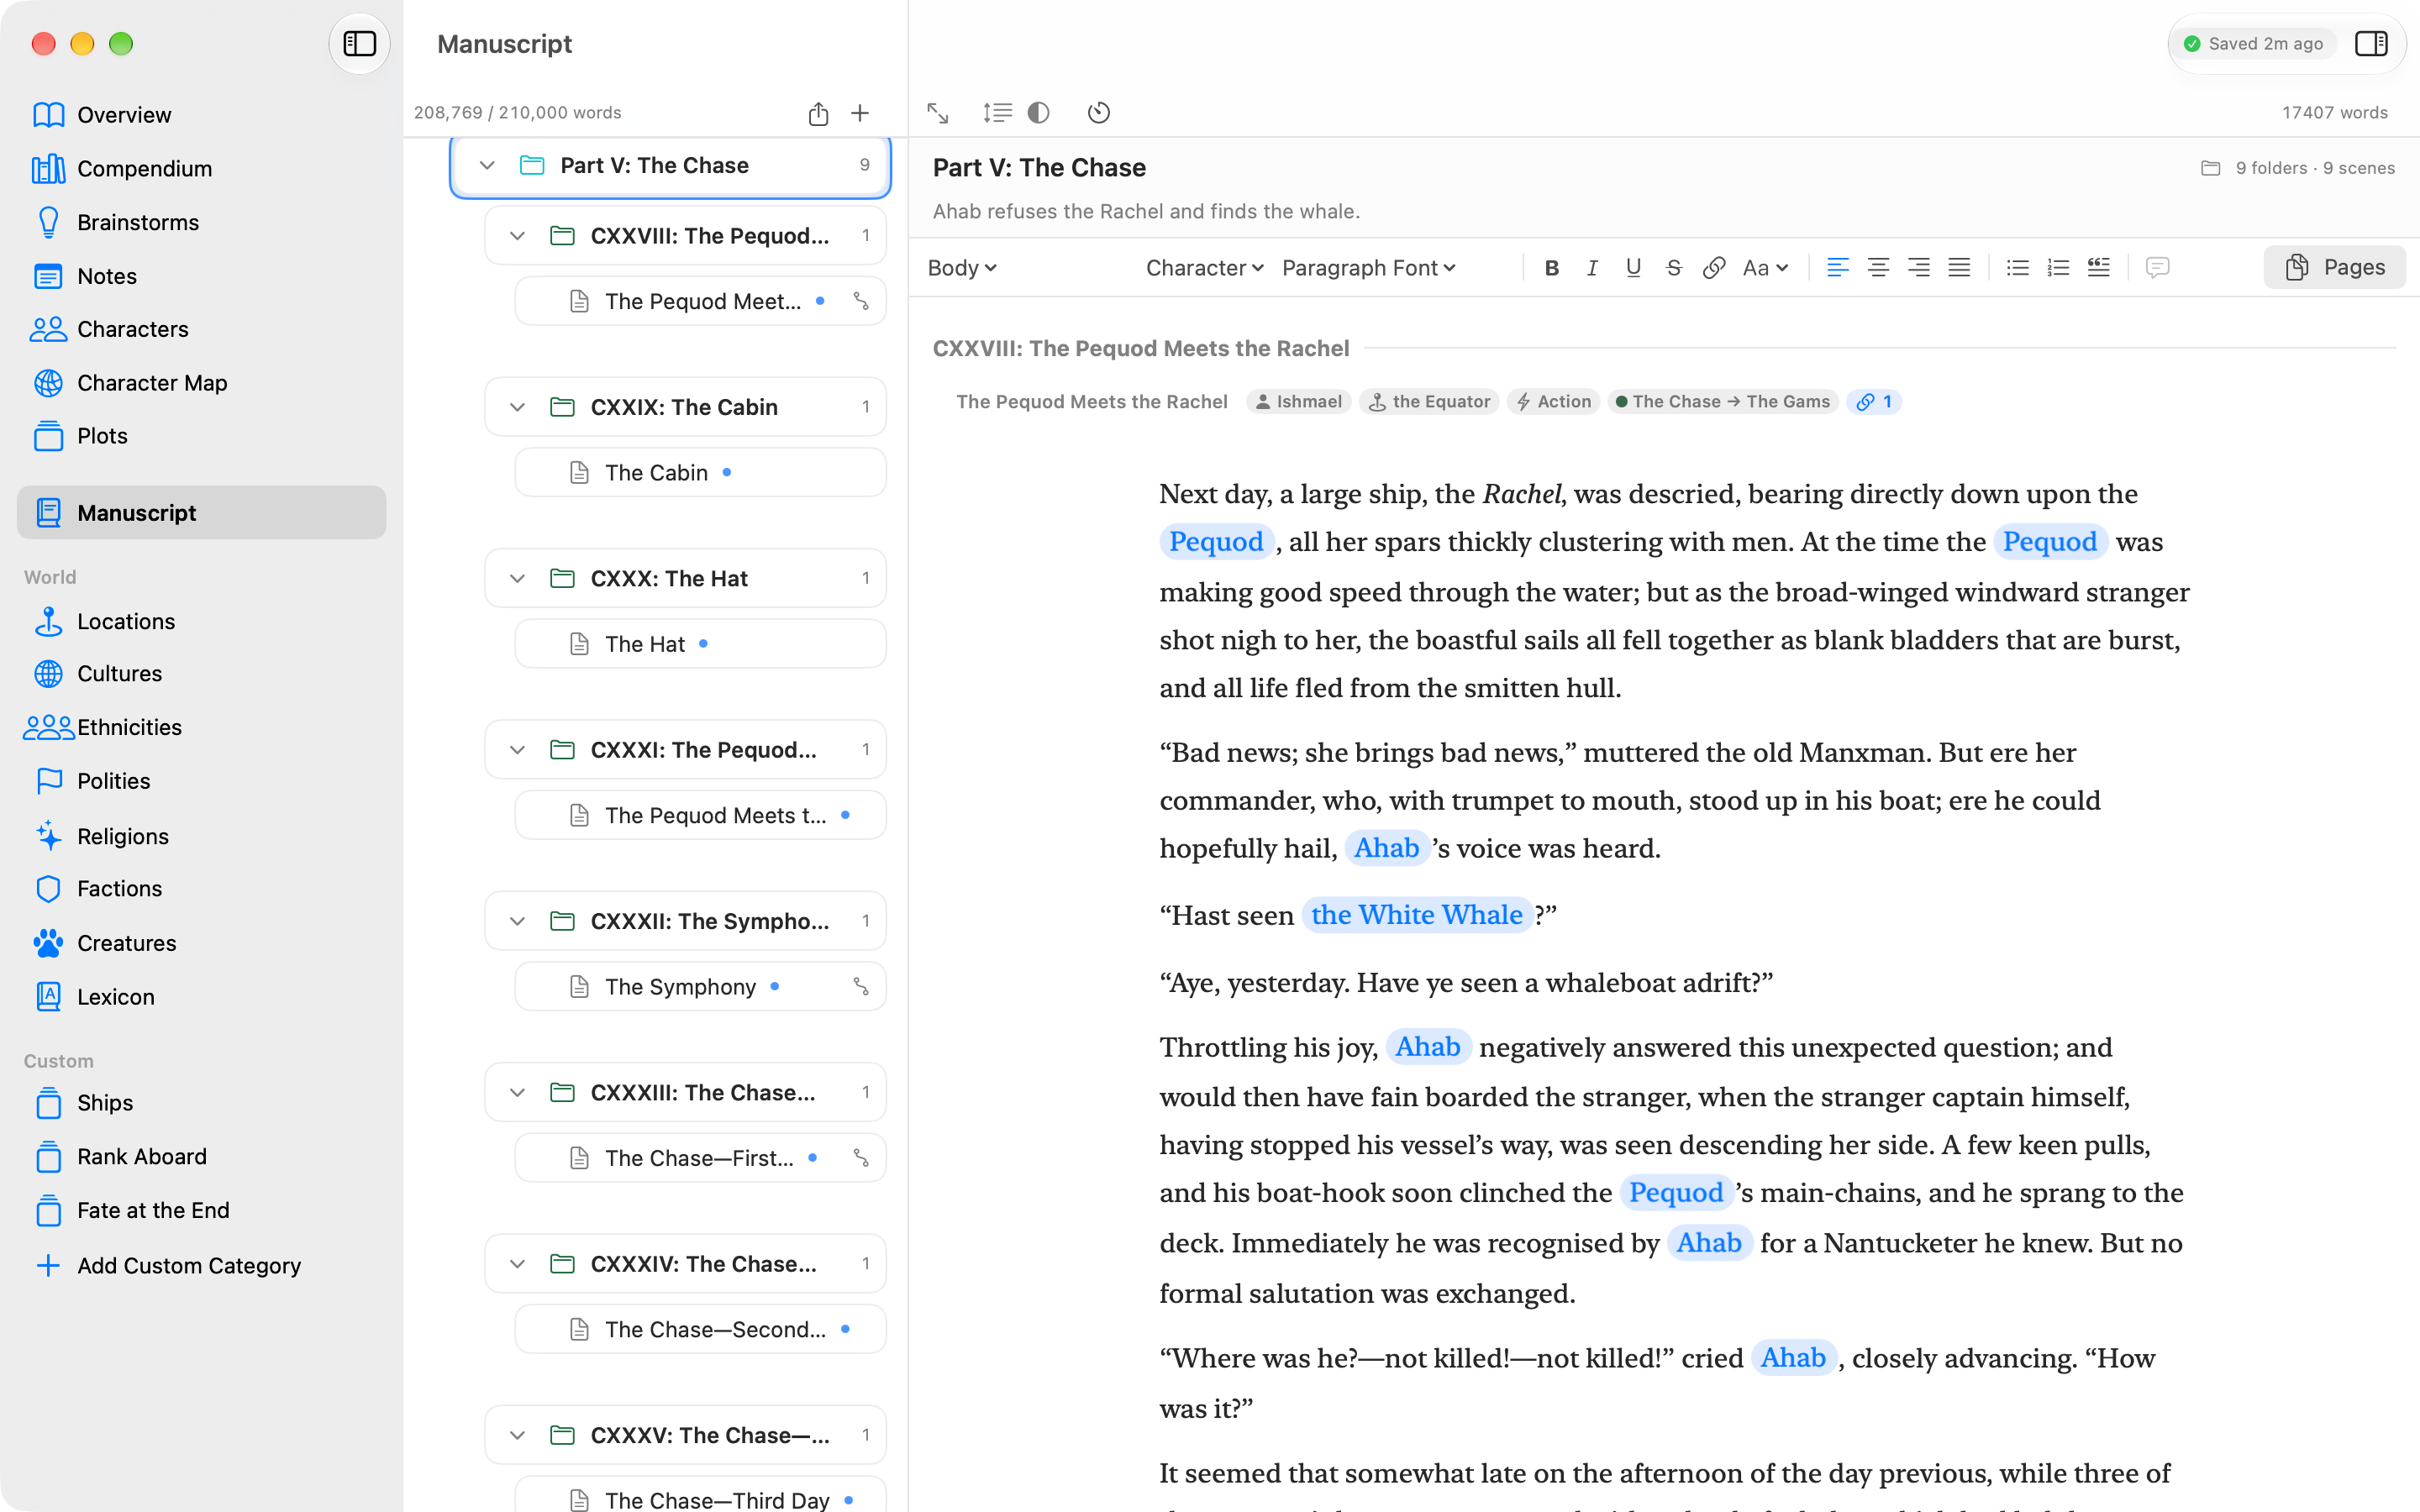
Clicking a scene opens that scene. Clicking a container — a chapter folder, an act, the outline row (that's your whole outline), or a manuscript-only folder — opens everything beneath it as one continuous writing surface, in reading order: act and chapter titles as dividers, each scene under its own title, one after another.
It is stitched, not merged. Every scene keeps its own document, and you are editing exactly the prose the single-scene editor edits, in place. Nothing is copied, concatenated or re-split, so a scene can never end up holding its neighbour's words. The caret stays inside the scene you're typing in — click into the next one to carry on there.
- Rename in the title bar. The act, chapter, outline or folder name sits at the top, with the count of what's underneath beside it. It's the same row Contents shows, so the rename lands there too.
- The toolbar and the Reference Inspector follow your caret — whichever scene you're typing in is the one they format and describe.
- The word count in the header is the total for everything on the surface.
- Undrafted scenes appear as empty boxes under their titles. Type in one and Norn mints its document right then, exactly as it does in the single-scene editor.
- Structure isn't editable here. The headings are labels; add, reorder or remove scenes in Contents.
- A container with nothing to write in yet — an act whose chapters hold no scenes, a brand-new folder — shows its summary card instead, with the same rename field and counts.
The editor
Norn's manuscript editor is genuinely WYSIWYG. Headings look like headings. Bold looks bold. There are no # marks or ** asterisks cluttering your page, and there's no preview pane to flip to, because what you're looking at is the rendered view.
Underneath, your prose is stored in Norn's own prose format, which records each paragraph's style and each word's formatting exactly as you see them. Every edit is checked to make sure it reads back exactly before it's saved. When you want a portable file, File ▸ Export… (or the share button above the editor) writes Markdown, RTF or Manuscript Format whenever you like (see chapter 15).
One consequence to internalise: typing Markdown syntax doesn't do anything special. An asterisk is an asterisk. Formatting comes from the toolbar, the Format menu or their shortcuts:
| Command | Shortcut |
|---|---|
| Bold | ⌘B |
| Italic | ⌘I |
| Underline | ⌘U |
| Strikethrough | ⇧⌘X |
| Small Caps | Format ▸ Small Caps, or the toolbar's More Formatting menu (no shortcut) |
| Superscript | ⌃⌘+ |
| Subscript | ⌃⌘− |
| Add Link… / Edit Link… | ⌘K, or the toolbar's Link button (not in the Manuscript) |
| Paragraph style | the style menu at the left of the toolbar, or Format ▸ Style |
| Character style | the Character menu beside it, or Format ▸ Character Style |
| Font for a selection | the font menu beside it, or Format ▸ Font (⌘T shows the Mac's Font panel) |
| Bigger / Smaller | ⌘+ / ⌘−, or Format ▸ Font |
| Alignment — Left, Center, Right, Justified | toolbar, or Format ▸ Alignment |
| Bullet list | toolbar |
| Numbered list | toolbar |
| Blockquote | toolbar |
| Make Scene Break | the style menu, or Format ▸ Make Scene Break |
| Insert Footnote | ⌥⌘N, or Format ▸ Insert Footnote |
| Insert Endnote | Format ▸ Insert Endnote |
| Add Comment | ⇧⌘K, the toolbar, Format ▸ Add Comment, or right-click |
| Paste as plain text | ⌥⇧⌘V |
Bold, italic, underline and strikethrough are independent. Arm any combination — all four at once if you like — and each character keeps its own set, so bolding a phrase never disturbs the italics already on half of it, and turning one off leaves the rest alone. A Return is not a formatting command either: what you have armed carries to the next line, and stays on until you turn it off.
Toolbar buttons light up to show what the caret is sitting inside. Press Return in a list and it continues, numbering as it goes. Press Return on an empty list item and you're back to plain text. Undo works exactly as you'd expect, one action at a time.
Grammarly and ProWritingAid on the Mac. Both work in Norn's editor through the Mac's accessibility features. They check one scene at a time, including in a chapter view, and a character or place chip shows to them as a blank character. A correction you accept from either one changes only the words it names, keeps your italics, chips and comments around them, is saved at once, and is undone with ⌘Z like your own typing.
Styles and the Format menu
Every paragraph has one style. The style menu at the left of the toolbar shows the caret's, with a tick beside it, and choosing another restyles every paragraph your selection touches:
- Body — ordinary prose. Choosing Body is how you take a style off.
- Chapter Heading, Heading 2, Heading 3 — headings, largest first. In Manuscript Format a Chapter Heading starts a new page.
- Block Quote — an indented quotation.
- Bullet and Numbered — list items, the same as the list buttons.
- Scene Break — a paragraph of its own that marks a break between scenes, drawn centred on the page (see below).
Older books may hold a Heading 4, 5 or 6 from before 0.9.2. They're kept and shown, and the style menu names them Heading 4, Heading 5 or Heading 6.
Alignment is per paragraph too — Left, Center, Right or Justified — and a style change keeps it. The look of each style comes from Settings ▸ Editor (see Typography), so every book reads the same.
The Format menu in the menu bar holds the same commands — Bold, Italic, Underline, Strikethrough, Small Caps, Superscript, Subscript, the link commands, Style, Character Style, Alignment, Make Scene Break, Make Links from Markdown and Add Comment (⇧⌘K, see Comments) — plus the footnote commands, and acts on whichever editor you're typing in, in a scene, a stitched chapter, distraction-free writing or a note. Its last item, Insert from File…, is in Inserting a file.
Small caps, superscript, subscript and links
Three more marks sit in the toolbar's More Formatting menu (the "Aa" button after strikethrough) and in the Format menu, each ticked when the caret is in it:
- Small Caps draws lowercase letters as small capitals and leaves capitals as they are — "THE MORNING she left", or AD and NASA set the book way. A typeface with real small caps (New York, San Francisco, Iowan Old Style, Baskerville, Avenir Next) draws its own; in one without them (Georgia, Charter, Palatino, Helvetica Neue, Menlo) Norn draws smaller capitals for the screen. Your letters are stored as you typed them, so spelling, Find and the word count see the real words. Small caps has no shortcut.
- Superscript (⌃⌘+) raises smaller letters — 1st, Mme, e = mc². Subscript (⌃⌘−) lowers them — H₂O. Turning one on turns the other off.
Like bold, each carries on as you type and across a Return, and each is one step to undo.
Links. In the Manuscript — scenes and documents alike — Norn doesn't add or edit links: a link there comes from a paste, an imported manuscript or Make Links from Markdown, and you can open, copy or remove it. In notes, and in footnotes and endnotes, select some words and choose Add Link… (⌘K, the toolbar's Link button, or the right-click menu). Type the address in the Link field and press Return. With nothing selected, the popover asks for the Text as well and puts it in as a link. Norn makes web and email links only: it adds https:// to an address like example.org/page and mailto: to an email address; anything else says "Norn makes web and email links only.", and a space in the address says "A link can't contain spaces."
A link keeps the ink of the words around it, with an underline in your theme's accent colour (in High Contrast, a thicker underline in the text colour). Outside the Manuscript, with the caret in a link, the command reads Edit Link… and the popover shows the address and a Remove Link button. Format ▸ Remove Link takes a link off anywhere, the Manuscript included. Typing at either end of a link is plain text; typing inside it joins it.
Clicking a link puts the caret there, so you can edit it (outside the Manuscript) or remove it. ⌘-click opens it (hover to see the address), or choose Open Link. Right-click a link for Open Link, Edit Link…, Copy Link and Remove Link (in the Manuscript, Open Link, Copy Link and Remove Link). In a read-only view, such as a note's Compendium article, a click opens the link. A link of another kind, made by a later version of Norn, is kept but says "Norn can't open this link." when you try.
Make Links from Markdown. Notes written before 0.9.2 show their Markdown links as the characters you typed, [text](address). Choose Format ▸ Make Links from Markdown to turn each one — in the selection, or with nothing selected the whole note or document — into a link on its words, keeping any italic or bold they had. <address> becomes a link too. Images () and anything that isn't a web or email link stay as they are. It's one step to undo.
In exports: Markdown writes a link as [text](address), superscript and subscript as <sup>/<sub>, and small caps as the words you typed. RTF writes live links, raised and lowered letters, and small caps as smaller capitals. Manuscript Format prints small caps as FULL CAPITALS, keeps superscript and subscript, and prints a link's words only. A World Data file carries a note's links as [text](address) and they come back as links when the file is imported.
Character styles
Italics do several jobs in a novel: a character's thought, a foreign word, the title of a book, a few words of a letter or a sign. A character style marks a word or phrase for what it is, so its look can be changed in one place later. Select the words and choose a style from the Character menu beside the paragraph style menu, from Format ▸ Character Style, or from Character Style at the top of the menu you get by Control-clicking the text:
- Thought — a character's direct thought: I can't go back, she thought.
- Foreign Word — words not in the book's language.
- Title of a Work — books, films, songs, ships, newspapers.
- Message — short written words inside a paragraph: a text, a sign, a line of a letter.
Every style starts out looking like italics, so marked text looks just as it did until you change a style's look in the Writer's Kit. Choosing a style sets it on the selection; None takes it off. With nothing selected, the style is armed for what you type next, as ⌘I is. A word has one style at a time, and bold, italic and underline still go on top: ⌘I inside an italic style shows upright, as publishers set emphasis inside italic text. The menu ticks the caret's style; a selection with mixed styles ticks nothing. Each choice is one step you can undo. Character styles work in notes too, and they don't change word counts. There are no shortcuts for them; you can add your own in System Settings ▸ Keyboard ▸ Keyboard Shortcuts ▸ App Shortcuts, by menu title.
A word may carry a style this device's Writer's Kit doesn't have yet — one you added on another device before sync has brought it here. Its words keep the style and show in italics, and the menu ticks Not in your Writer's Kit; choose a style or None to replace it. Exports write it as italics. When you export a .norn archive whose words use a style that's in neither your Kit nor the book, Norn says so: the style can't go with the book, and its words will show in italics. A Book Archive backup of such a book fails for the same reason. Either way, Add This Book's Styles to Writer's Kit (below) gives the style a home in your Kit.
A book exported from another Norn brings the styles it uses with it, and importing it adds them to your Writer's Kit, as the book had them, so their words keep their names and looks here. For a style nothing describes, or a book imported before this version (Norn adds those once, by itself, the first time this version opens), choose Format ▸ Character Style ▸ Add This Book's Styles to Writer's Kit (on iPad and iPhone it's also in the book's "…" menu, and at the foot of Character Style in the menu over selected text): each style your Kit lacks is added with the same name and look, and one whose name you already use arrives retired. A style the book's words use that nothing here describes — in neither your Kit nor the book — is added too, looking like italics, and named Style from and the book's title: Style from Dune, then Style from Dune 2, and so on. Rename it or change its look in the Kit. Everything it adds is one step you can undo. The item is greyed out (on iPad and iPhone, left out of the menus) when there's nothing to add, or while the Writer's Kit can't be changed.
Exports write each style as its look — Manuscript Format, RTF, Scrivener and Markdown alike (Markdown keeps italic and bold; underline and small caps become plain text). Word (DOCX) goes further: each style you used becomes a named character style in the file, under the name it has in your Writer's Kit and with its look, so an editor or typesetter can restyle every thought at once. (Manuscript Format DOCX writes the look only.) When you import a Word file, words in a character style with the same name as one of yours come back in that style; any other character style comes in as its look.
Fonts for a word or passage
Your page has one typeface, from Settings ▸ Editor, and that's how it should usually stay. When a passage needs a face of its own — a handwritten letter, a sign, a telegram — select it and choose a font. The font is kept in the book, on the words, like italics.
- The font menu on the toolbar, beside Character, shows the selection's font, or Paragraph Font when it has none of its own. It lists the fonts you've used in this document and chosen lately, Show Fonts and Use Paragraph Font.
- Format ▸ Font ▸ Show Fonts (⌘T) opens the Mac's Font panel. Choosing a family or a size there sets it on the selection; choosing a heavier face sets its family and bold. Colours, shadows and underlines from the panel aren't used.
- Bigger (⌘+) and Smaller (⌘−) step the selection's size, relative to the paragraph around it: 75, 85, 100, 115, 130, 150 and 200 percent. A heading's words stay bigger than a body paragraph's at the same step. This changes the words in your book; to make everything bigger on screen only, zoom instead (Zooming the editor).
- Use Paragraph Font takes the font and size off the selection, back to the paragraph's own. It is the quick way back from a patchwork.
With nothing selected, a font you choose is armed for what you type next, as ⌘B is; typing goes on in the font of the letter before the caret, across a Return too. Each choice is one step you can undo ("Set Font", "Use Paragraph Font"). Fonts work in notes and footnotes too, and they don't change word counts.
Bold and italic stay yours: a font is a family, and ⌘B or ⌘I in it uses that family's bold or italic face. A family with no italic face leans its letters instead.
A font this device doesn't have keeps its name in the book and shows in the paragraph's font, at its size, with a thin dotted underline. The font menu shows it as, for example, "Font Name (not on this Mac)", and hovering over the words says the same. Install the font and the words show in it; choose another font, or Use Paragraph Font, to replace it.
Fonts in This Book… (Format ▸ Font) lists every font your book's scenes, documents, other drafts and notes use — footnotes too — with how many places use it, for example "Font Name · 14 places · not on this Mac". Replace… beside a font asks "Replace Font Name with:" and offers Paragraph Font or any font on this device; Replace changes it everywhere. A document you're typing in with an input method, or one written by a newer version of Norn, is left as it is. Each document changed is its own step to undo ("Replace Font"): one ⌘Z puts back one document, as long as nothing has changed in it since; if it has, Norn leaves it and says so in the list.
On the iPad and iPhone. Select words, then choose Font in the menu that appears over them: Font… opens the system's font list, Use Paragraph Font takes the font off, and a font this device doesn't have is named at the top, for example "Font Name (not on this iPhone)". On the iPad the toolbar's font menu also has Font…, Bigger and Smaller, and with a keyboard the menu bar's Format ▸ Font has them too (⌘T, ⌘+, ⌘−), with Edit ▸ Paste and Keep Fonts. The iPhone's bar above the keyboard has no font button, but every font shows and is kept.
In exports: RTF and Scrivener write each passage's font and its size against 12 points, and so does a copy pasted into another app; a font this device doesn't have is still named, so a computer that has it shows it. Word (DOCX) writes them too. Manuscript Format ignores fonts — a submission is Courier or Times at 12 points whatever you chose — but keeps bold, italic and underline. Markdown drops them.
Scene breaks
A Scene Break is a paragraph, not a row of asterisks. Norn draws it centred, in the style of your theme, and Manuscript Format prints it as #. To add one, put the caret on an empty line and choose Scene Break from the style menu, or Make Scene Break.
Books written before 0.9.2 mark breaks with lines like ***, * * * or #. Norn leaves those as text; it never guesses. To turn one into a real Scene Break, select it (or several) and choose Make Scene Break: every selected paragraph that holds nothing but break marks, or nothing at all, becomes a Scene Break, its marks removed, in one step you can undo. A paragraph of prose is never converted, so the command can't remove a word.
Footnotes and endnotes
A note belongs to the point in your prose it's attached to, the way Pratchett's footnotes do. Put the caret where the note goes and choose Format ▸ Insert Footnote (⌥⌘N) or Insert Endnote. A small raised number appears in the text, in your theme's accent colour, and a popover opens beside it with the caret in it, ready for the note's text. With words selected, the note goes at the end of the selection and the words stay. Both commands are on the text's right-click menu too.
- Footnotes are numbered 1, 2, 3 and endnotes i, ii, iii, so the two never share a mark. Each note is one kind or the other; you choose when you insert it, and can change your mind.
- Click a number to open its note. Hovering over one shows the note's first line. Format ▸ Edit Footnote (or Edit Endnote) opens the note beside the caret.
- In the popover you can use bold, italic, underline, strikethrough and the other formatting of your prose, in plain paragraphs. A note can't hold a token, a heading or another note. ⌘Z there undoes your typing in the note. Esc, ⌘Return or a click elsewhere closes it, and the whole change to the note is then one step in Edit ▸ Undo (Undo Edit Footnote). While the popover is open Norn saves what you've typed every couple of seconds.
- The popover's ⋯ menu, and the number's right-click menu, hold Change to Endnote (or Change to Footnote) and Delete Footnote (or Delete Endnote). Deleting the number deletes the note; undo brings it back with its text. Cut and paste a number within Norn and its note goes with it.
- Numbering starts again at 1 in each chapter, or runs through the whole book: the choice is in the Export sheet (Number footnotes and endnotes:), it's remembered on this Mac, and the editor and every export follow it. In a stitched chapter or act, the numbers run on from one scene to the next. A chapter is what Manuscript Format starts a new page for: a folder, a document at the top of Contents, or a Chapter Heading inside the prose.
- Note words never count: not in the word counts in Contents, your writing log or the title page.
- The References list — the inspector's References icon — shows every note in the scene, or in every scene of a stitched chapter, act or manuscript: Footnotes, then Endnotes, each numbered as in the text, with the note's first line. Click one to go to its number and open the note.
On the iPad and iPhone. On the iPad the note opens in a popover beside its number, as on the Mac; with a keyboard, Format ▸ Insert Footnote is ⌥⌘N there too, and Insert Footnote and Insert Endnote are in the text's edit menu beside Add Comment. On the iPhone, Insert Footnote and Insert Endnote are in the style menu of the bar above the keyboard, and the note opens in a sheet you can pull up to full height, with Done to close it. Tap a number to open its note; select it to find Edit, Change to Endnote (or Footnote) and Delete in the edit menu. On the iPhone the bar's References button, after Comments, opens the References list as a sheet; tap a note there to open it.
Footnotes are for manuscript prose. The Notes section doesn't have them, and a note's text isn't seen by the editor's own find bar (⌘F) — Find in Manuscript searches it, even with This Scene chosen.
Paste and copy
Paste from Pages, Word or a web page and the formatting that matters comes with it: bold, italic, underline, strikethrough, superscript, subscript, small caps (when the other app marks them) and paragraph breaks, and web and email links. Fonts, sizes, colours, other kinds of links and images are dropped, so the pasted text takes on your page's look. A pasted web address is plain text, and pasting an address over selected words replaces them. ⌥⇧⌘V pastes plain text with no formatting at all. To keep the other app's fonts and sizes as well, choose Edit ▸ Paste and Keep Fonts: each passage keeps its font (unless it's the same as your paragraph's) and its size, relative to the paragraph you paste into. Pasting from one Norn document to another always keeps fonts.
Comments travel with your words inside Norn. Copy a commented passage to another scene and the comment is copied too; cut and paste it and the comment moves with it. Copied to another app, the text goes without its comments, and nothing pasted from another app ever becomes a comment.
Copy goes out two ways at once. Pages, Word and Mail get rich text in your editor's typeface (and a passage's own font and size), with its bold, italic, underline, strikethrough, superscript, subscript, small caps (as smaller capitals), live links and alignment; plain-text apps get plain text — not Markdown. Token chips copy as their names, list items keep their bullets or numbers, and an empty Scene Break copies as * * *.
Two more buttons in the header bar flip the focus modes wherever you're writing — a single scene, a stitched chapter, the whole manuscript. Keep Line Centered holds the line you're typing in the middle of the window; focus mode dims every paragraph but the one you're in. Each lights up while it's on. Turn focus mode on and a small popup appears beside it for how much stays bright — Paragraph, Sentence or Caret line — the same choice as Settings ▸ Editor ▸ Focus Modes, and app-wide like the rest of the typography. The centring and dimming switches are the standard editor's own: distraction-free writing keeps its separate pair in the footer, so what you set there doesn't disturb the ordinary editor.
There is no inline-code style, and typing Markdown never makes a link: a backtick or a bracket is ordinary punctuation (links come from Add Link… outside the Manuscript, or from Make Links from Markdown — see Small caps, superscript, subscript and links). Prose you wrote with backticks keeps every character exactly as you typed it — it simply reads as text now.
Inserting a file
Format ▸ Insert from File… puts a Word (.docx) or RTF file into the editor you're typing in — a scene, a chunk of a stitched chapter, a note — at the caret, replacing any selection. It comes in exactly as a paste from another Norn document would: with the same styles, emphasis, comments, footnotes and endnotes that Import Manuscript… keeps, nothing split, a page break dropped, and a line of break marks such as * * * made a Scene Break. One ⌘Z takes the whole insertion out again. If something couldn't come in, Norn says so afterwards: "Some things weren’t brought in: 2 images, 4 comments." The inserted words count toward today's writing, as pasted words do.
Insert from File is meant for a scene or a chapter. A file over 20,000 words asks first — "Insert 48,200 words?" — and a whole book belongs in Import Manuscript…. The command does nothing in an editor you can't type in. On an iPad it's also in a book's "…" menu; on an iPhone, in the style menu of the formatting bar.
Comments
A comment is a short note to yourself pinned to a stretch of a scene — "check the eclipse date", "too slow, cut?". It stays on its words as you write around them, can be marked done, and never reaches a submission: Manuscript Format leaves every comment out.
To add one, select some text (or put the caret in a word) and choose Add Comment: ⇧⌘K, the speech-bubble button on the toolbar, Format ▸ Add Comment, or right-click the text. The inspector opens at Comments with an empty card: type the comment, then press ⌘Return or click away. Leave the card empty and nothing is added.
Commented words get a soft tint, a little stronger where two comments overlap and stronger again for the comment you're in, and a small speech-bubble mark sits in the margin beside the line where each comment starts. Click the mark to select its comment.
The Comments list lists every comment in the order it appears in the text. Each card quotes the words it's pinned to, holds the comment itself — click into it to change it — and shows the day it was added. Click a card to select its words in the text; put the caret in commented words and their card is selected. The "…" on a card has Resolve and Delete Comment:
- Resolve marks a comment done. It disappears from the list and its tint goes; Show Resolved at the foot of the list brings resolved comments back, with a fainter tint, and their "…" menu has Reopen.
- Delete Comment removes it. Deleting all of a comment's words removes the comment with them.
Adding, changing, resolving, reopening and deleting a comment are each one step you can undo with ⌘Z, and undoing the deletion of commented words brings their comment back too.
Writing a chapter or more at once, the list shows the comments of every scene in view, under each scene's title. A scene scrolled far out of sight shows its cards but can't be changed until you click one, which brings its scene back into view. Distraction-free writing has the same icons in its inspector. Comments are for the manuscript: notes don't have them, though a note that holds comments keeps them. A document Norn opens read-only shows its comments and doesn't let you change them.
Comments are part of a document's text, so they sync, are kept in snapshots and archives, and come with a kept copy just as your words do. Exports leave them out, except Word (DOCX), which writes them as Word comments (see Word (DOCX)).
Tokens: live names in your prose
Type { anywhere, or @ at the start of a word, and a completion list opens. It searches your characters (including every alias), locations, world facets, creatures and lexicon words. Arrow to the one you want, press Return, and the name drops into your sentence as a chip.
A chip isn't decoration. It's a live reference:
- Rename the character and every chip updates, everywhere in the manuscript, instantly.
- Pick an alias row and the chip keeps that alias. Write "Eddie" and it stays "Eddie" even after you rename the character to something else, because the chip points at the alias, not the string.
- Click a chip for a small popover showing the entity, its kind and an Open in Editor button.
- Delete the underlying character and the chip turns back into ordinary words. No broken links, no red text, nothing to clean up.
The last row of the completion list is always Create new character…, which mints a character on the spot without leaving the keyboard. Perfect for the walk-on innkeeper you invented mid-sentence.
There's one more nicety. If the document you're writing belongs to a scene, tokenising a character adds them to that scene's cast automatically. It only ever adds — never removes — so a character you staged deliberately without naming them stays put.
Typography
Norn takes the look of the page seriously. Settings ▸ Editor holds the controls, and they apply app-wide rather than per book, so your writing surface stays the same everywhere.
- Font — Norn's ten writing faces come first: New York (the default serif), Iowan Old Style, Charter, Palatino, Georgia, Baskerville, System, Avenir Next, Helvetica Neue and Menlo. Below a divider comes every other font on your Mac, alphabetically, each name shown in its own face (symbol fonts such as Zapf Dingbats are left out). On an iPad or iPhone, tap Font for the same list: the system's fonts and any you installed through a font app. The choice belongs to each device, like the rest of these settings, and changes nothing in your books. If you remove the font you chose, the editor shows New York and Settings shows it as "(not installed)"; install it again and it comes back. A font with no italic face slants its letters for italic. Choosing a font of your own makes the preset read Custom. Size runs 10–24pt, with an optional medium weight. To make the page bigger or smaller for a while without changing Size, zoom instead (Zooming the editor).
- Rhythm — line height from 1.0× to 2.0×, and a choice between first-line indents (the book convention) or spaced blocks, which is the default. Justification and hyphenation are there if you want them.
- Layout — measure controls the text column's width: Narrow (~55 characters), Medium (~65), Wide (~80) or Full width, which is the default. Add vertical margin to taste — 24pt to start. Page presentation floats the column as a sheet of paper over a muted desk.
- Theme — System, Light, Dark, Paper (cream page, sepia ink) or High Contrast, independent of your Mac's appearance.
- Smart Typography — as you type, quotes become curly,
--and---become dashes, and...becomes an ellipsis. What you see is what's saved, and ⌘Z undoes it like any keystroke. Text written before Norn 0.9.2 isn't rewritten, so its straight quotes now show straight until you curl them with Book ▸ Curl Straight Quotes… (below). Manuscript Format, printing, and one document exported on its own as Markdown or RTF still curl them on the way out, by the same rules as Curl Straight Quotes (inch and foot marks stay straight); the whole manuscript as Markdown or RTF, the ZIPs and the Scrivener project keep them as they are.
Four presets bundle sensible combinations: Manuscript, Book Page, Typewriter and Focused Dark. Apply one, then tweak whatever you like — the moment you tweak any knob, the preset reads Custom.
A preset chooses type and mood, not page geometry: they all use the full-width measure with a 24pt vertical margin, and narrowing the column is a deliberate move you make yourself. The exception is Book Page, which keeps a medium column because its paper sheet needs something to float over. Book Page is also the only preset with first-line indents — the rest separate paragraphs with a gap.
View ▸ Editor Style shows which preset is active (a checkmark, or Custom once you've tweaked) and switches presets without a trip to Settings; Editor Settings… at the bottom of that menu jumps to the full Typography controls. These settings are app-wide — every book and every scene renders with the same style, which is why the menu lives in the menu bar rather than in any one editor's header.
Zooming the editor
Zoom makes the text bigger or smaller on screen while you work, without changing your book or your settings. Zoom in to read a passage up close; zoom out to see more of a chapter at once.
- On a Mac — View ▸ Zoom In (⇧⌘.), Zoom Out (⇧⌘,) and Actual Size (⇧⌘0), or pinch on the trackpad over the text.
- On an iPad — pinch the text with two fingers. With a keyboard, the same three items are in the menu bar's View menu, with the same keys.
- On an iPhone — pinch the text. There are no menu items for zoom; with a keyboard, the keys work.
Zoom goes in steps: 75, 90, 100, 110, 125, 150, 175 and 200 percent. A pinch moves to the nearest step when it ends. At each step the new level, such as "125 %", shows for a moment in the middle of the editor and fades; nothing stays on screen. VoiceOver says "Zoom 125 percent". Zoom In is greyed out at 200 percent, Zoom Out at 75 and Actual Size at 100, and all three are greyed out where there's no editor, such as Brainstorms, the plot board and the Library. They work in the Compendium too, while it shows a note's text. To go back to 100 percent, choose Actual Size, or pinch back to it.
One zoom for every editor on this device. The manuscript editor — a scene, a stitched chapter, act or manuscript, and distraction-free writing — a comparison, footnotes and endnotes, your notes and notes from elsewhere, and a note's text in the Compendium all zoom together. Every open book window changes at once (the level shows only in the window you zoomed in), a book you open later opens at the same zoom, and Norn keeps it when you quit. Each Mac, iPad and iPhone has its own zoom; it doesn't sync.
The text is laid out again at the new size, not magnified like a picture. Lines wrap again to fit the window, and paragraph indents and spacing, quote and list indents, the space around headings, and the scene and chapter titles of a stitched chapter grow with the text. Only the vertical margin stays as you set it. A Narrow, Medium or Wide column keeps its number of characters per line, so zooming in widens it until it reaches the edge of the window; from there the lines wrap to the window, and nothing ever scrolls sideways.
Your place stays put. The caret and any selection stay on the same words, and the line you're on stays where it was in the window (with Keep Line Centered on, it's centred again). Find's highlights stay on their words, and an open footnote or endnote stays open beside its number, at the new size. While you're composing a character with an input method, zoom waits: it does nothing until you finish, so zoom again once you have.
Zoom is for viewing only. It is never part of your book. Zooming doesn't change a word, doesn't mark the book as changed and adds nothing to Undo, and it never reaches Pages view's pages, Print, an export or a backup.
Zoom, Size and Bigger are three different things:
| What it changes | Where it's kept | |
|---|---|---|
| Zoom (⇧⌘. and ⇧⌘,) | How big every editor shows its text, on screen only | This device, for every book |
| Settings ▸ Editor ▸ Size | The size of the editor's text, 10–24pt | This device, for every book |
| Format ▸ Font ▸ Bigger and Smaller (⌘+ and ⌘−) | The selected words' own size, against the paragraph around them | The book, on the words, and in exports that keep sizes |
Zoom works on top of Size: at a Size of 16pt, 125 percent shows the text at 20pt. Zooming never moves the Size slider, the preview in Settings ▸ Editor stays at your Size, and View ▸ Editor Style keeps its checkmark rather than turning to Custom. Words you made bigger or smaller with Bigger and Smaller keep their size against their paragraph, and zoom with it.
In Pages view, Zoom In, Zoom Out and Actual Size, and their keys, zoom the pages instead, as ⌘+, ⌘− and ⌘0 do there (see Pages). The two zooms are separate: zooming the pages leaves the editor's zoom as it was, and going back to the editor finds it at the zoom you left. Brainstorms and the Character Map keep their own zoom too.
Settings ▸ General ▸ Reset Remembered Panel & Section State puts the zoom back to 100 percent.
Curling older quotes
Book ▸ Curl Straight Quotes… (on an iPad or iPhone, the book's "…" menu ▸ Curl Straight Quotes…) turns the straight ' and " in text you wrote before Norn 0.9.2 into curly quotes and apostrophes, so a scene written across the upgrade reads the same all the way through. It changes your book itself, and it only ever swaps those characters: no word, style, token or paragraph is touched.
- Change — This document (the document or note in front; This chapter when a chapter or folder is selected in Contents, with everything under it), The whole manuscript, Notes, or The whole book (the manuscript and your notes).
- Turn -- into dashes — on by default:
--and---become an em dash, as typing does now. Four or more hyphens are left alone, as a drawn line. - The count appears at once — for example 2,914 quotes and 316 dashes in 41 documents. — or No straight quotes here. when there's nothing to do.
- Left straight lists any
"or'that looks like inches or feet (5'10",a 12" ruler), with the words around it. They stay straight; change them by hand if they're really quotes. - Not changed lists documents Norn won't touch: one being typed in (with text still marked, as while composing an accented letter), one written by a newer version of Norn, and one that couldn't be checked.
Norn works out which way each quote faces from the characters on either side — after a space it opens, before one it closes, 'tis, 'twas, 'em, 'n' and '90s get an apostrophe, and text between backticks or inside a web address is left as typed. It's right nearly every time on ordinary prose, but not every time, so the whole pass is one step you can undo with Undo (⌘Z, or Undo on an iPad or iPhone), and for The whole manuscript or The whole book Norn saves and takes a snapshot first, kept until you delete it. If that snapshot can't be made, nothing is changed and the sheet says so. Open editors show the curled text straight away, with your place kept. Kept copies of a scene from another device are left as they arrived.
Find and replace across the manuscript
Edit ▸ Find ▸ Find in Manuscript… (⇧⌘F) searches the prose of the whole book, not just the scene in front of you. Contents turns into the Find in Manuscript pane while it's open, the way a code editor's search list replaces its file list. Esc or the ✕ brings Contents back exactly as you left it. On an iPad or iPhone, the magnifying glass in the header above Contents opens it.
Type in Find and the matches appear as you type, grouped by scene in manuscript order, each group headed by where it lives ("Act II › Chapter 9 › The Chateau d'If") with the match shown in bold in its sentence. A line above the list counts them: "41 matches in 12 scenes". Click a match and Norn opens that scene with the words selected; the pane stays, and ↑ and ↓ walk from match to match. The list keeps up as you write: change a scene and its matches are found again once you pause.
Search in chooses where to look: This Scene, This Chapter, This Act (or the folder you're in), Manuscript, Notes, or Manuscript and Notes. It starts on the chapter, act or folder you're looking at, or the whole manuscript from a single scene. The ⋯ menu beside it holds the options:
- Match Case — "lyra" no longer finds "Lyra".
- Whole Words — "Lyra" no longer finds "Lyrae".
- Ignore Accents — "Dantes" finds "Dantès". Off until you turn it on.
- Include Older Versions and Conflict Copies — also search older, locked versions of a scene and its conflict copies. Off by default, so only each scene's current version is searched.
- Include Footnotes and Endnotes — search the text of your footnotes and endnotes too. On by default: notes are part of the story. A match in a note is listed under its scene, right after the matches before its number, captioned with the note ("Footnote 3", "Endnote ii"). Click it and Norn opens the note with the words selected; Replace and Replace All change notes the same way, and one ⌘Z still undoes it.
Straight and curly quotes always match each other, so "don't" finds "don’t" whichever you typed. Token chips aren't searched — a chip is a link to a character or place, not words on the page — and nor are comments. Very common words can find thousands of matches; the list shows the first 1,000 and says so ("Showing the first 1,000 of 24,310 matches").
Replacing. Open Replace under the search field and type the new words in Replace with. Replace changes the selected match, through the editor exactly as if you had typed it, then moves to the next one; ⌘Z takes it back. Replace All changes every match in the list, after asking first ("Replace 41 matches in 12 scenes?"). The replacement takes the formatting of the first character it replaces, so a name in italics stays in italics. A scene you're in the middle of typing in with an input method, or one written by a newer version of Norn (marked with a lock), is left as it is and named.
One ⌘Z undoes a whole Replace All (Edit ▸ Undo Replace All). It puts back every scene still as Replace All left it. If a scene has changed since — you typed in it after its own undo steps were gone, or a change arrived from another device — Norn leaves that scene as it is rather than overwrite newer words, and says which ("Undone, except in 1 scene changed since: Aftermath"). Words that Replace All adds or removes don't count as words written toward your goals or the writing timer.
Finding in a stitched chapter, act or manuscript
In a single scene or a note, ⌘F opens the editor's own find bar, as in any Mac app. On a stitched surface — a chapter, an act, a folder or the whole manuscript, in the ordinary editor or distraction-free — Edit ▸ Find ▸ Find… (⌘F) opens one find bar above the stitch instead, searching everything the surface holds, scene after scene, not just the scene the caret is in.
Type and Norn goes to the first match after the caret: the bar counts it ("3 of 41"), every match on screen is tinted, and the current one is tinted more strongly and selected. Return, Find Next (⌘G) or › goes to the next match, Find Previous (⇧⌘G) or ‹ to the one before; both carry on round from the end to the start. A match in a scene far down the page is scrolled into view and selected, whether or not you've been near it. Use Selection for Find (⌘E) searches for the words you've selected. The ⋯ menu holds Match Case, Whole Words and Ignore Accents — the same three as the Find in Manuscript pane, set in either place. Find and Replace… (⌥⌘F), or Replace in the bar, opens Replace with, Replace (the current match, as if you'd typed it, then the next one) and Replace All (every match on the surface, asked first, and one ⌘Z undoes it, as in the pane).
Done or Esc closes the bar and leaves you in the text at the current match. In distraction-free writing the first Esc closes the bar and the second leaves distraction-free. The bar searches the scenes' prose; a footnote's or endnote's text is found by Find in Manuscript (⇧⌘F).
Scrolled away from where you were working? Edit ▸ Find ▸ Jump to Selection (⌘J) brings your caret or selected text back into view, in a stitched surface or, on a Mac, in a single scene or note. On an iPad it's there while a stitched surface is showing.
Distraction-free writing
The expand button in the editor's header clears everything away: no sidebar, no Contents, no toolbar. Just your text at the width you chose. On a Mac the window goes full screen too, and comes back out when you leave; if it was already full screen, it stays that way. Taking the window out of full screen yourself — the green button, ⌃⌘F or Globe-F (fn-F) — leaves distraction-free as well.
It works on a container too — click the expand button on a chapter, an act, the outline row or a folder and the whole stitched surface goes deep-writing, scene after scene, with the footer showing what you're in and its total word count. Keep Line Centered and focus dimming both work there; on a stitched surface the line you're typing is centred in the page, and it can do that on the first and last lines of the chapter as well as the middle ones.
Inside, a quiet footer shows the document title, the exit button, the same two focus-mode buttons — Keep Line Centered and focus dimming, both on by default here, the second bringing its highlight popup with it — the writing timer chip and your live word count. The writing timer and inspector buttons sit in the top corner; on a Mac they fade after a couple of seconds and return when you move the mouse. (On an iPhone the exit button sits up there with them, since the footer steps aside while the keyboard is up.)
Keep Line Centered holds the line you're typing in the middle of the window. Focus mode dims every paragraph except the one you're in — or the sentence, or the line, depending on your Focus Highlight setting.
Need to check a fact? Hold ⌥⌘ to peek at the Reference Inspector, release to hide it again.
Esc takes you back.
Pages: the manuscript as printed pages
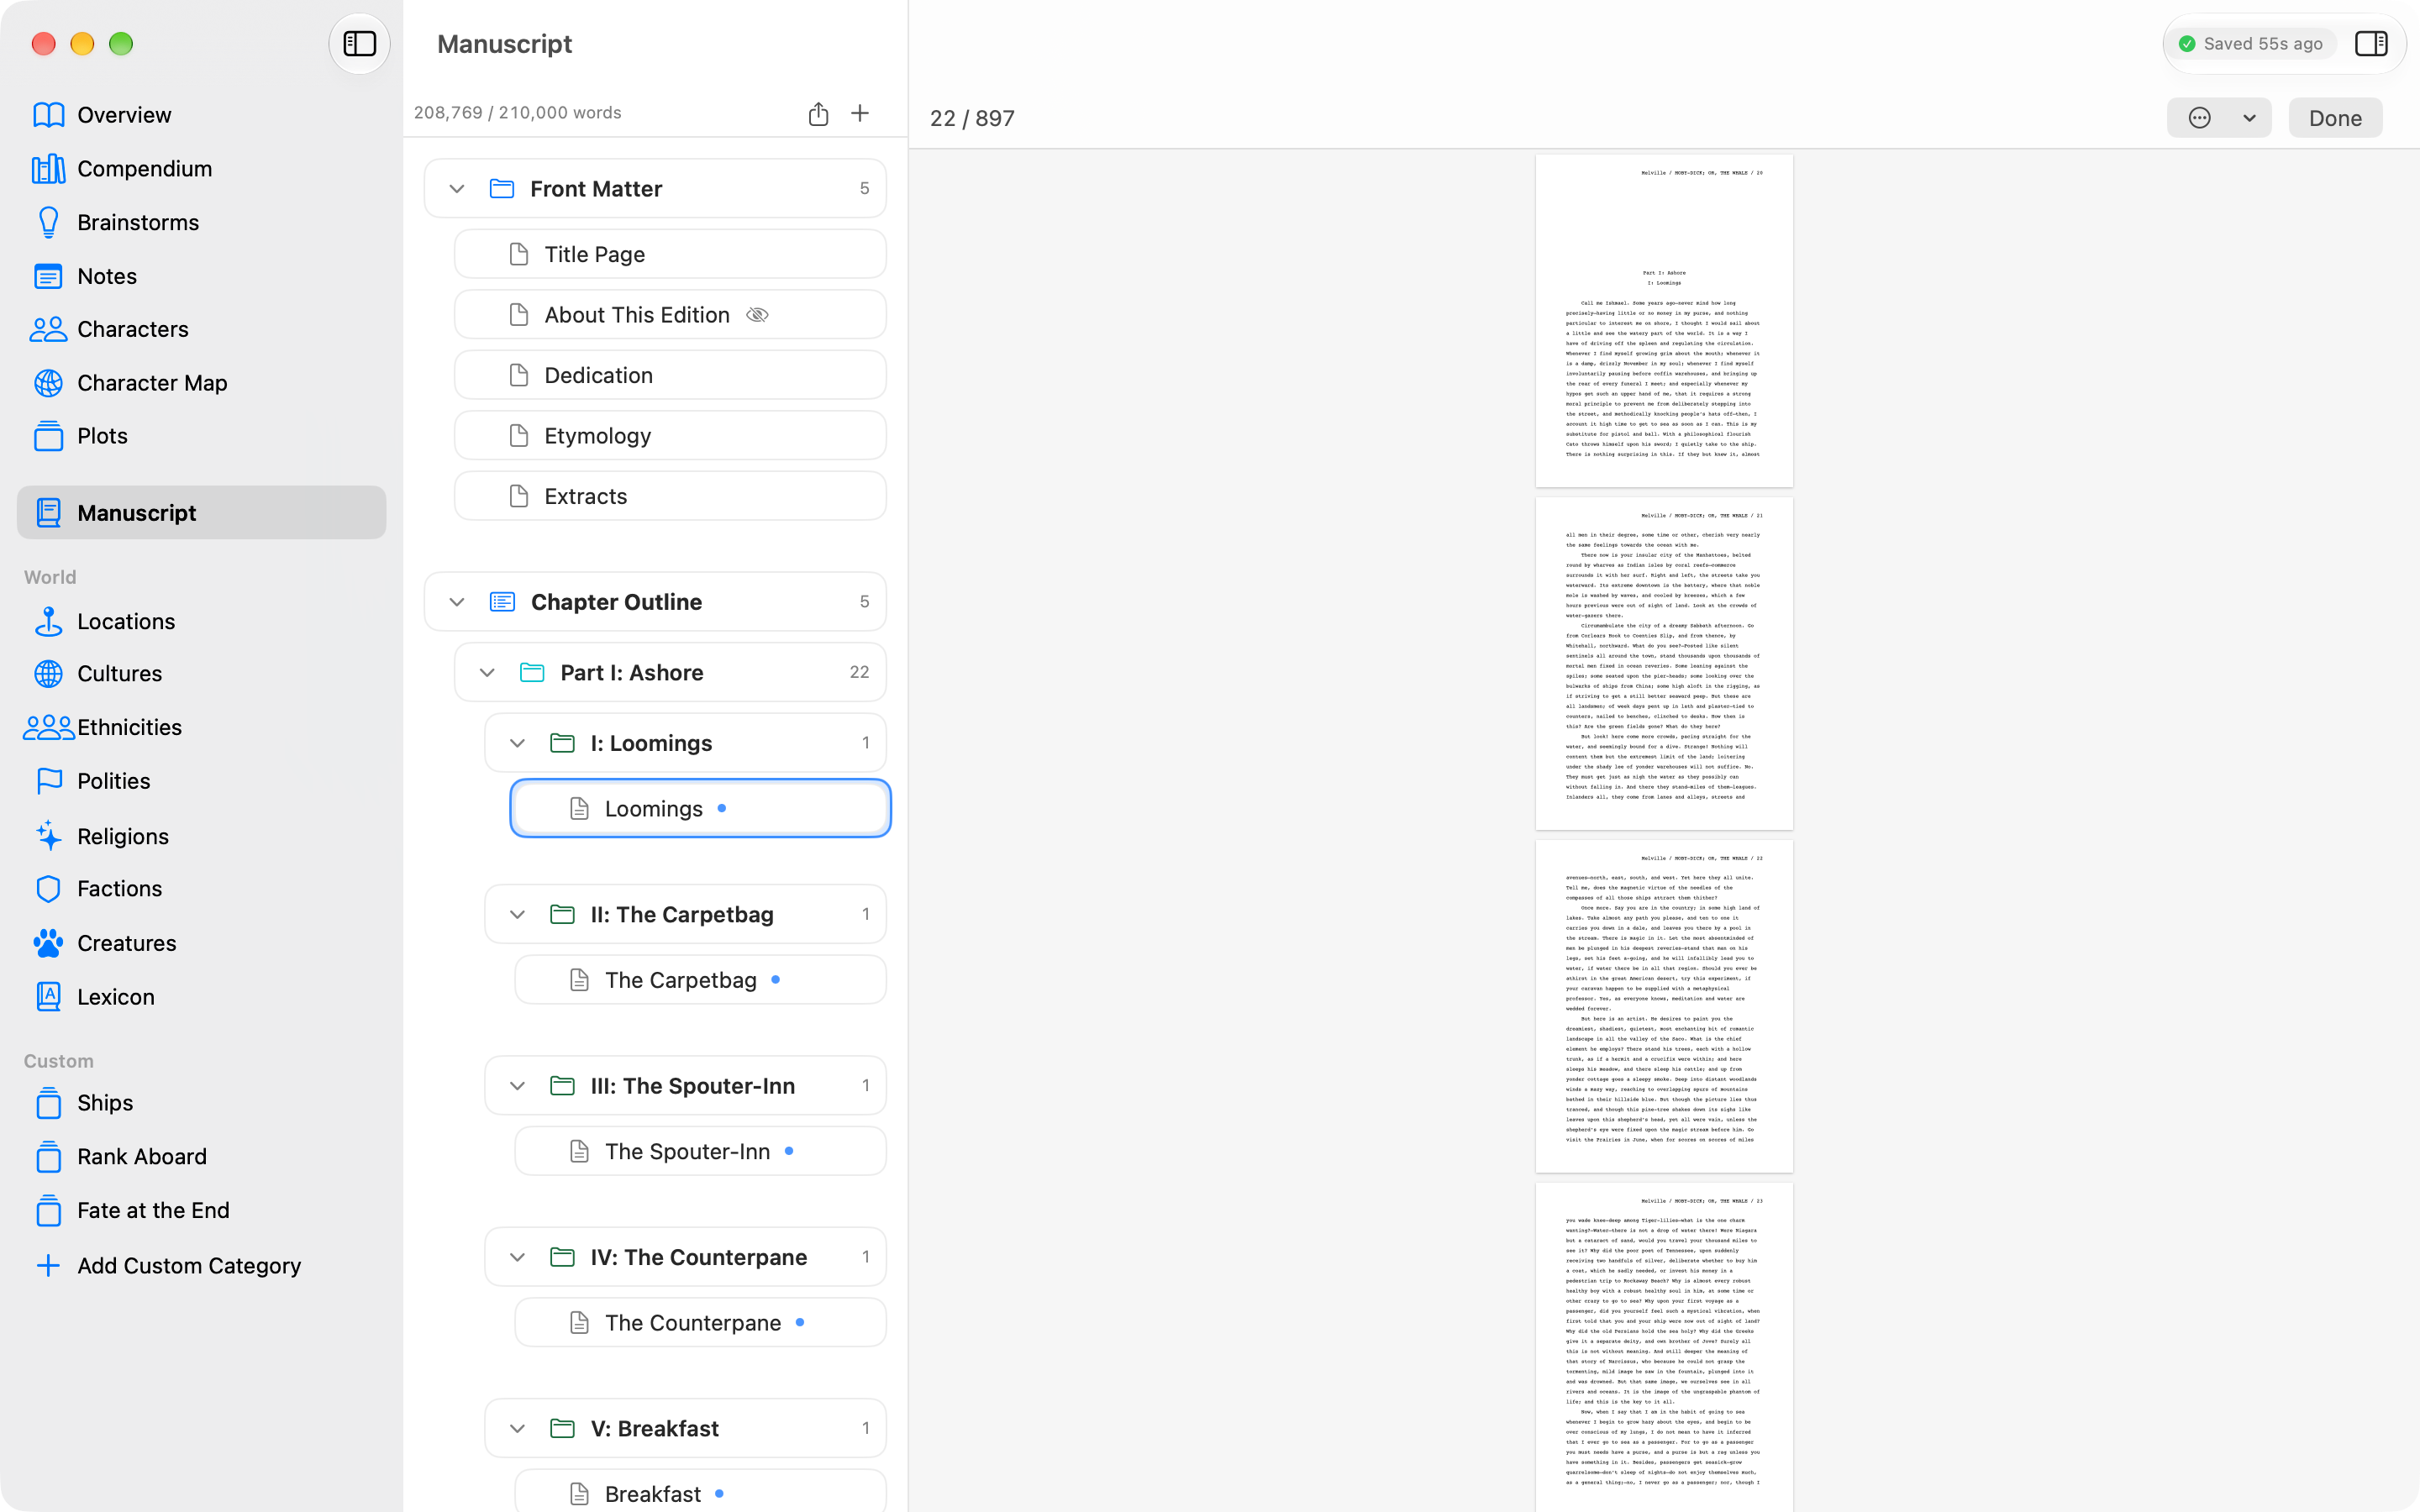
The Pages button in the editor's formatting bar (or View ▸ Show Pages, ⌥⌘P) swaps the editor for the whole manuscript laid out in Manuscript Format — exactly the pages Print and Manuscript Format (PDF) make, title page and all. It opens at the page your caret is on, whether you were in one scene or a whole stitched chapter. The pages are read-only, black on white whatever your theme: they are paper.
The bar above them shows Page 37 of 1,842, with its paper and font in the tooltip. On a long book you'll see Laying out pages… for a moment first; the window stays usable meanwhile. Also in the bar:
- Go to Page… — type a number in Page: and click Go. A number past the end goes to the last page.
- Paper: and Font: — the same choices as the Export sheet and the Print panel, remembered on this Mac. Changing one lays the pages out again, staying at the same words.
- Fit Width, Fit Page and Actual Size, also in the View menu with Zoom In and Zoom Out. ⌘+ and ⌘− zoom in and out and ⌘0 is actual size, and so do the editor's zoom keys, ⇧⌘., ⇧⌘, and ⇧⌘0; you can pinch on a trackpad too. The pages zoom from 25 to 400 percent, separately from the editor: zooming one leaves the other as it was (Zooming the editor). In the View menu, Zoom In is greyed out at 400 percent, Zoom Out at 25 and Actual Size at actual size, and all three while the pages are being laid out.
- Print… and Export PDF… use the pages already laid out, so they start at once.
- Done (or Esc, or ⌥⌘P again — the menu item now reads Show Editor) goes back to the editor, with the caret where you left it and its undo history intact.
To get back to the words on a page, double-click it, or right-click it and choose Edit Here, or click it and press Return. Norn opens the editor at the first paragraph that starts on that page (or, on a page in the middle of one long paragraph, that paragraph). In a stitched chapter it scrolls to the scene; from a single scene it opens whichever scene that page belongs to.
Page Up and Page Down move a page at a time, Home and End go to the first and last pages. With VoiceOver, each page reads as Page 37 with its text, and has an Edit Here action; the page number is announced as you scroll.
If the book changes while the pages are showing — from another window, or from sync — an Update button appears in the bar. The pages don't re-lay themselves under you; click it when you're ready.
The page count is the one for the paper and font you chose, so a Mac and an iPad set differently can show different counts. Nothing about pages is saved in your book.
11. Notes
Press ⌘4. Notes are scratch space — research, timelines, "things to fix in draft two."
The list has two parts. My notes are the ones you create with +; they can be tagged, archived, reordered and deleted. Notes from elsewhere gathers the notes fields scattered across the app — brainstorm cards, characters, scenes — into three collapsible groups. Clicking one edits the original in place. Nothing is copied, so there's no version to get out of sync, and a "jump to source" link takes you to where it lives.
My notes are written in the same editor as the manuscript, with the same toolbar, styles, Format menu, paste and copy (see The editor). Token chips are the one thing it leaves out. There's no preview to flip to, because the page is already the finished look. A note written before Norn 0.9.2 comes across with its formatting, with two exceptions: a Markdown link ([text](address)) and inline ` code ` now show as the characters you typed. Nothing is lost; they just don't render. To turn the links back into links, choose Format ▸ Make Links from Markdown.
Notes from elsewhere keep the Markdown editor. Its toolbar covers bold (⌘B), italic (⌘I), strikethrough, headings 1–3, bullet and numbered lists, blockquote, inline code and links, and the eye icon (⇧⌘P) toggles a live preview beside your text. The preview handles headings, blockquotes, both list kinds, and inline bold, italic, code and links. It's a fast look rather than a full renderer, so tables and fenced code blocks show as plain paragraphs.
Each note exports on its own as Markdown from the header's share menu.
Find in Notes searches your notes the way Find in Manuscript searches the manuscript: ⇧⌘F in the Notes section, or the magnifying glass in the list's header on an iPad or iPhone. Notes from elsewhere aren't searched.
12. Brainstorms
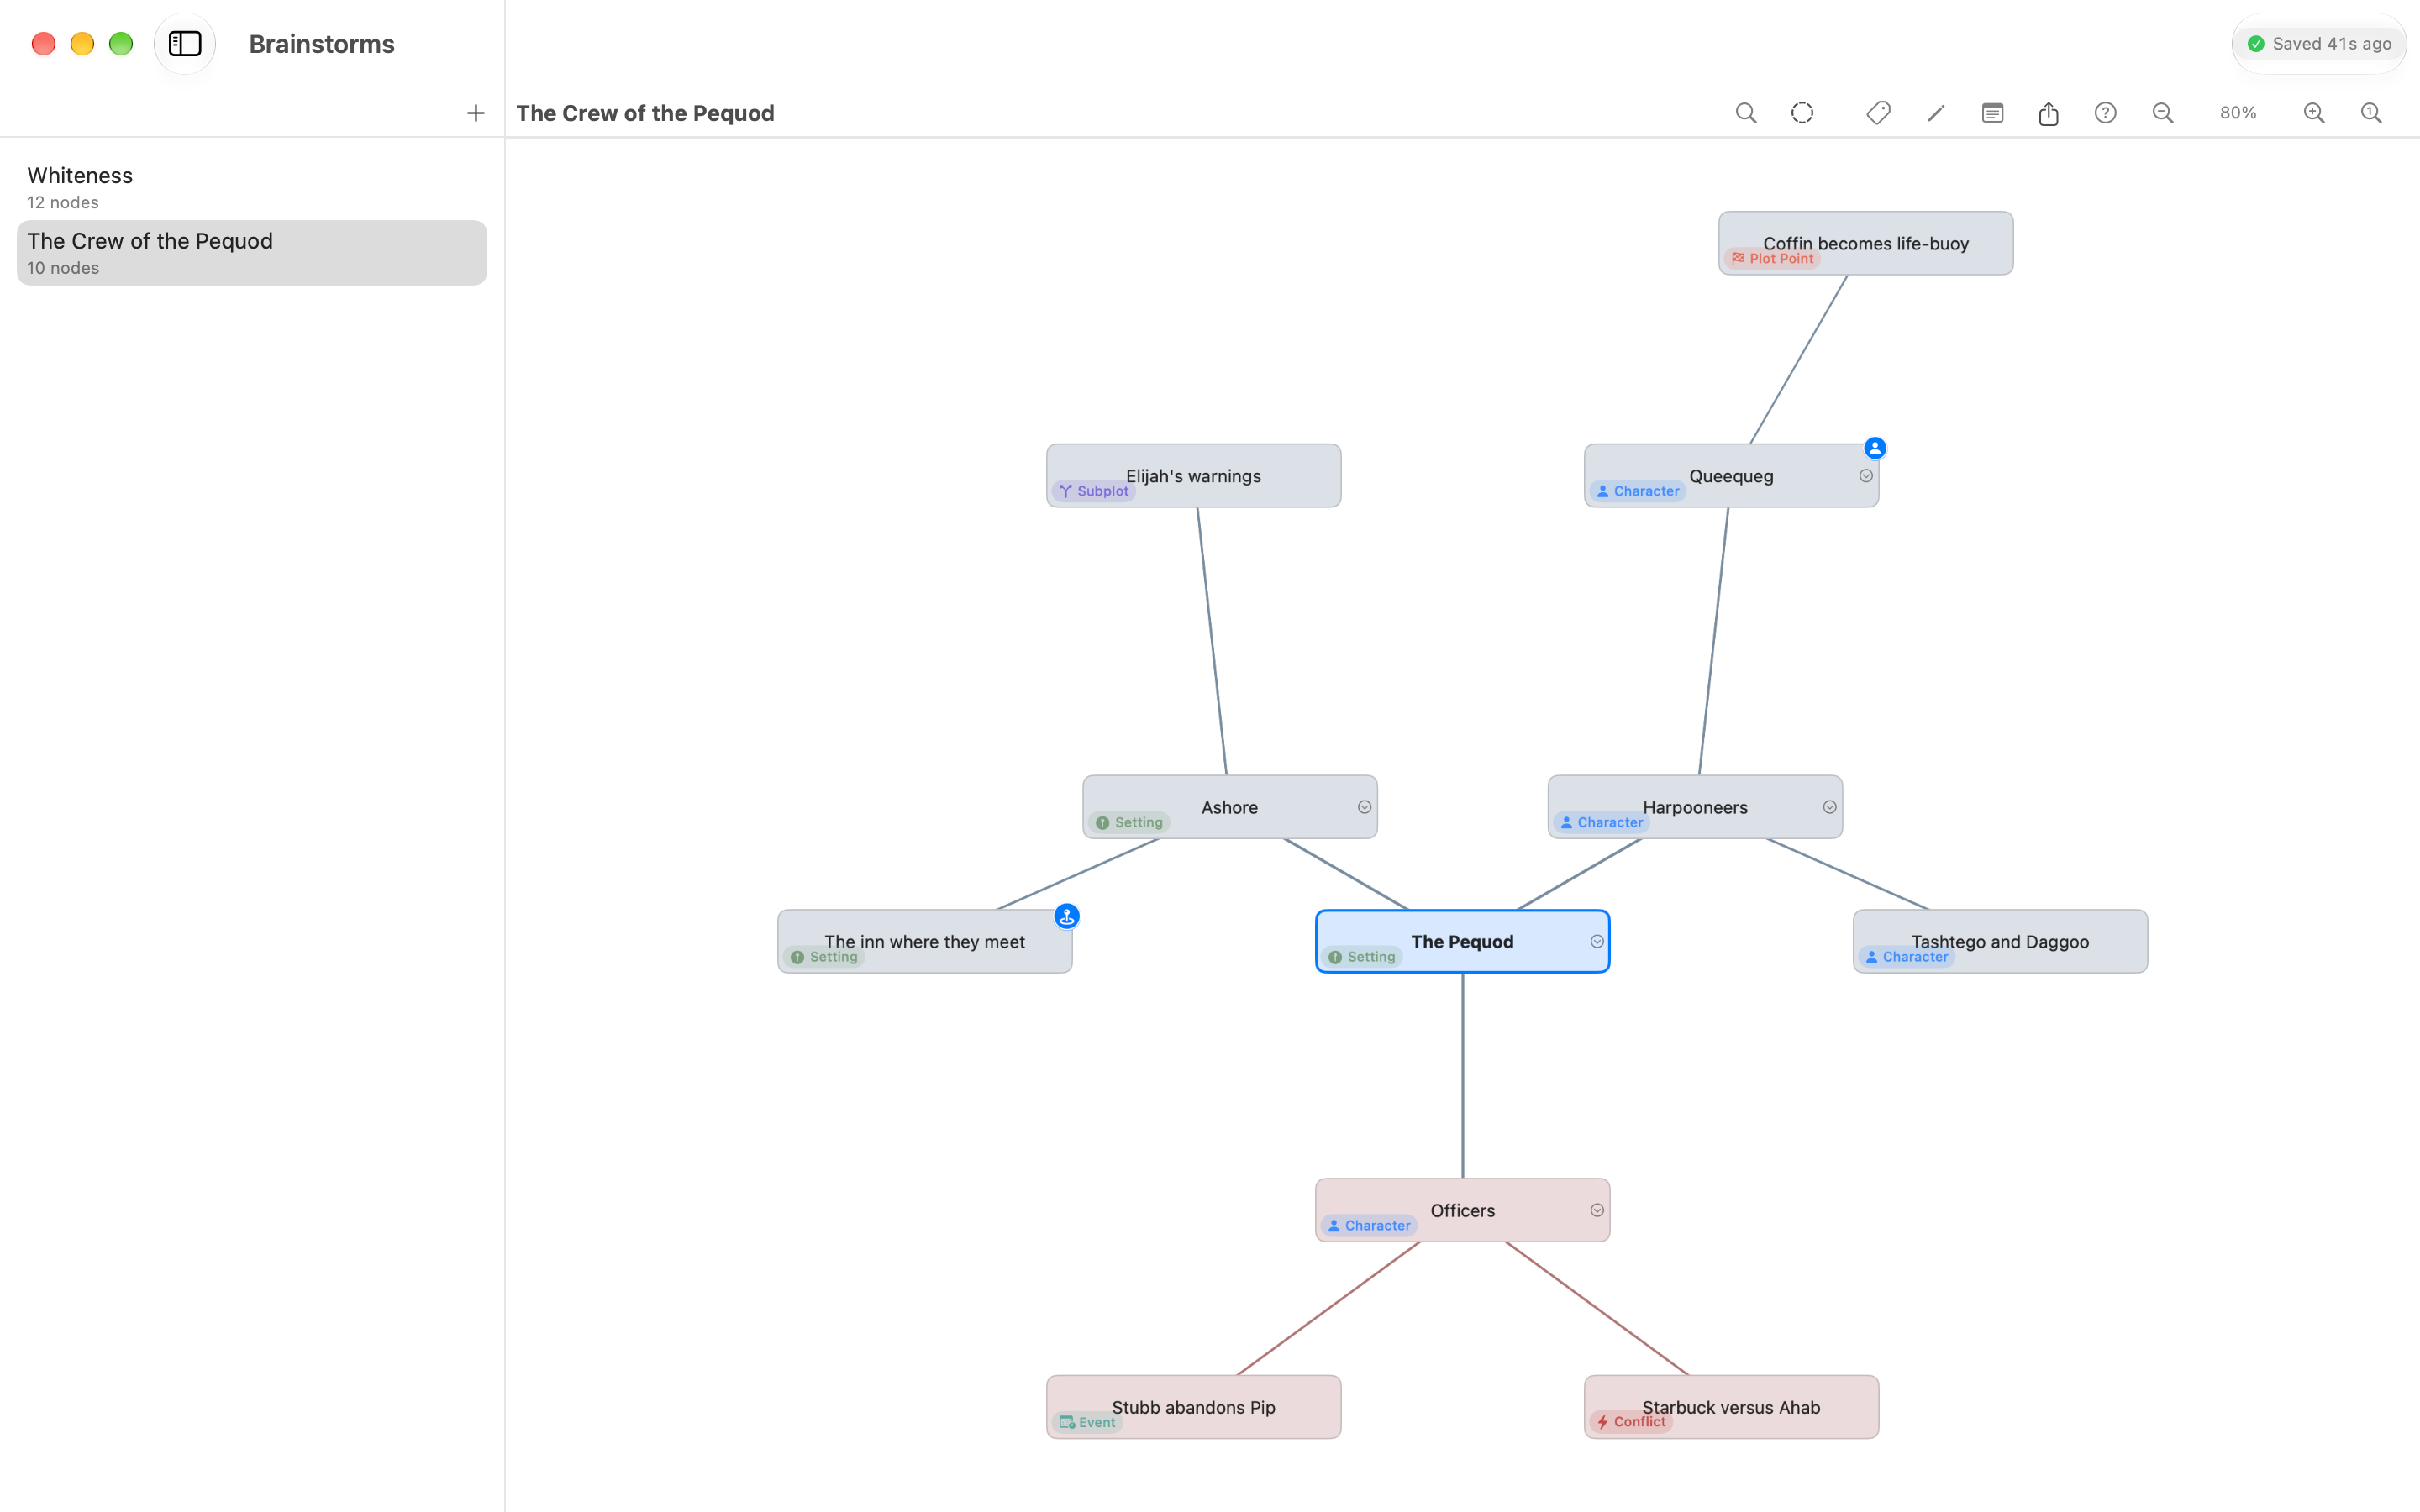
Press ⌘3. A brainstorm is a mind map for the messy early stage — ideas, plot fragments, half-formed characters, questions you can't answer yet.
New maps start with a root node named after your book, because a mind map without a centre isn't one.
The keys that matter
Brainstorms are built for speed. Learn four shortcuts and you'll never touch the mouse:
| Key | Does |
|---|---|
| Return | Add a child of the selected node and start typing |
| Tab | Add a sibling and start typing |
| Double-click or ⌘E | Edit the selected node |
| Delete | Remove the node and everything under it |
While you're typing, Return commits, ⇧Return inserts a line break, Tab commits and immediately starts a new sibling — that last one is how you dump twenty ideas in ninety seconds. Esc commits too, and if you left the node empty it deletes itself.
More:
| Key | Does |
|---|---|
| Arrow keys | Move to parent, first child, previous or next sibling |
| ⇧ + arrows | Extend the selection |
| Home | Jump to the root |
| Space | Collapse or expand |
| ⌥↑ / ⌥↓ | Reorder among siblings |
| ⌥← / ⌥→ | Promote out of, or demote into, the surrounding structure |
| 1–8 | Apply a colour |
| ⌘F | Search the map |
| ⌘L | Switch layout |
| ⌘+ / ⌘− / ⌘0 | Zoom in, out, reset |
| ⇧⌘N | Open the notes panel for the selected node |
| ? | Open the shortcut cheat sheet |
Drag a node onto another to re-parent it. Drag a whole selection and it moves together. Drop onto a collapsed node and it opens to receive it.
Deleting a subtree of five or more nodes asks first. Smaller deletions go straight through, and ⌘Z has your back either way.
Layouts, colours and categories
Two layouts: Horizontal Tree (the default) and Radial, which fans children around the root. ⌘L cycles between them with a gentle animation.
Eight colours sit on the number keys. Uncoloured nodes inherit from the nearest coloured ancestor, so colouring a branch's head tints the branch — turn that off per node if you'd rather it stayed neutral.
Nine categories ship with the app: Plot Point, Character, Setting, Trope, Theme, Event, Conflict, Subplot, Question/TODO. You can invent your own from the right-click menu; custom labels get a consistent colour derived from the text, so "Magic System" looks the same every time you use it.
The legend panel lists every category in the map with a live count. Click one to dim everything else — a fast way to see just your unanswered questions. Note that the dimming only applies while the legend is open.
The notes panel (⇧⌘N) attaches longer prose to a single node, with Edit and Preview modes. It stays pinned to the node you opened it for rather than following your selection around, which keeps focus where you put it.
Turning ideas into things
Right-click a node and choose Convert to. Norn creates the real thing and seeds it from the node:
| Convert to | Node text becomes | Node notes become |
|---|---|---|
| Character | Name | Notes |
| Location | Name | Description |
| Creature | Name | Summary |
| Lexicon Word | Headword | Word origin |
| World Facet | Name | Long description |
| Note | Title | Body |
The node stays put and gains a small badge; right-click again to jump to what it created. Nothing is consumed, so a map remains a map.
Export a brainstorm as Markdown (nested bullets with categories and notes) or OPML from the share menu. OPML is the mind-map interchange format read by XMind, FreeMind, MindNode and OmniOutliner.
13. The Compendium
Press ⌘2 for a read-only wiki of your entire book.
The index opens with the Glossary, then groups everything else — Characters, Cultures, Ethnicities, Polities, Religions, Factions, Custom Categories (each category you made, inside it), Creatures, Locations, Plots with their scenes (and, once you have any, a Unplotted Scenes row after the plots), the Outline, Notes and Story Structure. The Outline's article leads to its row in Contents. Search across the top matches names, titles, aliases, tags and short descriptions, and lists what it finds under the same headings.
Click anything for its article. Articles link to each other, and Back and Forward buttons work the way a browser's do. A Show archived items toggle brings retired entries back into view.
The best part is at the bottom of every article: Referenced by. Norn walks the whole book and tells you where this thing actually appears — which scenes cast this character, which factions they lead, which scenes use this location, which prose paragraphs mention this word. It's the answer to "wait, did I ever use that?"
An Open in Editor button on each article takes you to the editable version. Everything else in here is safely look-only.
The Lexicon is the one exception to one-article-per-thing: the whole glossary renders as a single page, with individual words as anchors.
14. Writing goals, the timer and your stats
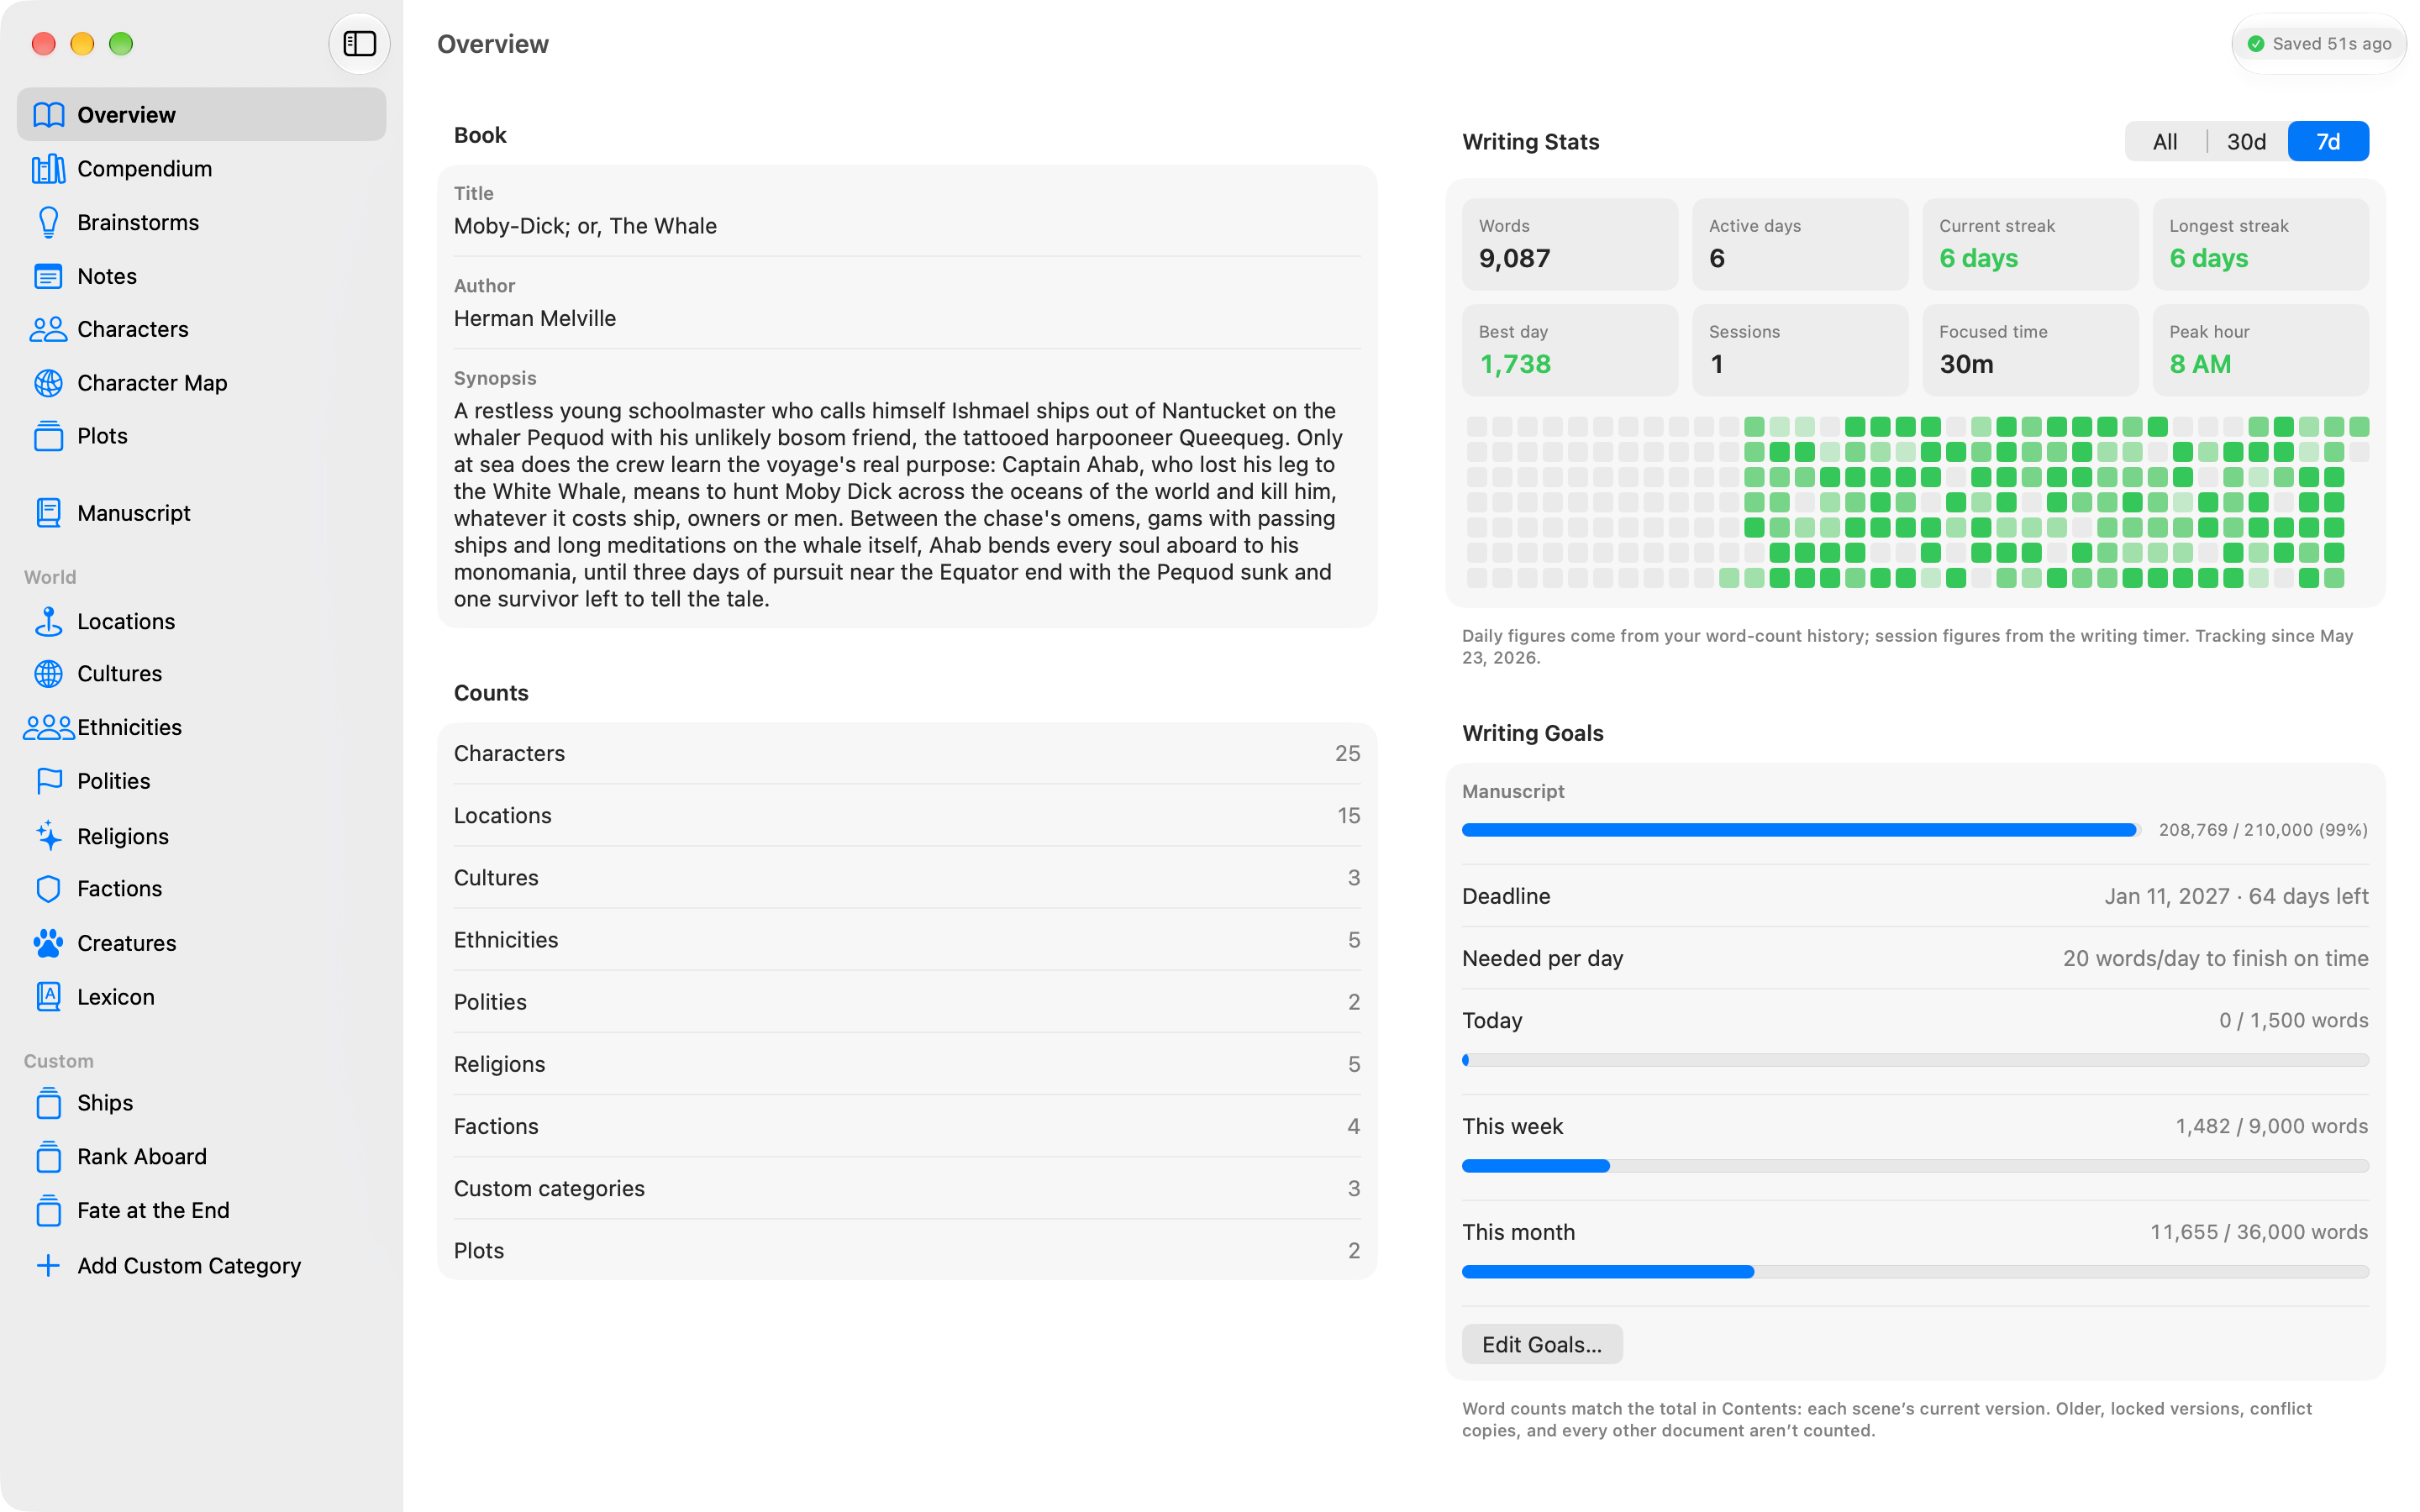
Goals
On the Overview page, Set Goals… opens the goals editor. Everything is optional and independent.
- Manuscript target — total words for the finished draft, with an optional deadline. Set both and Norn shows you how many words a day it'll take to land on time. When the deadline passes it reports the facts without editorialising.
- Pace goals — words per day, per week, per month. Weeks start Sunday. Months are calendar months.
- Session goal — words per session, shown by the writing timer while you work.
Progress bars fill toward each target and turn green when you hit it. Numbers keep counting past 100%.
Period figures are net and signed. Cut three hundred words today and today reads −300. That's deliberate. Writers cut, and a tool that hides it isn't telling you the truth about your day.
The writing timer
⌥⌘T starts a session. The same menu item then reads Pause, Resume, Start Break or Start Writing depending on where you are — one key for the whole cycle. A chip in the header shows the running clock, and clicking it opens the full controls.
Five modes:
| Mode | Shape |
|---|---|
| Pomodoro | 25 minutes work, 5 short, 15 long, long break every 4 — all adjustable |
| Desk Worker Ideal | 52 and 17 |
| Ultradian Rhythm | 90 and 20 |
| Flowtime | Count up with no scheduled end; take a break when you're ready and earn one proportional to how long you worked |
| Custom | Anything from one minute to eight hours |
Two toggles apply everywhere: start the next phase automatically, and play a sound when a phase ends.
When a phase completes, a card slides down from the top of the editor — never a modal, never a lockout. Norn's whole distraction-free mode exists to remove chrome, so throwing a wall in front of your sentence would be hypocritical. The card offers Start Break or Keep Writing (which extends the current phase rather than ending it), and after a break, Start Writing or Extend Break 5 min. It fades after thirty seconds into the chip, and the choice stays available.
Flowtime nudges you gently at ninety minutes with a line in the popover and a pulse on the chip. It never interrupts.
Close the lid mid-session and a work phase pauses itself. A break that elapses while your Mac sleeps is simply over.
End a session and Norn records when it started, which mode you used, how long you actually worked, how many breaks you took and your net words. A session with no measurable work isn't recorded at all.
Stats
The Writing Stats section on Overview shows a range switch — All / 30d / 7d — and rebuilds everything below it to match.
Daily tiles, always present:
- Words — net words across the range.
- Active days — days with a positive net.
- Current streak — consecutive positive days ending today or yesterday. (Ending yesterday counts, so your streak doesn't look broken at 9 a.m. before you've started.)
- Longest streak — the best run in range.
- Best day — your biggest single day.
If you've used the timer, three more appear: Sessions, Focused time and Peak hour — the hour of the day your best words happen. That last one has changed a few writers' schedules.
Below the tiles, a calendar heatmap: one small shaded square per day, up to a year across, today at the right edge. Shading is relative to your best day currently on screen, so the picture rescales as the window resizes. The heatmap always shows the full year regardless of the range switch above it.
Two things are worth knowing about the numbers.
Your writing log starts the day you create the book, whether or not you ever set a goal. The caption tells you the date it's been tracking since.
Only the current version of each scene in the manuscript counts. Words in character sheets, notes, brainstorms, plots and world entries don't move these numbers. A day spent building a religion from scratch will read as zero words, which is honest about drafting and a bit unfair about work. Token chips count as the words in the name they display, not the machinery behind them.
15. Getting your work out of Norn
Norn is a place to work, not a place to be trapped. Everything comes out.
The Export sheet
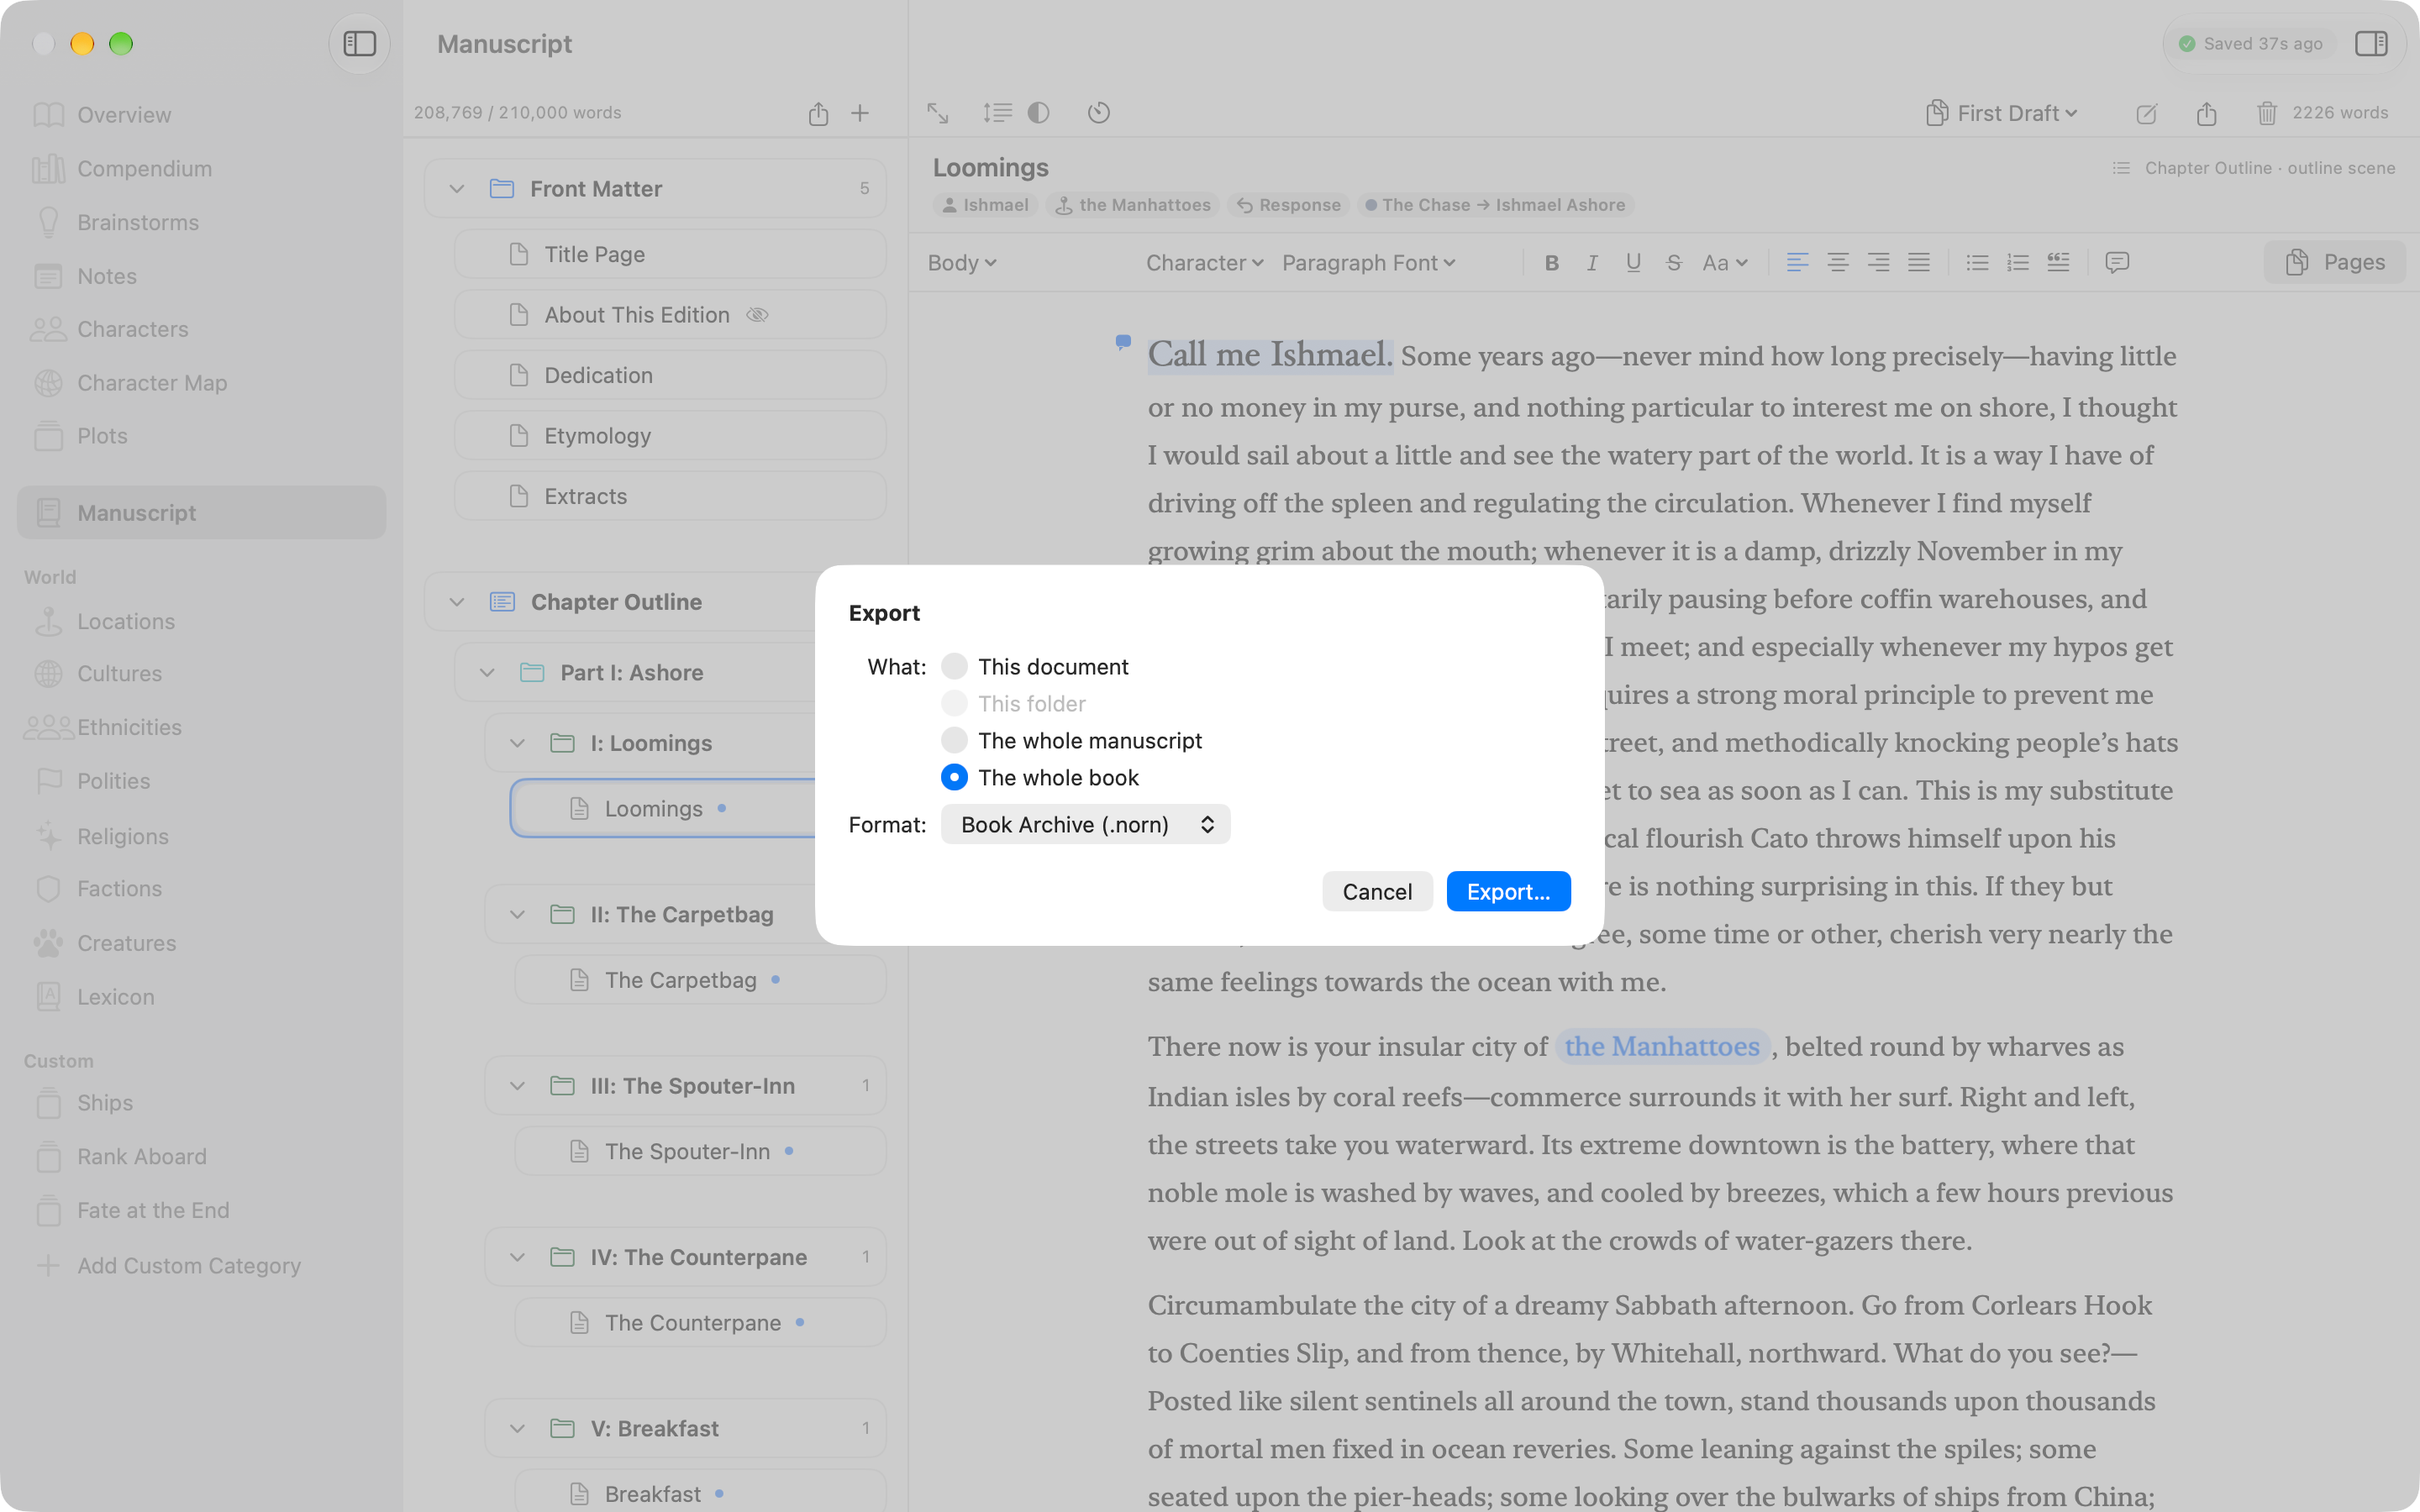
File ▸ Export… (⇧⌘E) opens one Export sheet for the manuscript and the whole book. The share button above Contents in the Manuscript opens it set to The whole manuscript, and the one above a scene or document you're writing opens it set to This document.
- What: — This document, This chapter (or This act, or This folder), The whole manuscript or The whole book. This document is the scene or document you have open in the Manuscript (selected in Contents, or being written distraction-free); with a chapter, an act, a folder or nothing selected, it's greyed out. The second choice follows what's selected in Contents (or open distraction-free): This chapter for a chapter in the outline, This act for an act, This folder for a manuscript folder. It exports everything under it, and it's greyed out when nothing like that is selected or there are no words under it yet.
- Format: lists only what fits. For a document or the manuscript: Manuscript Format (PDF), Manuscript Format (RTF), Manuscript Format (DOCX), RTF, Word (DOCX) and Markdown. For a chapter, an act or a folder: the three Manuscript Formats and Word (DOCX). For the whole book: Scrivener Project, Book Archive (.norn), Markdown files (ZIP) and RTF files (ZIP).
- Below that, the format's own choices: Paper: and Font: for Manuscript Format, and Names as plain text, not links for Markdown (see Tokens in exported prose).
- Number footnotes and endnotes: — By chapter or Through the book, shown when the book holds a footnote or endnote. It's remembered on this Mac, and the editor numbers the same way.
Export… then asks where to save it. Cancel closes the sheet. Norn remembers what you chose on this Mac, and File ▸ Export… opens on it next time. Export… is greyed out when there's nothing to export: the manuscript formats and Scrivener need something in Contents, and the ZIPs need at least one character or plot, or something in the outline.
File ▸ Print… (⌘P) prints the whole manuscript in Manuscript Format.
Every export at a glance
| What | Where you trigger it | Produces |
|---|---|---|
| One character | Character editor ▸ share menu | .md (+ images folder) or .rtf |
| One creature | Creature editor ▸ share menu | .md or .rtf |
| One note | Note editor ▸ share menu | .md |
| The whole Lexicon | Lexicon list ▸ share menu | .md or .rtf glossary |
| The outline | The export menu above Contents ▸ Export Outline as Markdown… / RTF… / OPML (Scrivener)… | .md, .rtf or .opml |
| One brainstorm | Brainstorm canvas ▸ share menu | .md or .opml |
| One scene or document | File ▸ Export… ▸ This document (or the editor's share button) | .md, .rtf, .docx, or Manuscript Format .pdf / .rtf / .docx |
| One chapter, act or folder | File ▸ Export… ▸ This chapter / This act / This folder | .docx, or Manuscript Format .pdf / .rtf / .docx |
| The whole manuscript | File ▸ Export… ▸ The whole manuscript (or the share button above Contents) | .md, .rtf, .docx, or Manuscript Format .pdf / .rtf / .docx |
| The whole manuscript, on paper | File ▸ Print… | paper |
| Everything, in bulk | File ▸ Export… ▸ The whole book ▸ Markdown files (ZIP) / RTF files (ZIP) | .zip |
| A Scrivener project | File ▸ Export… ▸ The whole book ▸ Scrivener Project | .scriv package |
| World data | World ▸ Export World Data… | .nornpack |
| A whole book | File ▸ Export… ▸ The whole book ▸ Book Archive (.norn) (or Library ▸ right-click ▸ Export Archive…) | .norn |
Tokens in exported prose
When you export a scene, a document or the manuscript as Markdown, the default keeps your tokens as links — [Mira](norn://character/…) — which stays readable in any editor and comes back intact if you ever paste it home. Turn on Names as plain text, not links in the Export sheet and every chip flattens to ordinary words.
RTF always flattens. It's a hand-off format for Word and Pages, where a link to a Norn character would be noise on the page. Word (DOCX) flattens too.
Footnotes and endnotes in exports
Every note keeps its own kind on the way out:
| Export | A footnote | An endnote |
|---|---|---|
| RTF, Manuscript Format (RTF), the Scrivener project and the RTF ZIP | a real footnote at the foot of its page | a real endnote at the end |
| Word (DOCX) and Manuscript Format (DOCX) | a Word footnote at the foot of its page | a Word endnote at the end |
| Manuscript Format (PDF), Print and the Pages view | at the foot of its page, under a short rule | on a Notes page after END |
| Markdown | [^1], its text at the end of the file | [^i], at the end of the file |
Word and the RTF readers number the notes themselves (footnotes 1, 2, 3, endnotes i, ii, iii); numbered By chapter, Norn writes its own numbers instead, so they start again at 1 in each chapter. A page that holds footnotes is shortened to make room for them; a footnote that won't fit moves on to the foot of the next page. The Notes page lists each chapter's endnotes under the chapter's title when numbering by chapter, each opening with its number ("ii. See Book III."). In a whole-manuscript Markdown file every note's label is different — [^2-1] is chapter two's first footnote when numbering by chapter — and Norn's own Markdown reading keeps [^1] as plain text, so a note doesn't come back into Norn that way. Pages may not show RTF footnotes; send DOCX or the PDF if the file will pass through Pages. Copying text out to another app leaves its notes behind, and footnotes in text pasted from another app arrive as that app gives them, not as Norn notes.
Word (DOCX)
Word (DOCX) in the Export sheet saves a Word document that Word, Pages, Google Docs and LibreOffice open as they would their own. Your paragraph styles become real Word styles — a Chapter Heading is Word's Heading 1, so it shows in Word's navigation pane — and bold, italic, underline, strikethrough and alignment come with them. The look is plain and the same on every Mac: Times New Roman 12, single-spaced, with indented paragraphs.
- This document writes the scene or document under its title.
- This chapter, This act or This folder writes that part the same way.
- The whole manuscript writes the copy an editor works in: chapter and folder titles as headings (a folder inside another one a level down), a Scene Break between the scenes of a chapter, and no scene titles. A Chapter Heading at the top of a scene stays.
Your comments go out as Word comments, beside the words they're pinned to, with a resolved one marked done. Turn off Include comments in the Export sheet to leave them out. Manuscript Format (DOCX) never includes them.
Empty lines are left out, a Scene Break prints as * * *, and tokens are written as names. With Smart Typography on, straight quotes and dashes are curled on the way out, as in Manuscript Format.
Manuscript Format
When a story is ready to send to an agent, an editor or a magazine, Norn lays it out in standard Manuscript Format (the Shunn layout most of them ask for):
- Manuscript Format (PDF) in the Export sheet saves a PDF.
- Manuscript Format (RTF) saves an RTF file for Word or Pages.
- Manuscript Format (DOCX) saves a Word document, which is what most agents and publishers ask for. It has the same title page, header and chapter pages; its line spacing is Word's own Double, so its page count can differ a little from the PDF's, and its headings are still Word headings underneath, plain and centred.
- File ▸ Print… (⌘P) sends the whole manuscript straight to a printer.
Choose The whole manuscript, This chapter (or This act, or This folder) for that part alone, or This document for one scene or document on its own (a short story, say); each has its own title page. Pick Paper (US Letter or A4) and Font (Courier or Times New Roman) in the Export sheet; the save panel's button reads Export. For printing, a small Print Manuscript panel with Continue and Cancel asks for them before the usual Print panel. Norn remembers your choice on this Mac.
What you get:
- a title page, with your contact details at the top left, a rounded word count at the top right ("about 92,000 words"), and the title and "by" line halfway down;
- the text in 12-point type, double-spaced, with one-inch margins and indented paragraphs;
- a header on every page after the title page: your surname, the title in capitals, and the page number;
- each chapter starting on a new page, a third of the way down; a Chapter Heading inside your prose does the same;
#between scenes and in place of each Scene Break, and END at the end;- footnotes and endnotes as the table above says: in the PDF and on paper, footnotes at the foot of the page and endnotes on a Notes page after END; in the RTF and DOCX, real notes. Note words never count toward the title page's word count.
Front matter prints in your book but isn’t counted in “about N words”. Exporting a single document that isn’t counted leaves the word count off its title page.
The contact details come from Contact Details in your Writer's Kit: your legal name, address, phone, email and one more line on the title page, and your byline (your pen name) on the "by" line. Leave the byline empty and your legal name is used. While the Kit holds no contact details, the "by" line uses the author set on the book and the contact block is left empty.
With Smart Typography on, straight quotes and dashes in older text are curled on the way out; your book itself isn't changed.
Pages drops the page header when it opens the RTF file; the PDF always keeps it. If the file will pass through Pages, send the PDF.
The bulk ZIP
File ▸ Export…, The whole book, then Markdown files (ZIP) (or RTF files (ZIP)) writes one archive of your book's core content:
characters/     one document per character
                (+ an images folder beside each in Markdown)
plots/          one document per plot
outlines/       the outline, as one document named after it
manuscript/     one numbered document per item in Contents, in reading order
Manuscript.md   the whole manuscript, in one file
Glossary.md     your Lexicon, if you have one
Markdown exports put a character's images in a sidecar folder next to the file. RTF embeds them in the document itself.
Every scene renders the same way whether it came out of a plot or the outline — the same block of POV, cast, location, beat, threads, tags and links — so the two stay consistent.
One thing to know: the bulk archive covers characters, plots, the outline, the manuscript and the glossary. Creatures, locations, facets and standalone notes aren't in it. Export those individually from their own editors, or send the whole world across in a Scrivener project or a .nornpack.
Choosing what a character sheet includes
Character sections carry an include/exclude switch in their header: Personality, Death Stake, Hooks, Manual Traits, Inherited Traits, Relationships, Four Selves, Character Arcs, Contradictions and Notes. Flip one off and it disappears from that character's Markdown and RTF exports and from their sheet. Identity and World always travel — they're the spine of a character sheet.
Traits you've suppressed never export, whatever the switches say.
Settings ▸ Exports sets the defaults for characters you create from then on. Existing characters keep their own choices.
Scrivener
File ▸ Export…, The whole book, then Scrivener Project builds a real Scrivener 3 project you can double-click.
- The Draft folder (named "Manuscript") mirrors Contents: the outline, acts, chapters, scenes with their prose, plus any manuscript-only front matter. Anything left out of the book is left out here too, and so is Not in Manuscript. Scene summaries become Scrivener synopses.
- The Research folder holds up to five groups — Characters, Places, World, Bestiary and Notes — one document per entity, each with a formatted sheet and a short synopsis card. Empty groups are left out.
- Tokens resolve to plain names, using the alias you actually wrote. Nothing exports as a
norn://link. - Formatting carries over as real rich text: headings, lists, blockquotes, bold, italic, strikethrough and code.
- Images ride along for characters, creatures and facets.
Two things to expect. Scrivener supplies its own default compile and interface settings on first open, since Norn doesn't invent settings it can't get right. And this is a one-way trip — Norn exports to Scrivener and never reads a project back.
Custom-category facets and Lexicon words don't currently make the journey, and archived entries stay behind.
OPML
The outline and brainstorms both export as OPML, the interchange format outliners and mind-mappers understand. For the outline, it's Export Outline as OPML (Scrivener)… in the export menu above Contents, beside Export Outline as Markdown… and Export Outline as RTF…. All three cover the outline only, not Not in Manuscript.
In the Markdown and RTF outline exports, an unplotted scene's line reads In Unplotted Scenes where a scene on a lane says which plot and lane it's from.
For the outline, everything Norn knows about each scene — summary, POV, cast, location, beat, threads, tags, links, the plot and lane it came from, your Outline Note and the scene's own notes — is packed into the note field, separated by dividers. That's because Scrivener's OPML importer reads exactly two things: the title and the note. On import Scrivener lets you send that note to the Synopsis, the document body or the Notes pane, so you choose where it lands.
Sharing your world between books
Writing a series? World ▸ Export World Data… writes a .nornpack file holding your facets, custom categories, creatures, locations, notes and lexicon words. Characters are never included, and neither are images.
In the other book, World ▸ Import World Data… shows you a preview before anything is written. Every entry gets its own choice:
- Skip
- Import as new
- Merge into existing — offered only when a name collides
Merging a facet appends the incoming tendency traits and tags to the one you already have without overwriting its descriptions. Merging a creature, location, note or word replaces its fields, except that a merged word keeps its link to a Culture or Ethnicity if it has one.
Imports are one-shot copies with fresh identities. There's no live link back to the source, so nothing dangles when books move around. So each entry starts on the choice that avoids repeats. With the same name and the same contents as an entry in your book, it starts on Skip. With a new name, or the same name and different contents, it starts on Import as new, so a changed entry arrives beside yours and yours stays as it was. You can change any of these before you import. Custom categories have no choice: one that exactly matches a category in your book is skipped, and anything else imports as new.
Only what the file carries is compared, so images don't count. A word in different capitals is the same word, but a word linked to a different Culture or Ethnicity counts as changed. When a word comes in and its Culture or Ethnicity is skipped, the word links to your matching entry. Archived facets, creatures, notes and words count as a match too, so an entry that matches one of those stays out.
16. Keeping your work safe
Norn's design has one rule above all others: never lose a writer's data. Here's how that plays out in practice.
Saving
You don't have to think about it. Norn saves continuously as you work, and after every save it flushes the change fully to disk rather than leaving it in a journal file.
⌘S still works, because reflexes are reflexes. It saves and flushes every open book. Closing a window and quitting the app both do a final save first.
The save status chip in the toolbar shows "Saving…" while a change is being written, then "Saved 2m ago." It's a tripwire as much as a status: if autosave ever stopped working, that chip would stop updating and you'd notice before closing the window. It counts only your own saves: changes from your other devices that Norn saves quietly don't move it.
Snapshots
Beyond ordinary saving, Norn keeps a rolling set of complete copies of each book.
- A baseline snapshot is taken the moment you open a book, before you touch anything.
- Periodic snapshots follow every 60 seconds — but only if something actually changed.
- By default Norn keeps 20 periodic snapshots and 3 baselines per book, in separate buckets so a long session can never crowd out the clean copy from before it started.
- Snapshots of a deleted book are cleaned up after 30 days.
All four numbers, plus where snapshots live, are yours to change in Settings ▸ Snapshots. If you want offsite copies of your recovery net, point the snapshot folder at iCloud Drive or Dropbox — snapshots are inert files, so syncing them is safe in a way that syncing a live database isn't.
Every snapshot holds the whole book, every version of every scene included, so a book with many versions makes bigger snapshots. The first time a book's snapshots together pass 250 MB, Norn says so once, above the book: This book's snapshots now take up more than 250 MB. You can keep fewer in Settings ▸ Snapshots. Open Settings goes there; OK puts it away. Either way it isn't shown for that book again.
File ▸ Restore from Snapshot… lists every snapshot for the current book with its date, relative age and size. Two things you can do from there:
- Open a snapshot. It arrives in your library as a separate book, so you can compare the two side by side and copy across whatever you need. Your current book is never overwritten.
- Show in Finder, if you'd rather handle the files yourself (Show in Files on an iPad).
Your Writer's Kit has snapshots of its own, kept on this Mac and separate from any book's. See chapter 21.
Backups vs Snapshots
Snapshots are Norn's own safety net. Norn makes them by itself as you work, keeps them in its own folder (or the one you chose in Settings ▸ Snapshots), and opens them only through File ▸ Restore from Snapshot…. They are complete copies of a book in Norn's own format, made every minute while it changes, and kept for a short while.
Backups are files you keep. In Settings ▸ Backups you set up to three backups, each with its own format, timing, folder and books. Norn writes each backup as an ordinary export file — the same files File ▸ Export… makes — into a Norn Backups folder inside the folder you chose, one folder per book. They're yours to keep, open in other apps, or sync with any cloud service. Norn never opens a backup again: to bring one back, open a Book Archive (.norn) with Import Book… (it arrives as a separate book), or a Word or RTF file with Import Manuscript….
Only a Book Archive keeps everything and opens in Norn. The other formats keep the manuscript only, for reading or sending. A backup is made from a copy of the book, never the book itself, so it never changes your book, its sync, or its snapshots.
The integrity check
Each time you open a book, Norn checks that every row in its database is still connected to the book. If something has come loose, a sheet appears telling you exactly what and how many.
Three choices:
- Reattach to Book reconnects everything it can. This is the right answer almost every time.
- Discard permanently deletes the detached rows. Use it when a reattach couldn't help.
- Ignore for Now changes nothing and asks again next time.
A scene whose lane no longer exists has a gentler way out. When the list under What was detached includes such scenes, a Move to Unplotted Scenes button sits below it: it keeps the scenes, their drafts and their places in the manuscript, and puts them among your Unplotted Scenes, where Place on Lane… gives them a lane again.
The sheet can also have a section headed Scene in the Manuscript Twice, listing scenes that sit at two places in the outline. Its Remove the Later Entry button takes out the second row of each; the scenes and their drafts stay.
Most writers will never see this sheet. It exists so that if something ever does go wrong, you find out immediately instead of discovering a missing chapter three months later.
Format versions
Norn's file format evolves as features land. This version of Norn makes books in format 1.26.0, which keeps a history of each scene's text (scene versions). Format 1.25.0 changed how Contents, the outline and drafts fit together: one outline per book, each draft belonging to its scene, and scenes that don't need a lane.
Books from Norn 0.9.7 to 0.9.10
These books are in format 1.25.0. Their Library row says Made before Scene Versions — open it to update. Open one and Norn asks first:
Update “The Glass Road” for Scene Versions? — This version of Norn keeps a history of each scene’s text. To open this book, Norn updates its format to 1.26. Your book’s text isn’t changed, and the original is kept inside the book’s folder. Once it’s updated, earlier versions of Norn can’t open it.
Update Book updates the book and opens it; Not Now leaves it closed and unchanged. Once a book is updated, Norn 0.9.10 can't open it, and a device still on 0.9.10 stops syncing it, so update Norn on all your devices together. A Book Archive (.norn) from 0.9.10 is updated as it's imported; the archive itself isn't changed.
Books made by an older Norn
This version of Norn doesn't open books made by Norn 0.9.6 or earlier (format 1.24.0 and older), and it doesn't convert them. Rather than reshape a book you've worked on into the new structure — guessing which outline to keep and where its drafts belong — it leaves the book exactly as it is.
In the Library, such a book's row says Made by an older Norn (format 1.24.0). Open it and Norn shows:
Made by an Older Norn — This version of Norn can't open “The Glass Road” for editing. Export its text to keep it, then start a new book. Its files stay as they are.
>
To export this book, open it in the previous version of Norn. TestFlight keeps it installable.
Close is the only button. Nothing is opened, nothing is written, no snapshot is taken. Norn never changes or deletes the old book's files; you can still move it to the Trash yourself, as with any book.
To bring its text across:
- Open the book in the previous version of Norn. If you've already updated, the TestFlight app keeps earlier builds of Norn you can install again.
- Export it there: File ▸ Export…, The whole manuscript, RTF is the easiest to bring back in (Norn 0.9.6 and earlier have no Word export). Manuscript Format and Markdown are there too, and The whole book writes Markdown or RTF files (ZIP) of your characters, plots and outlines for reference.
- In this version, choose Import Manuscript… in the Library (see Bringing in a manuscript) and pick the
.rtf. It arrives as a new book, its chapters as manuscript documents.
What doesn't come across: plot boards, outlines, character sheets, the world and notes. They stay in the old book's files, which the previous version can still open, so nothing is lost by waiting — export before or after you update.
A .norn archive of an old book, or a Library moved in from another account, comes in as a book made by an older Norn too, with the same row and the same message.
With Sync with iCloud on, this version never syncs a book made by an older Norn. Its line says Made by an older Norn — not syncing on this device: no pause, no badge, nothing to answer. A book that's in iCloud but was only ever synced by an older Norn shows the same line and isn't brought onto this device; open it in the previous version to export it. Devices still on the previous version keep syncing those books with each other as before. A book made by this version, in turn, isn't brought onto a device still running 0.9: there, its line says update Norn on this Mac to keep syncing until that device updates.
If a book's files can't be read at all, or its database holds data but no book record, Norn shows Couldn't Open Book, opens nothing and changes nothing. Recover it from one of its snapshots: they're in the Snapshots folder (Settings ▸ Snapshots shows where), and Import Book… in the Library brings a snapshot back as a separate book.
A book saved by a newer version of Norn won't open at all. Norn tells you plainly and leaves it alone. Downgrading data is how books get quietly mangled, so the app refuses on principle. Update Norn and the book opens.
Undo
⌘Z works throughout the app, per book window. It's a session-scoped safety net rather than a permanent history — the confirmation dialogs on destructive actions say so where it matters.
Undoing a delete brings the item back as it was when the book last saved — which, with autosave, is seconds before you deleted it. If that delete had already been saved, the Undo also starts the window's undo history afresh: the item is back, and there is nothing further to undo or redo until you make another change.
A backup routine worth adopting
Belt and braces, five minutes once:
- Leave snapshots on, at the defaults or better.
- In Settings ▸ Backups, add a Book Archive (.norn) backup Every day, into a folder in iCloud Drive, Dropbox or on an external drive, so a full copy of every book is kept away from this device.
- If you like a readable copy too, add a second backup in Word (DOCX) or Manuscript Format (PDF) As I write or When I meet a goal.
- Let Time Machine do its thing. On an iPad or iPhone, keep iCloud Backup on, or back it up to your Mac.
Before a big change — a restructure, a new draft — choose File ▸ Back Up Now (on an iPad or iPhone, Back Up Now in the Library's "…" menu).
17. Settings
Norn ▸ Settings… (⌘,), seven tabs. Everything here is an app preference — none of it lives inside your books. The iCloud tab is the exception: its switch is kept with this Mac's copy of your Writer's Kit and books. On an iPad, Settings opens as a sheet — see Settings on the iPad.
General
- Appearance — System, Light or Dark, applied immediately.
- Confirm before deleting — "Multiple items only" (the default) or "Always."
- Show tips at launch — on by default: a Tip of the Day when Norn opens on this Mac or iPad, at most once a day. The tip itself has the same switch. (Not on an iPhone, where tips show only from the menu.)
- Reset Remembered Panel & Section State — forgets which sections you'd collapsed and where the inspector was, and where you are in the tips, and puts the editor's zoom back to 100 percent. It never touches your documents, and it leaves Show tips at launch as it is.
Editor
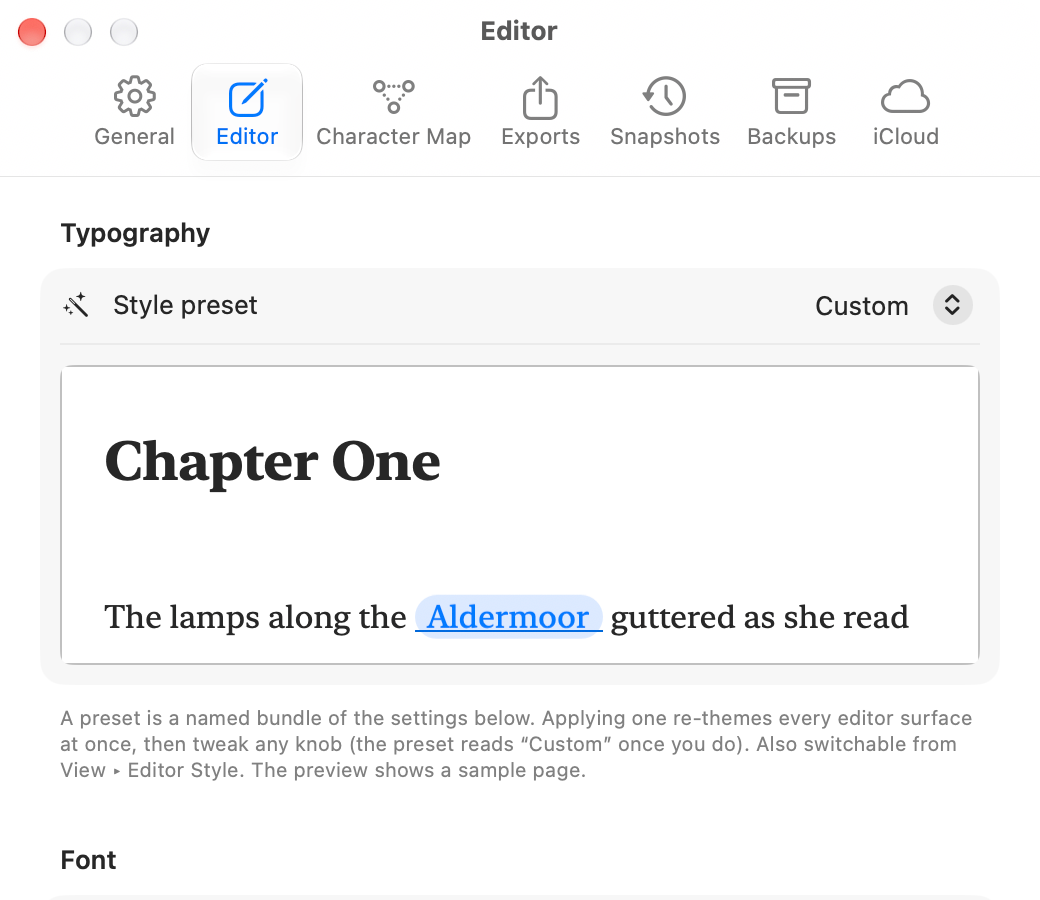
The full typography set described in chapter 10, plus:
- Focus Modes — keeping the line centred, focus dimming and how much stays bright (paragraph, sentence or line). These extend the distraction-free behaviours into the ordinary editor. All three are also reachable from every editor's header bar: two buttons, with the highlight popup appearing beside them while focus mode is on.
- Versions — Version limit per scene, 10 to 50 (20 to start): How many versions Revise makes for each scene before it asks you to delete one. Versions are never deleted for you.
- Checking — spelling as you type (on by default) and grammar (off). With Smart Typography on, Norn uses macOS's own smart quotes and dashes as you type; with it off, they stay off.
- Spelling that knows your book — the names Norn already holds (characters and their aliases, locations, every world category, creatures, and your Lexicon's Words) are never flagged as misspellings, with a straight or a curly apostrophe alike, and autocorrect leaves them as you typed them. Select a name in your prose, flagged or not, and right-click it for Add to Lexicon, Add to Characters… and Add to Locations…: at the top of the menu, or after Ignore Spelling on a flagged word. Each makes an entry in that list with the selected text as its name, less any punctuation at its ends, and you stay in the editor: nothing opens. Add to Lexicon leaves the text as it is. Add to Characters… and Add to Locations… also turn the selected name into a chip for the new entry (if the words you selected end in 's, Norn asks whether to add the name with or without it), then look for the name in the rest of the book's text — the current version of each scene in Contents, with the same case, as a whole word — and, if it's there, list each place it appears, with the words around it and the scene's title, every one ticked. Untick any you want left as they are ("May I come in?"), then choose Turn Them All Into Chips (or, with some unticked, Turn 3 Into Chips), or Only This One. A possessive such as "Anna's" becomes the chip followed by "'s"; a name joined to another word by a hyphen, as in "Anna-Lise", stays as it is; so does one whose formatting, comments or link change partway through the name, and the list says how many of those it left. Text that's already a chip stays as it is, and apart from what you selected, older versions, conflict copies, scenes in Not in Manuscript, documents, footnotes and notes are never changed. Each scene that gains a character's chip lists that character in its cast, and word counts don't change. As with any chip, Find no longer finds the name where it's a chip, and Markdown export writes it as a link unless Names as plain text, not links is on. In Notes and in a footnote's text, where chips can't go, the two items add the name and leave the text as it is. The name stops being flagged everywhere in the book, travels with the book to your other devices, and one ⌘Z takes it all back, chips included (the undo is named Add Word, Add Character or Add Location). If a scene has changed since — on another device, say — ⌘Z leaves it as it is and tells you which, and the chips in it go back to plain words. A list that already has the name doesn't offer its item, whatever the case and whether its apostrophes are straight or curly (for Characters, aliases count), and the same name may live in two lists. A selection names nothing, and offers none of these, if it crosses a line break, holds a chip or a note marker, has no letters, or comes to more than 80 characters. If the Lexicon holds the name as an archived Word, Add to Lexicon brings that Word back with its definition, and ⌘Z archives it again. A new Character starts with your Settings ▸ Exports default for new characters. Ignore Spelling holds in every editor of the book — every scene of a chapter view, Notes, the source editor — until you close it; Learn Spelling adds the word to your Mac's own dictionary, for every app.
- Autocorrect and text replacements follow your Mac's own settings (System Settings ▸ Keyboard ▸ Text Input): with Correct spelling automatically on, Norn corrects as you type, and your text replacements expand in the manuscript editor. The right-click Substitutions menu shows these settings and Smart Typography, but changes them only where they live — Smart Typography here, the rest in System Settings.
- Writing Tools — Apple's Writing Tools is turned off everywhere in Norn: in the manuscript editor, the notes editors, the Writer's Kit and every field, on the Mac, the iPad and the iPhone, so no rewrite can replace your prose, drop a token or change its fonts behind your back. To use it on a passage, copy the text into another app.
- Notes Editor & Other — Monospaced font for notes from elsewhere and Show preview by default for notes from elsewhere, both for the Markdown editor that Notes from elsewhere use (your own notes use the manuscript editor, and the font size above applies to both), and which key combination peeks at the Reference Inspector (⌥⌘ by default, or ⌘⌃, or off).
Character Map
Display defaults for new books — animation, settle speed, node size, node spacing, link thickness. Books that have customised their own map keep their settings.
Forces — center, repel, link and link distance — apply everywhere, live, in every book. There's a Restore Built-in Defaults button when you've tuned yourself into a corner.
Exports
Which sections new characters include in their exports by default.
Snapshots
Interval, how many periodic snapshots and baselines to keep, how long to keep snapshots of deleted books, and where snapshots are written. A book still on this Mac, in your Library or in the Trash, never loses its snapshots; a deleted book's are cleared once that time is up, checked once each time Norn opens. Every value has a floor, so you can't accidentally turn the safety net off. If your chosen folder becomes unreachable, Norn says so and quietly falls back to the default location rather than silently stopping.
Backups
Up to three backups, each a row with its switch, what it makes — Word (DOCX) · Every day · All books — its folder, and Last backup. A row whose backup has a problem says so in orange instead. Add Backup makes a new one and opens it; Edit… opens one again. Each backup has:
- Format — any export format but Scrivener Project. Manuscript Format has its own Paper and Font, Word (DOCX) Include comments, Markdown Names as plain text, not links, each kept with the backup and never changed by the Export sheet (or the other way round).
- When — On a schedule (Every Day, Week or Month), As I write (every 500, 1,000, 2,500 or 5,000 words added or cut in a book's manuscript), or When I meet a goal (daily, weekly or monthly goal met, or manuscript target reached; only books with goals). A new backup makes its first files straight away. A book that hasn't changed isn't backed up again. If Norn wasn't open when a backup was due, it runs the next time Norn opens. Norn waits until you have stopped changing a book for 30 seconds, so a backup never lands mid-sentence.
- Folder — Choose Folder…, and Show in Finder. Norn writes into a Norn Backups folder inside it, one folder per book, each file named with the book's title, the date and time, this device's name and a short code for the backup, for example The Door — 2026-11-06 1432 — MacBook Air 3f2a — c7a1.docx. Two backups can share a folder; neither touches the other's files.
- Books — All books, or Chosen books. Books in the Library's Trash aren't backed up.
- Keep — Backups kept per book, 1 to 100 (10 to start). When there are more, the oldest are moved to the Trash. Norn only removes files that backup made on this device, never files you renamed, another device's, or anything else in the folder.
- Status — any book the backup couldn't make, and why.
- Remove Backup — its files stay in the folder; Norn won't add to them or remove any.
Back Up Now, at the foot of the tab and in the File menu, runs every backup that's on, for all its books, now — even when nothing has changed — with Stop while it runs.
Each device keeps its own backups: set them up on each Mac, iPad or iPhone you write on. If a folder can't be reached (a drive unplugged, a share gone), that backup waits, and the Library shows one notice, with Backups Settings… and OK; the others carry on. The notice isn't shown again for the same problem after OK, and goes by itself after the backup's next success. Norn writes only into the folders you choose, and sends nothing anywhere; a cloud folder is uploaded by your own cloud service.
iCloud
Sync with iCloud keeps your Writer's Kit and every book in your iCloud account; each device holds its own copy. Beside the switch, Sync Now syncs the Kit and every book at once. Under the switch, a line reminds you to work on one device at a time. The Writer's Kit section says how the Kit stands, with Choose What to Keep… and Resume Sync… when it needs you. The Books section lists every book with its status, Resume Sync… for a paused one, and Open Book for one with choices waiting. A book made by an older Norn says Made by an older Norn — not syncing on this device (Books made by an older Norn). Its footnote says how images are stored. A book made while you weren't signed in to iCloud says On this Mac only, with Send to iCloud… (and Send All to iCloud… above the list for several). Libraries on This Mac…, under the Books list, appears only when another Apple Account has a Library on this Mac. Everything about it is in chapter 22. If this build of Norn can't use iCloud, the tab says so.
18. Keyboard shortcuts
These work on an iPad with a hardware keyboard too — see Keyboard, pointer and the menu bar.
Everywhere
| Shortcut | Action |
|---|---|
| ⌘N | New book |
| ⌘W | Close window |
| ⌘S | Save every open book |
| ⇧⌘E | Export… |
| ⌘P | Print the manuscript in Manuscript Format |
| ⌘, | Settings |
| ⌘Z / ⇧⌘Z | Undo / Redo |
| ⌥⌘T | Start, pause or resume the writing timer |
| ⌥⌘M | Toggle the Mini Rail (Navigator layout only) |
| ⌥⌘P | Show Pages / Show Editor (the manuscript as printed pages) |
| ⌘F | Find… (the editor's find bar; on a stitched surface, the stitch's) |
| ⌥⌘F | Find and Replace… |
| ⌘G / ⇧⌘G | Find Next / Find Previous |
| ⌘E | Use Selection for Find |
| ⌘J | Jump to Selection (on an iPad, on a stitched surface) |
| ⇧⌘F | Find in Manuscript… |
Navigation
| Shortcut | Section |
|---|---|
| ⌘1 | Overview |
| ⌘2 | Compendium |
| ⌘3 | Brainstorms |
| ⌘4 | Notes |
| ⌘5 | Characters |
| ⌘6 | Character Map |
| ⌘7 | Plots |
| ⌘8 | Unplotted Scenes (in Plots) |
| ⌘9 | Manuscript |
Writing
| Shortcut | Action | Where |
|---|---|---|
| ⌘B | Bold | Manuscript and Notes editors |
| ⌘I | Italic | Manuscript and Notes editors |
| ⌘U | Underline | Manuscript editor and My notes |
| ⇧⌘X | Strikethrough | Manuscript editor and My notes |
| ⌃⌘+ | Superscript | Manuscript editor and My notes |
| ⌃⌘− | Subscript | Manuscript editor and My notes |
| ⌘T | Show Fonts | Manuscript editor and My notes |
| ⌘+ / ⌘− | Bigger / Smaller (font size of the selection) | Manuscript editor and My notes |
| ⇧⌘. / ⇧⌘, / ⇧⌘0 | Zoom In / Zoom Out / Actual Size (on screen only; see Zooming the editor) | Every editor; in Pages view, the pages |
| ⌘K | Add Link… / Edit Link… | My notes, footnotes and endnotes |
| ⇧⌘K | Add Comment | Manuscript editor |
| ⌥⇧⌘V | Paste as plain text | Manuscript editor and My notes |
| ⌥⌘N | Insert Footnote | Manuscript editor |
| ⇧⌘P | Toggle preview | Notes from elsewhere |
{ or @ | Insert a token | Manuscript editor |
| Esc | Leave distraction-free mode | Manuscript editor |
Plots and Contents
| Shortcut | Action |
|---|---|
| ⌘F | Search scenes across every plot and Unplotted Scenes (Plots list) |
| ⇧-click / ⌘-click | Extend / toggle selection (board and Contents) |
| ⌥⌘[ | Move a row in Contents up (Move Up) |
| ⌥⌘] | Move a row in Contents down (Move Down) |
Brainstorms
| Shortcut | Action |
|---|---|
| Return | Add a child node |
| Tab | Add a sibling node |
| ⌘E | Edit the selected node |
| Delete | Delete the node and its descendants |
| Arrows | Move through the tree |
| ⇧ + arrows | Extend the selection |
| Home | Go to the root |
| Space | Collapse or expand |
| ⌥↑ / ⌥↓ | Reorder among siblings |
| ⌥← / ⌥→ | Promote / demote |
| 1–8 | Apply a colour |
| ⌘F | Find in this map |
| ⌘L | Switch layout |
| ⌘+ / ⌘− / ⌘0 | Zoom in / out / reset |
| ⇧⌘N | Notes panel |
| ? | Shortcut cheat sheet |
19. The menu bar, item by item
On an iPad the menu bar stays hidden until you call it up, and a few items differ — see Keyboard, pointer and the menu bar.
Norn — About Norn, Writer's Kit…, Settings… (⌘,), Services, Hide, Quit.
File
- New Book (⌘N)
- Duplicate Book…
- Import Manuscript… — a Word or RTF file as a new book; see Bringing in a manuscript
- Close (⌘W)
- Save (⌘S)
- Restore from Snapshot…
- Back Up Now — every backup that's on; see Backups
- Print… (⌘P) — the manuscript in Manuscript Format
- Export… (⇧⌘E) — the Export sheet
- Start / Pause / Resume Writing Timer (⌥⌘T)
- End Session
Edit — the standard macOS set: Undo, Redo, Cut, Copy, Paste, Paste and Keep Fonts, Select All, and Find ▸ Find… (⌘F), Find and Replace… (⌥⌘F), Find Next (⌘G), Find Previous (⇧⌘G), Use Selection for Find (⌘E), Jump to Selection (⌘J) and Find in Manuscript… (⇧⌘F) — see Find and replace across the manuscript and Finding in a stitched chapter, act or manuscript.
Book
- Navigate ▸ Overview (⌘1) · Compendium (⌘2) · Brainstorms (⌘3) · Notes (⌘4) · Characters (⌘5) · Character Map (⌘6) · Plots (⌘7) · Unplotted Scenes (⌘8) · Manuscript (⌘9)
- Beats ▸ Manage Beats… · Add Beat Sheet as Scenes… (with a plot open)
- Trait Library ▸ Manage Custom Traits…
- Curl Straight Quotes…
World
- Navigate ▸ Locations · Cultures · Ethnicities · Polities · Religions · Factions · Creatures · Lexicon · Custom Categories ▸ …
- Export World Data…
- Import World Data…
Format — for the editor you're typing in (see Styles and the Format menu)
- Bold · Italic · Underline · Strikethrough · Small Caps · Superscript (⌃⌘+) · Subscript (⌃⌘−)
- Add Link… (⌘K; Edit Link… with the caret in a link; not in the Manuscript) · Remove Link · Open Link
- Add Comment (⇧⌘K)
- Style ▸ Body · Chapter Heading · Heading 2 · Heading 3 · Block Quote · Bullet · Numbered · Scene Break
- Character Style ▸ None · Thought · Foreign Word · Title of a Work · Message · Add This Book's Styles to Writer's Kit (see Character styles)
- Alignment ▸ Left · Center · Right · Justified
- Font ▸ Show Fonts (⌘T) · Bigger (⌘+) · Smaller (⌘−) · the fonts used lately · Use Paragraph Font · Fonts in This Book… (see Fonts for a word or passage)
- Make Scene Break · Make Links from Markdown
- Insert Footnote (⌥⌘N) · Insert Endnote · Edit Footnote (Edit Endnote when the note beside the caret is one)
- Insert from File… — see Inserting a file
View — the standard sidebar items, plus Use Navigator Layout, Mini Rail (⌥⌘M), and Editor Style — the checkmarked list of typography presets (with Editor Settings… to open the full controls; see chapter 10). Then the Pages view's items and the zoom: Show Pages / Show Editor (⌥⌘P), Go to Page…, then Zoom In (⇧⌘.), Zoom Out (⇧⌘,) and Actual Size (⇧⌘0), which zoom the editor, or in Pages view the pages (see Zooming the editor), then Fit Width and Fit Page.
Window — standard macOS.
Help — Norn User's Guide, which opens this manual in its own window. It works offline; the guide ships inside the app. The window's Back button returns to where you were before you followed a link. Learn Norn makes a book of examples and opens this manual at Learn Norn; if a book called Learn Norn is already in your Library, Norn asks whether to open it or start a fresh copy. Tip of the Day… shows a tip, starting with the one you saw last (see Tip of the Day). Norn Support and Privacy Policy open those pages on Woven Strand's website in your browser. If either is greyed out, this build of Norn doesn't have the page's address yet.
Anything that needs a book to act on stays greyed out while only the Library window is open. Print… also greys out while Contents is empty, and in the Export sheet, Export… greys out when there's nothing to export.
20. Troubleshooting and FAQ
Where are my books? I can't find them in Finder. They live in an app-private folder inside ~/Library/Application Support/Norn/, deliberately outside cloud-sync territory. Open books from the Library window. For a file you can hold, use File ▸ Export… and Book Archive (.norn) while the book is open, or right-click it in the Library and choose Export Archive…
Can I put my books in iCloud Drive or Dropbox? Not the live library, and that's a protection rather than a limitation — sync clients copying a live database mid-write is a known way to corrupt one. Instead, sync your snapshots folder (Settings ▸ Snapshots) and export archives at milestones.
Can I open the same book on two devices? Yes, with Sync with iCloud on: every book is on every device signed in to your Apple Account. Work on one device at a time, though — see chapter 22. Without sync, export an archive, move it across, and import it on the other machine.
A book changed while I had it open. Another device changed it, and Norn took the changes in by itself — nothing to press. Your place, your cursor and the page stay where they were. If you could have undone something, the bar says Undo was cleared. See When your other devices change a book you have open.
I have a copy of a scene I didn't write. The scene was changed on two devices before they synced, and Norn kept both. The other device's text is listed under Conflict Copies in the scene's version menu, for example First Draft from MacBook, Oct 16 — 1,204 words. Open it from there to read it and copy what you want into the newest version; then Delete Conflict Copy…, or Detach as a Document to keep it as a document of its own.
I renamed a character. Do I have to fix my prose? No. Every token chip in the manuscript updates itself. Same for locations, facets, creatures and lexicon words.
I deleted a character who's mentioned in three chapters. What happened to those mentions? They turned back into ordinary text using the name as written. Your sentences are intact; only the link is gone.
I removed a scene from the manuscript and its prose vanished from Contents. It didn't vanish. The scene and its draft are in Not in Manuscript, at the bottom of Contents. Right-click it and choose Restore to Manuscript, or drag it back. Only "Delete Document…" removes prose, and it warns you first.
Where did the Outlines section go? Into Contents. A book has one outline now, and Contents is it — see chapter 9. ⌘8 opens Unplotted Scenes in Plots instead.
A scene's row in Contents moved by itself. It was made on a plot board with Insert into Manuscript in Timeline Order on, so it follows its card: you moved the card. Move the row where you want it in Contents and it stays there — see Following the board.
Why does my word count sit at zero after a full day's work? Only the current version of each scene in the manuscript counts. Worldbuilding, notes, plots and brainstorms don't move the number. It's a drafting metric, not a productivity score.
My streak says 4 but the Goals section says something different. They measure different things. The streak in Writing Stats counts any day you added words. The streak in Writing Goals only counts days you hit your daily target, and only appears once that target exists.
Two facets gave my character the same trait twice. Only if the polarities differ. Identical traits merge into one entry listing both sources; the same name with opposing polarity stays as two, because that contradiction is usually the interesting part.
A typed asterisk isn't making my text italic. Right — the manuscript editor is true WYSIWYG, so Markdown syntax stays literal. Use ⌘I, the toolbar or the Format menu. For a Markdown file, use File ▸ Export… and Markdown.
My *** lines aren't scene breaks. Norn left them as you typed them when it upgraded the book. Select them and choose Make Scene Break (in the style menu or the Format menu) — see Scene breaks.
A Library row says "Made by an older Norn (format 1.24.0)." The book was made by Norn 0.9.6 or earlier, and this version can't open it. Its files are kept as they are. Export its text from the previous version of Norn, then bring it in with Import Manuscript… — see Books made by an older Norn.
The Character Map looks different every time I open it. Positions aren't saved; the layout is recomputed from your current relationships. Your groups, colours and settings are saved.
A book won't open — Norn says it's a newer format. It was saved by a later version of Norn. Update the app. Norn deliberately refuses to downgrade a book rather than risk mangling it.
A book says "Couldn't Open Book." Its files couldn't be read, or its database has lost its book record. Norn has changed nothing. Find the book's snapshots in the Snapshots folder (Settings ▸ Snapshots shows where) and bring the newest good one back with Import Book… in the Library.
I got a "Data Integrity" warning. Choose Reattach to Book. That reconnects rows that came loose from the book without deleting anything. For scenes whose lane is gone, Move to Unplotted Scenes keeps them. Discard is the last resort, and a snapshot is your safety net either way.
How do I undo a big mistake? ⌘Z first. If you've gone too far to undo, File ▸ Restore from Snapshot… and open a snapshot from before the damage. It arrives as a separate book, so you can copy across what you need without risking the current one.
Norn User's Guide, version 1. Written for Norn on macOS 26.4 and iPadOS 26.4 and later.
21. The Writer's Kit
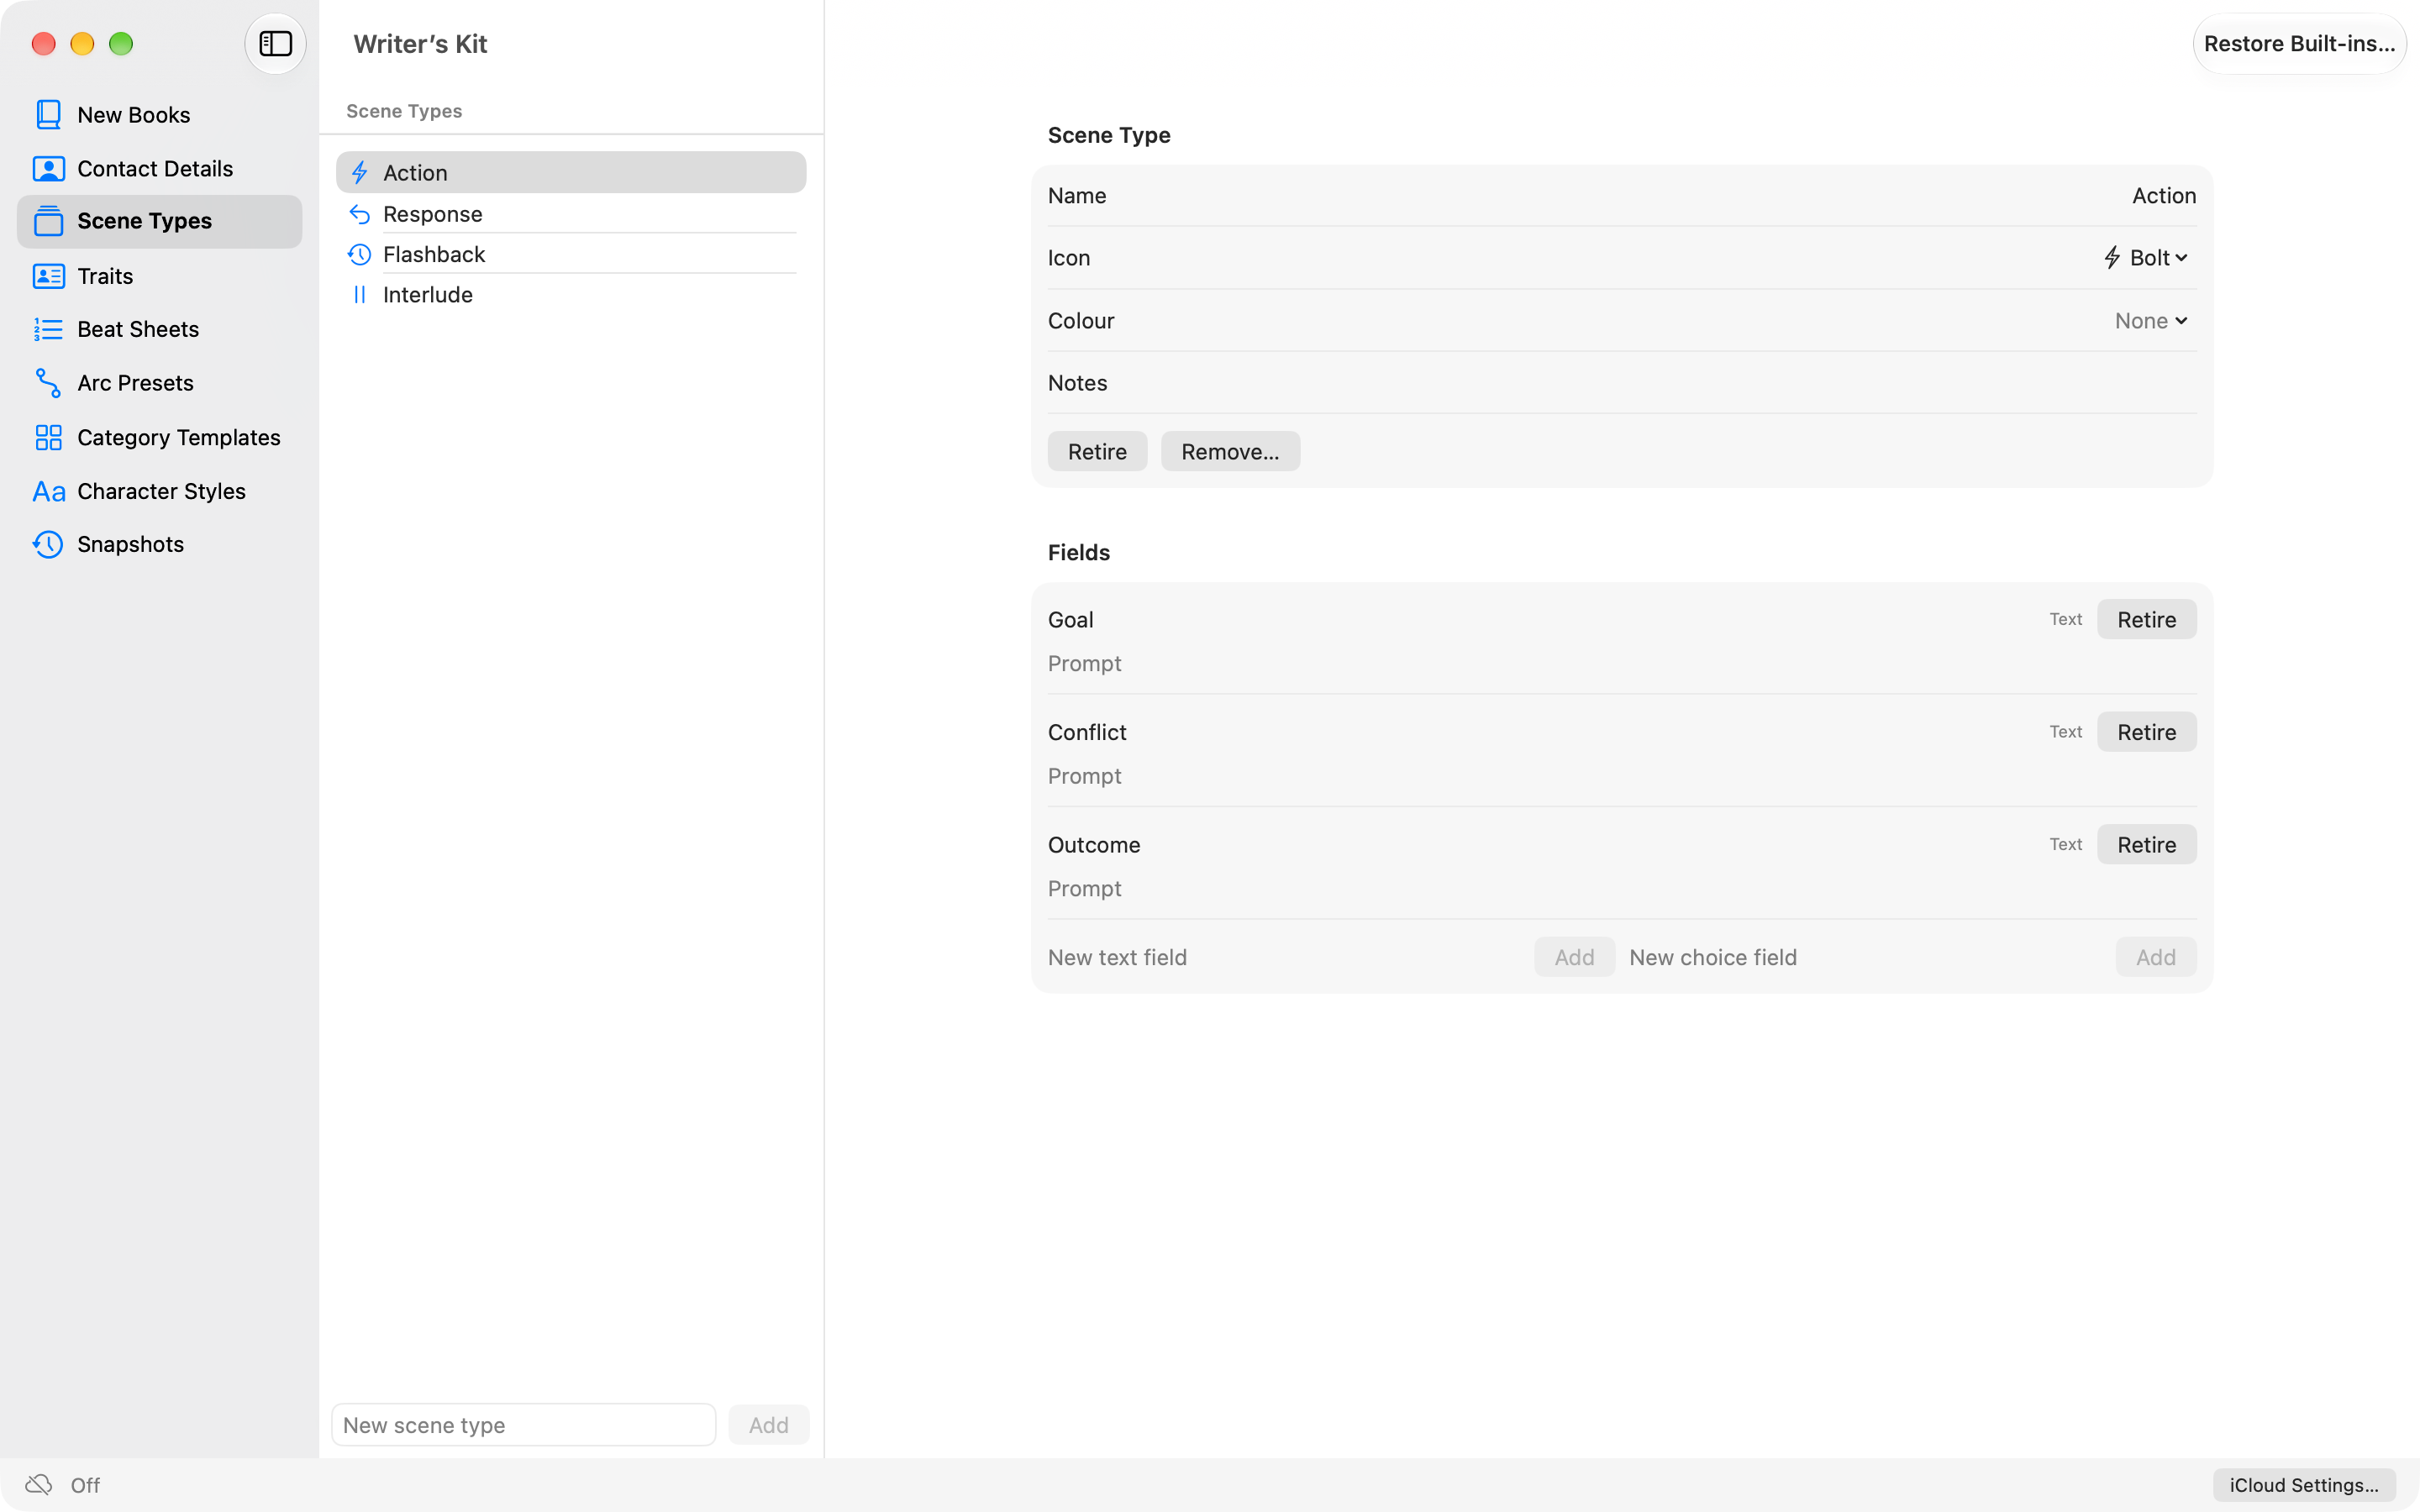
Your books are separate. Your habits aren't. The Writer's Kit is where the things you bring to every book live: the kinds of scene you think in, your trait vocabulary, your beat sheets, your arc presets, the categories you always end up building. Open it with Norn ▸ Writer's Kit…, or the Writer's Kit button (the briefcase) in the Library's toolbar. It has one window, and it works with no book open.
One rule runs through all of it: a book takes copies. A trait picked from the Kit, a beat sheet dropped into a book, a category made from a template — each becomes the book's own the moment it lands. Nothing in a book points back at the Kit, so editing the Kit never changes a book you've already written, and neither does restoring it. Scene types are the one thing a book reads live, and even there the book stores every name it needs.
The panes
| Pane | What it holds |
|---|---|
| New Books | What a new book starts with: your name as author, one beat sheet, any category templates. Under the beat sheet, Create plot with these beats makes New Book also add a plot, "Main Plot", with one lane, "Main", and one scene per beat on it, just as Add Beat Sheet as Scenes… would lay them out. It's off until you tick it, and greyed out while no beat sheet is chosen or the one chosen has no beats. Import Manuscript never makes the plot |
| Contact Details | Your name, address and other details for a Manuscript Format title page |
| Scene Types | Each type, its icon and colour, and its fields. A field is text or a choice; a choice field has options |
| Traits | Your master list of traits, with polarity and an optional description |
| Beat Sheets | Named, ordered lists of beats, each with an optional colour |
| Arc Presets | Named sets of arc components, each with the hint it shows |
| Category Templates | A category's name and switches, plus starter item names |
| Character Styles | Your character styles: each one's name, look and tint, and the order of the menus |
| Snapshots | The Kit's own snapshots, and Restore… |
A Needs Attention pane appears only if something is out of place — a field whose type is missing, say. Nothing is removed on its own; it is listed for you to deal with.
Editing
Type in a field and the change is saved when you leave the field. Quit mid-word and it's saved then. If what you typed can't be saved — a name another entry already has — the entry keeps its old name and the Kit window offers your text back next time, with Edit Again and Discard. If the entry itself is gone by the time you leave the field — removed by iCloud sync, say — your text is kept at the top of the window straight away, with Copy (to paste it somewhere else) in place of Edit Again, and Discard. A name typed into a New … field and not yet added is kept the same way: close the window or quit, and it's back in that field next time, still waiting for Add. If Norn refuses a name there, it stays in the field so you can change it.
Names must be unique among the active entries they sit beside: scene types among scene types, a type's fields among its fields, traits among traits of the same polarity. The comparison is exact, capitals and all. A beat sheet may repeat a beat's name.
Undo works on renames, other text, colours, retiring and reordering. Adding, removing and deleting can't be undone, which is why deleting always asks first here, whatever your "Confirm before deleting" setting says.
Contact Details
The Contact Details pane holds what goes on the title page of a Manuscript Format export: Legal name, Byline (the pen name you publish under), Address (as many lines as you need), Phone, Email and Other (one more line, such as a membership). Every field is optional; an empty one prints nothing. They're saved like any Kit text, when you leave the field, and Undo works on them.
There's one set of contact details for you, not one per book, and with sync on it's the same on every device. Type a phone number on one device and an address on another, and both end up in the one set; if two devices change the same field before they sync, Norn asks which to keep, as it does for any Kit entry. In iCloud they're end-to-end encrypted like the rest of the Kit.
Character styles in the Kit
The Character Styles pane holds your set of character styles — Format ▸ Character Style ▸ Edit Character Styles… (or the same item in the Character menu) opens it. A book stores only which style a word has; how the style looks comes from here, so changing a style changes it in every book, on every device that has your Kit, without changing a single word.
For each style:
- Its name, as the menus show it. Rename a built-in if you like; your words keep their style.
- Look — Italic, Bold, Underline and Small Caps, in any combination. Turn Italic off and the style's words are plain; an editor who wants thoughts upright is one click away. Manuscript Format, RTF, Scrivener and Markdown exports all follow the look.
- Tint While Writing — a colour for the style's words in the editor only, so a thought and a foreign word can be told apart at a glance. No Tint is the default. A tint is never exported or printed.
- Notes for yourself — a line of your own, such as who a style is for.
- Retire takes a style out of the menus. Words that already use it keep it and keep its look. Return to Use puts it back.
Add Style, at the foot of the pane, makes a style of your own — type its name and click it. It starts out italic, at the end of the list, and works everywhere the built-ins do. Remove takes one of your own styles away for good from the pane and the menus, after asking; words that already use it keep it, with its name and look. The four built-ins can be retired but not removed. If two devices each add a style of the same name before they sync, you'll have two, and both are marked so you can rename or retire one.
Drag a style up or down to change the menus' order (on an iPad or iPhone, use its Move Up and Move Down). Each change can be undone with Edit ▸ Undo, as anywhere in the Kit. While your Kit can't be used — before it's upgraded, say — the four built-in styles still work, with their usual names and italics.
Retiring, removing and deleting
Scene types, fields, options and traits can be retired. A retired entry is offered nowhere new, but everything that already uses it keeps working and keeps its name. Reinstate brings it back.
A scene type can also be removed from the list. It isn't deleted — scenes that use it still need it — and Put Back returns it. Fields and options are never deleted at all, for the same reason: something you wrote may be filed under them.
Traits, beat sheets, arc presets and templates can be deleted, because books hold their own copies.
Restore Built-ins…
The button in the Kit window's toolbar lists every built-in scene type, trait, beat sheet and arc preset that is missing, removed or retired — each with a tick box, all unticked. It adds or brings back only what you tick. It never renames, reorders or recolours anything, and never touches what you added. If you've changed a built-in beat sheet's beats, by renaming, adding, removing or reordering them, it offers the shipped version as a new sheet and leaves yours alone. A sheet you've only recoloured isn't offered one. A beat sheet or arc preset comes back in its alphabetical place among the built-ins, and a trait in its place among them (by polarity, then A–Z); anything else goes last. What it reinstates can be undone with Edit ▸ Undo, all in one step; what it adds or puts back can't, as elsewhere in the Kit.
Snapshots and Restore…
The Kit is snapshotted as you change it: once before the first change of a session, again within a minute of any change, and when you close the Kit window or quit. Snapshots are kept on this Mac, in Norn's own snapshot folder, whatever folder you've chosen for book snapshots.
Restore… in the Snapshots pane replaces the Kit with a snapshot. Before it does, it says exactly what will happen:
- Traits, beat sheets, arc presets, category templates and New Books settings are replaced by the snapshot's.
- Scene types, fields and options the current Kit has and the snapshot lacks are kept, retired — so no scene loses its type.
- The Kit being replaced is moved to a Set-Aside folder and saved as a snapshot too. Nothing is deleted, and no book is changed.
If sync is on, it pauses after the restore until you choose whether the restored Kit should replace your Kit in iCloud and on your other devices.
A Writer's Kit brought in from another Apple Account's Library by Libraries on This Mac… is listed as From another library, with its date; Restore… makes it your Kit.
The Snapshots pane also lists Kept from Earlier Kits — the last snapshots of any Kit that was replaced, which Norn never removes on its own — and Set-Aside Kits, with Show in Finder (Show in Files on an iPad). Delete a kept snapshot there if you're sure you're done with it; it goes to the Trash. On an iPad it's deleted for good, and Norn says so before you choose.
Syncing with iCloud
The switch that syncs your Kit — and your books — with iCloud is in Settings ▸ iCloud (see chapter 22). The foot of the Kit window shows the same status line, with Choose What to Keep… and Resume Sync… when sync needs you, and iCloud Settings… to open that tab.
If something is wrong with the Kit
Your books don't depend on the Kit to open. If the Kit can't be read, has gone missing, or was made by a version of Norn this one can't use, the Library window shows a line saying so with a Decide… button, and books carry on: scene types show from the names stored in each book, trait pickers show the book's own list, and new books start with Norn's built-in traits.
Decide… offers what fits: Restore from a Snapshot or Set-Aside Kit…, Start a New Kit, or — for a Kit made by an older version this one can't upgrade — Leave It. Starting a new Kit never throws the old one away: it moves to Set-Aside and its snapshots are kept. Not Now closes the sheet and changes nothing; the question returns next launch.
Upgrading the Kit
Norn 0.9.8 starts your Writer's Kit fresh: the first time it opens, your Kit, on every device and in iCloud, is replaced by Norn's current defaults, contact details included.
A new version of Norn sometimes needs room in the Kit for something new: Norn 0.9.2 added Contact Details, and a later version added Character Styles. A Kit made by an earlier version then needs upgrading once. The first time the new version opens, the Library says Writer's Kit was made by an earlier version of Norn (1.1.0) and needs to be upgraded (1.0.0 for a Kit from 0.9.1 or earlier). Decide… explains, with two buttons:
- Upgrade converts the Kit. A snapshot of it as it was is kept first (listed under Kept from Earlier Kits), and if the upgrade fails, the Kit is left as it was.
- Not Now leaves the Kit untouched and unavailable until Norn is next opened, when it asks again. Your books open as usual meanwhile, and the four built-in character styles still work.
Once upgraded, an earlier Norn can't use the Kit. On this Mac, an earlier Norn says the Kit is unavailable because a newer version of Norn made it, and leaves it alone. On your other devices, an earlier Norn keeps working with its own copy, but with sync on its Kit sync pauses with update Norn on this Mac to keep syncing. Update Norn on all your devices.
When a book uses scene types your Kit doesn't have
This can happen briefly when a book arrives from another device before your Writer's Kit has, and after you start a new Kit. The book still reads correctly. Its window shows one line:
This book uses scene types that aren't in your Writer's Kit.
Add to Writer's Kit rebuilds them — from the definitions that arrived with the book, then from the book's snapshots, and failing both, from what the scenes themselves store. That last source knows names, kinds and the options that were actually chosen, but not colours, icons, hints or options nobody picked, and the summary tells you which entries were rebuilt that way. Do it sooner rather than later: old snapshots rotate out. What's added is offered for new scenes in every book; retire any you don't want. Nothing already in your Kit is renamed, reordered or removed.
Not for This Book hides the line for this book. If the book later turns out to need something else, the line comes back.
22. Syncing with iCloud
With Sync with iCloud on, your Writer's Kit and every book in your Library are kept in your iCloud account, and every device signed in to that account has them. They're yours, not a device's: each device holds its own copy, and sync keeps the copies the same.
The one switch
The switch is in Settings ▸ iCloud, and it covers everything: the Writer's Kit and every book. There's no per-book switch.
- On the first device, turn it on. Every book starts syncing by itself, and so does every new book after it — created, duplicated, imported, or opened from a snapshot.
- On another device signed in to the same Apple Account, you don't need to do anything. When Norn sees that your Kit or your books are already in iCloud, it turns sync on by itself and tells you: "Sync with iCloud is on for your Apple Account, so it's on here too." Your Kit and books arrive, and books already on that device are sent.
- Turning it off on a device stops the Kit and every book there. That device stays off — it won't turn itself on again — until you turn it back on, and then it carries on from where it stopped.
What syncs
- Your Writer's Kit — scene types, traits, beat sheets, arc presets, templates.
- Every book, whole: characters, the world and its images, plots and Unplotted Scenes, the outline, the manuscript, notes, brainstorms.
- Images — portraits and every other image.
- Your writing log. Writing Stats — words per day, streaks, active days, timer sessions — show one combined history on every device. Words that arrive from another device never count as written here, and a running writing timer only counts what you type.
What doesn't sync: your Settings, and snapshots, which stay on the device that took them.
Before a book first syncs
Before a book is sent for the first time, Norn takes a "before sync" snapshot of it, and keeps it until you delete it — it's never rotated away. If that snapshot can't be taken, nothing of the book is sent, and Norn tries again. A book arriving on a second device gets one too, as it arrived.
Books made by an older Norn don't sync from this version. They show Made by an older Norn — not syncing on this device, and nothing else happens to them — see Books made by an older Norn.
While a book is first being sent its line reads Sending to iCloud — 40%. You can go on working in it. On the other device it shows as In iCloud — arriving until it's built and checked against what came from iCloud; only then does it appear in the Library.
Work on one device at a time
Sync is built for writing on one device, then the other. Try not to edit the same book, above all the same scene, on two devices before they've synced. If you do, nothing is lost: Norn keeps both versions and asks you. But you'll have choices to make.
Norn sends your changes a few seconds after you stop typing, when you close a book, when Norn goes to the background and when you quit. It asks iCloud for changes every minute, when the Library or a book window comes forward, and before a book opens. On an iPad, see Sync and pushes.
When your other devices change a book you have open
An open book takes changes from your other devices in by itself — there's no button to press and nothing rebuilds. A change shows up within about a minute of the other device saving it: a renamed note in its list, a new paragraph in the chapter you're reading, a deleted scene gone from Contents.
- What you're typing is never changed under your fingers. Norn waits until you've paused typing for a couple of seconds. If you're in the middle of composing text (Japanese input, dictation), that document waits until you commit it; everything else comes in. The same goes for a brainstorm card you're typing in. If both devices changed the same text, both are kept (see Conflict copies).
- You stay where you are. Your pane and item, your cursor and selection, and the page on screen stay put; if the text above your cursor changed, the cursor stays beside the same words. A running writing timer keeps running, and words that arrived aren't counted as yours.
- While a sheet is open, or while you're dragging, changes wait until you're done.
- If what you were looking at was deleted on the other device, Norn opens what it was in and says so in the bar.
- Undo. Changes from another device never go on your undo list, and once they've come in, that book's undo history starts afresh. If you could have undone something, the bar says once: Changes from your other devices arrived, so Undo was cleared.
- If changes have waited more than a minute — you've left the cursor composing in a scene, say — the bar says what they're waiting for.
A closed book takes changes in by itself too, the moment they arrive.
Questions
If the same thing was changed on both devices before they synced — a character's name, a note's title — Norn won't pick for you. The bar says how many are waiting for you to choose, and Choose What to Keep… shows each one side by side, On this Mac and In iCloud. What you don't keep is replaced or deleted on all your devices. Until you choose, this Mac keeps its own version and doesn't send it.
You're only asked about things you can see in Norn. Details it keeps behind the scenes, such as the relationship map's layout or a picture's file type, are settled without asking: the version in iCloud is kept.
Settings ▸ iCloud shows the same count beside the book, with Open Book: the questions are always answered in the book's own window.
If you delete something here that's waiting on a question, it's deleted on this Mac, but it isn't deleted on your other devices until you choose. And if you keep something another device deleted, the links its deletion removed — threads, cast, scene links — come back with it.
Conflict copies
A scene's or a note's text is never a question. If both devices changed it, both are kept:
- A scene's prose: this Mac's text stays the scene's text, and the other device's becomes a conflict copy of it: read-only, listed under Conflict Copies in the scene's version menu, for example First Draft from MacBook, Oct 16 — 1,204 words. Renaming the scene doesn't change that label. Copy from it, detach it or delete it there (Versions).
- A note, or a document that isn't a scene: the other device's text is kept beside it, titled with where it came from — "Research (from MacBook, Oct 16)".
Both devices say so in the bar, with Show It to go straight there. Choosing in Choose What to Keep… with the book open takes effect as soon as you close the sheet.
Revising on two devices
Each version of a scene syncs on its own, and once a newer version arrives on a device, the older one is locked there too.
- If you revise on one device while you're still typing on the other, what you typed stays in the version you typed it into. On the other device that version locks as soon as the new one arrives, and its editor turns read-only with its banner. Nothing is moved or lost, but the new version doesn't have those words. The device you revised on says so in the bar, for example: First Draft in “The Door” changed on iPad after it was revised. The new words are in First Draft, not Revision 1. Compare the two to see them. Show It opens First Draft. To find the words, open the newest version and choose First Draft in Compare with: — they show as removed text — then copy what you want into the newest version.
- If you revise the same scene on both devices before they sync, both new versions are kept. The same one, the one made first, becomes the version you edit on every device. The other is listed after it in the version menu, for example Revision 1 (2), with a lock: it opens read-only, like an old extra draft, and the scene's "+N" badge in Contents counts it. Both devices say so in the bar: The Door was revised on two devices. Both new versions are kept; Revision 1 is the one you're writing in. Show It opens the other one. Copy what you want from it, then delete it with Delete Version….
Pauses
Sometimes Norn has to stop syncing a book and ask. The book's line says Paused — and why, and Resume Sync… (in its window's bar or in Settings ▸ iCloud) explains what happened and what each choice will do before you choose. Other books carry on. Before any choice that replaces a book's contents, Norn takes a snapshot.
| The book's line says | What happened | What you can do |
|---|---|---|
| can't tell what was last synced | Norn's record of this book's syncing is missing or unreadable | Use the Copy in iCloud — this Mac's copy is kept first, as a separate book that doesn't sync |
| replaced by an older copy | The book's files were put back from Time Machine or copied by hand — on an iPad, from a backup of the iPad | Use the Copy in iCloud (this Mac's copy is kept as a separate book), or Use This Mac's Copy Everywhere…, which asks first |
| things missing on this Mac | Some things disappeared without being deleted in Norn | Bring Them Back, or Delete Them Everywhere |
| this book is missing from iCloud | The book was removed from iCloud — on your other device, or in iCloud settings. The copy here is safe | Send This Mac's Copy to iCloud, or Keep It on This Mac Only |
| waiting for your other device to finish | Your other device is sending the book again and hasn't finished | Check Again, Use This Mac's Copy Instead…, or Keep It on This Mac Only |
| update Norn on this Mac to keep syncing | Your other device upgraded the book with a newer Norn — or a newer Norn on this Mac did | Update Norn here. Until then the copy here opens and works as usual; a book a newer Norn upgraded on this Mac doesn't open until you update |
A few books don't sync at all, and say Not syncing — and why: a copy Norn put aside when you used the copy in iCloud, or a book you chose to keep on this Mac only (Resume Sync… sends it again). To sync a copy put aside, Duplicate it: the duplicate is a new book, and it syncs. A book made while you weren't signed in to iCloud says On this Mac only (see Accounts, below).
Trash and deleting across devices
- Move to Trash on one device moves the book to the Trash on your other devices too, and they say so. If the book is open on the other device, or has changes there that haven't been sent, it stays in that Library, and Settings ▸ iCloud there asks: Keep It or Move to Trash. Keep It brings it back on your other devices as well.
- Restore to Library on one device restores it on the others.
- Delete Permanently… and Empty Trash… delete the book on this Mac at once, after the usual confirmation. It's removed from iCloud after 30 days, so your other devices can move their copies to the Trash first: a device that syncs within the 30 days moves its copy to its own Trash. If it's restored to the Library on one of your other devices in that time, or kept there, it stays in iCloud and comes back to this Mac's Library too, with a note: "title was restored on your other device." If the book is in the Trash on your other devices, it stays there until you empty the Trash on that device — no device ever deletes its own copy because iCloud's went. After the 30 days the book is removed from iCloud; if this Mac is offline then, the removal waits until it's back online, and the Settings tab says so until it's done.
- If your other device doesn't sync until the 30 days are over, it never sees the book go to the Trash: it shows it as missing from iCloud, and you decide. Nothing is lost.
Accounts
Your Writer's Kit and books belong to your Apple Account. If someone signs in to iCloud on this Mac with a different Apple Account, Norn shows that account's Library instead: its own Kit and books, or, if it hasn't used Norn on this Mac before, an empty Library and the built-in Kit. Yours stays on this Mac, untouched, and comes back as you left it when you sign in again. Norn doesn't ask, and nothing on screen mentions the other account. If Norn is open when the account changes, your book windows and the Writer's Kit window close first, with your work saved, and the Library window says Opening your Library… for a moment.
Only a different Apple Account does this. Turning Sync with iCloud off never hides anything, and nor does being offline.
If you sign out of iCloud, Norn keeps your Library and works on this Mac only: Settings ▸ iCloud says Not signed in to iCloud. Your Writer's Kit and books stay on this Mac, and your changes sync when you sign in again. A book you make while signed out (with Sync with iCloud on) says On this Mac only until you send it: Send to iCloud… on its line in Settings ▸ iCloud, or Send All to iCloud… above the list. Norn asks first, and takes a snapshot of each book before it's sent. Turning Sync with iCloud off and on again sends these books too.
To bring a Library from another Apple Account into yours, use Libraries on This Mac… (below). Keeping each account's work apart isn't a lock, though: for privacy, give each person their own macOS user (see Sharing a Mac).
If the Library window says Norn couldn't open your Library. Nothing was lost. Quit Norn and open it again., do just that. When Norn changes Libraries it never deletes or merges anything. If it says A newer version of Norn started changing your Library, update Norn on this Mac to open it.
Libraries on This Mac
Settings ▸ iCloud ▸ Libraries on This Mac…, under the Books list, appears only when another Apple Account has a Library on this Mac. It lists each one. Yours comes first, as This Apple Account (signed in now). Each other is Another Apple Account, with when it was last used on this Mac, how many books it has, whether it has a Writer's Kit, and the titles of its books. Name… gives it a name that only you see, on this Mac.
Move into This Account… brings that Library into the Apple Account you're signed in to. Norn says what will happen before you choose Move:
- Its books are added to your Library as new books, beside your own, and sync with your account (when Sync with iCloud is on). Books made by an older Norn come over as they are and don't open here (Books made by an older Norn), and each book's snapshots come with it.
- Its Writer's Kit replaces yours only if yours is still Norn's built-in Kit and has never synced. Norn keeps a snapshot of your Kit first. Otherwise your Kit stays as it is, and the other Library's Kit is kept in your Kit's Snapshots pane as From another library, so you can restore it later.
- The original stays on this Mac, unchanged, and nothing in the other Apple Account's iCloud changes. If that account signs in again, it finds its Library as it was. From then on the two copies are separate books.
You have to be signed in to iCloud to move a Library. If your Kit will be replaced, close the Writer's Kit window first. A book that can't be moved is named and left in the other Library, unchanged; you can try again later, and books already moved aren't moved twice. If Norn is interrupted part-way, it finishes the move the next time you open it. Norn never removes another account's Library from this Mac.
Moving to a new Apple Account for good? Sign in to iCloud with the new account, open Norn, and move your Library in before you turn on Sync with iCloud. Your old Writer's Kit then replaces the new account's built-in one. Once sync is on, the new account's Kit has synced, so your old Kit is only kept as a snapshot (you can still restore it from the Kit's Snapshots pane). The same is true if the new account already uses Norn on another device: sync turns itself on, and that account's Kit stays.
Sharing a Mac
If two people write on one Mac, give each their own macOS user: System Settings ▸ Users & Groups, and add a Standard user for each. Norn then keeps each user's Library, Writer's Kit and settings apart automatically, and each can sync with their own Apple Account.
Two people on the same macOS user share one Library while they share an Apple Account. With different Apple Accounts, Norn shows each account only its own Library, but that isn't private: anyone using the macOS user can open Libraries on This Mac… and see the other Library's book titles, or move it into their own account.
Test builds and TestFlight builds
A test build of Norn and a TestFlight (or App Store) build each use their own iCloud — they don't share one, even under the same Apple Account. Norn remembers which one your Writer's Kit and books last synced with. If you open them with the other kind of build, sync pauses for the Kit and every book, and Settings ▸ iCloud says: This copy of Norn uses a different iCloud, so sync is paused. Nothing is sent or taken while it's paused, and your Kit and books on this Mac are safe.
To sync with this iCloud, choose Switch to This iCloud… and confirm. Norn first takes a snapshot of your Kit and of every book. It then sets aside what it knew of the other iCloud (on this Mac; nothing is deleted) and starts over. If your Kit and books aren't in this iCloud yet, each says it isn't in this iCloud yet, and Send This Mac's Copy to iCloud sends it. If another device has already sent them, this Mac joins them and asks you where they differ. Nothing in the other iCloud changes. Going back to the other kind of build later pauses again, and the same choice takes you back.
Privacy: what's encrypted
Everything you write — every name, field and line of prose — is stored in iCloud end-to-end encrypted: only your devices can read it. Images are not end-to-end encrypted. They're stored in your iCloud account with iCloud's standard protection — encrypted, but with keys Apple holds rather than only your devices. iCloud can also see how many entries of each kind a book has and when they changed, though not what they say. Settings ▸ iCloud repeats this under the Books list.
23. Norn on iPad
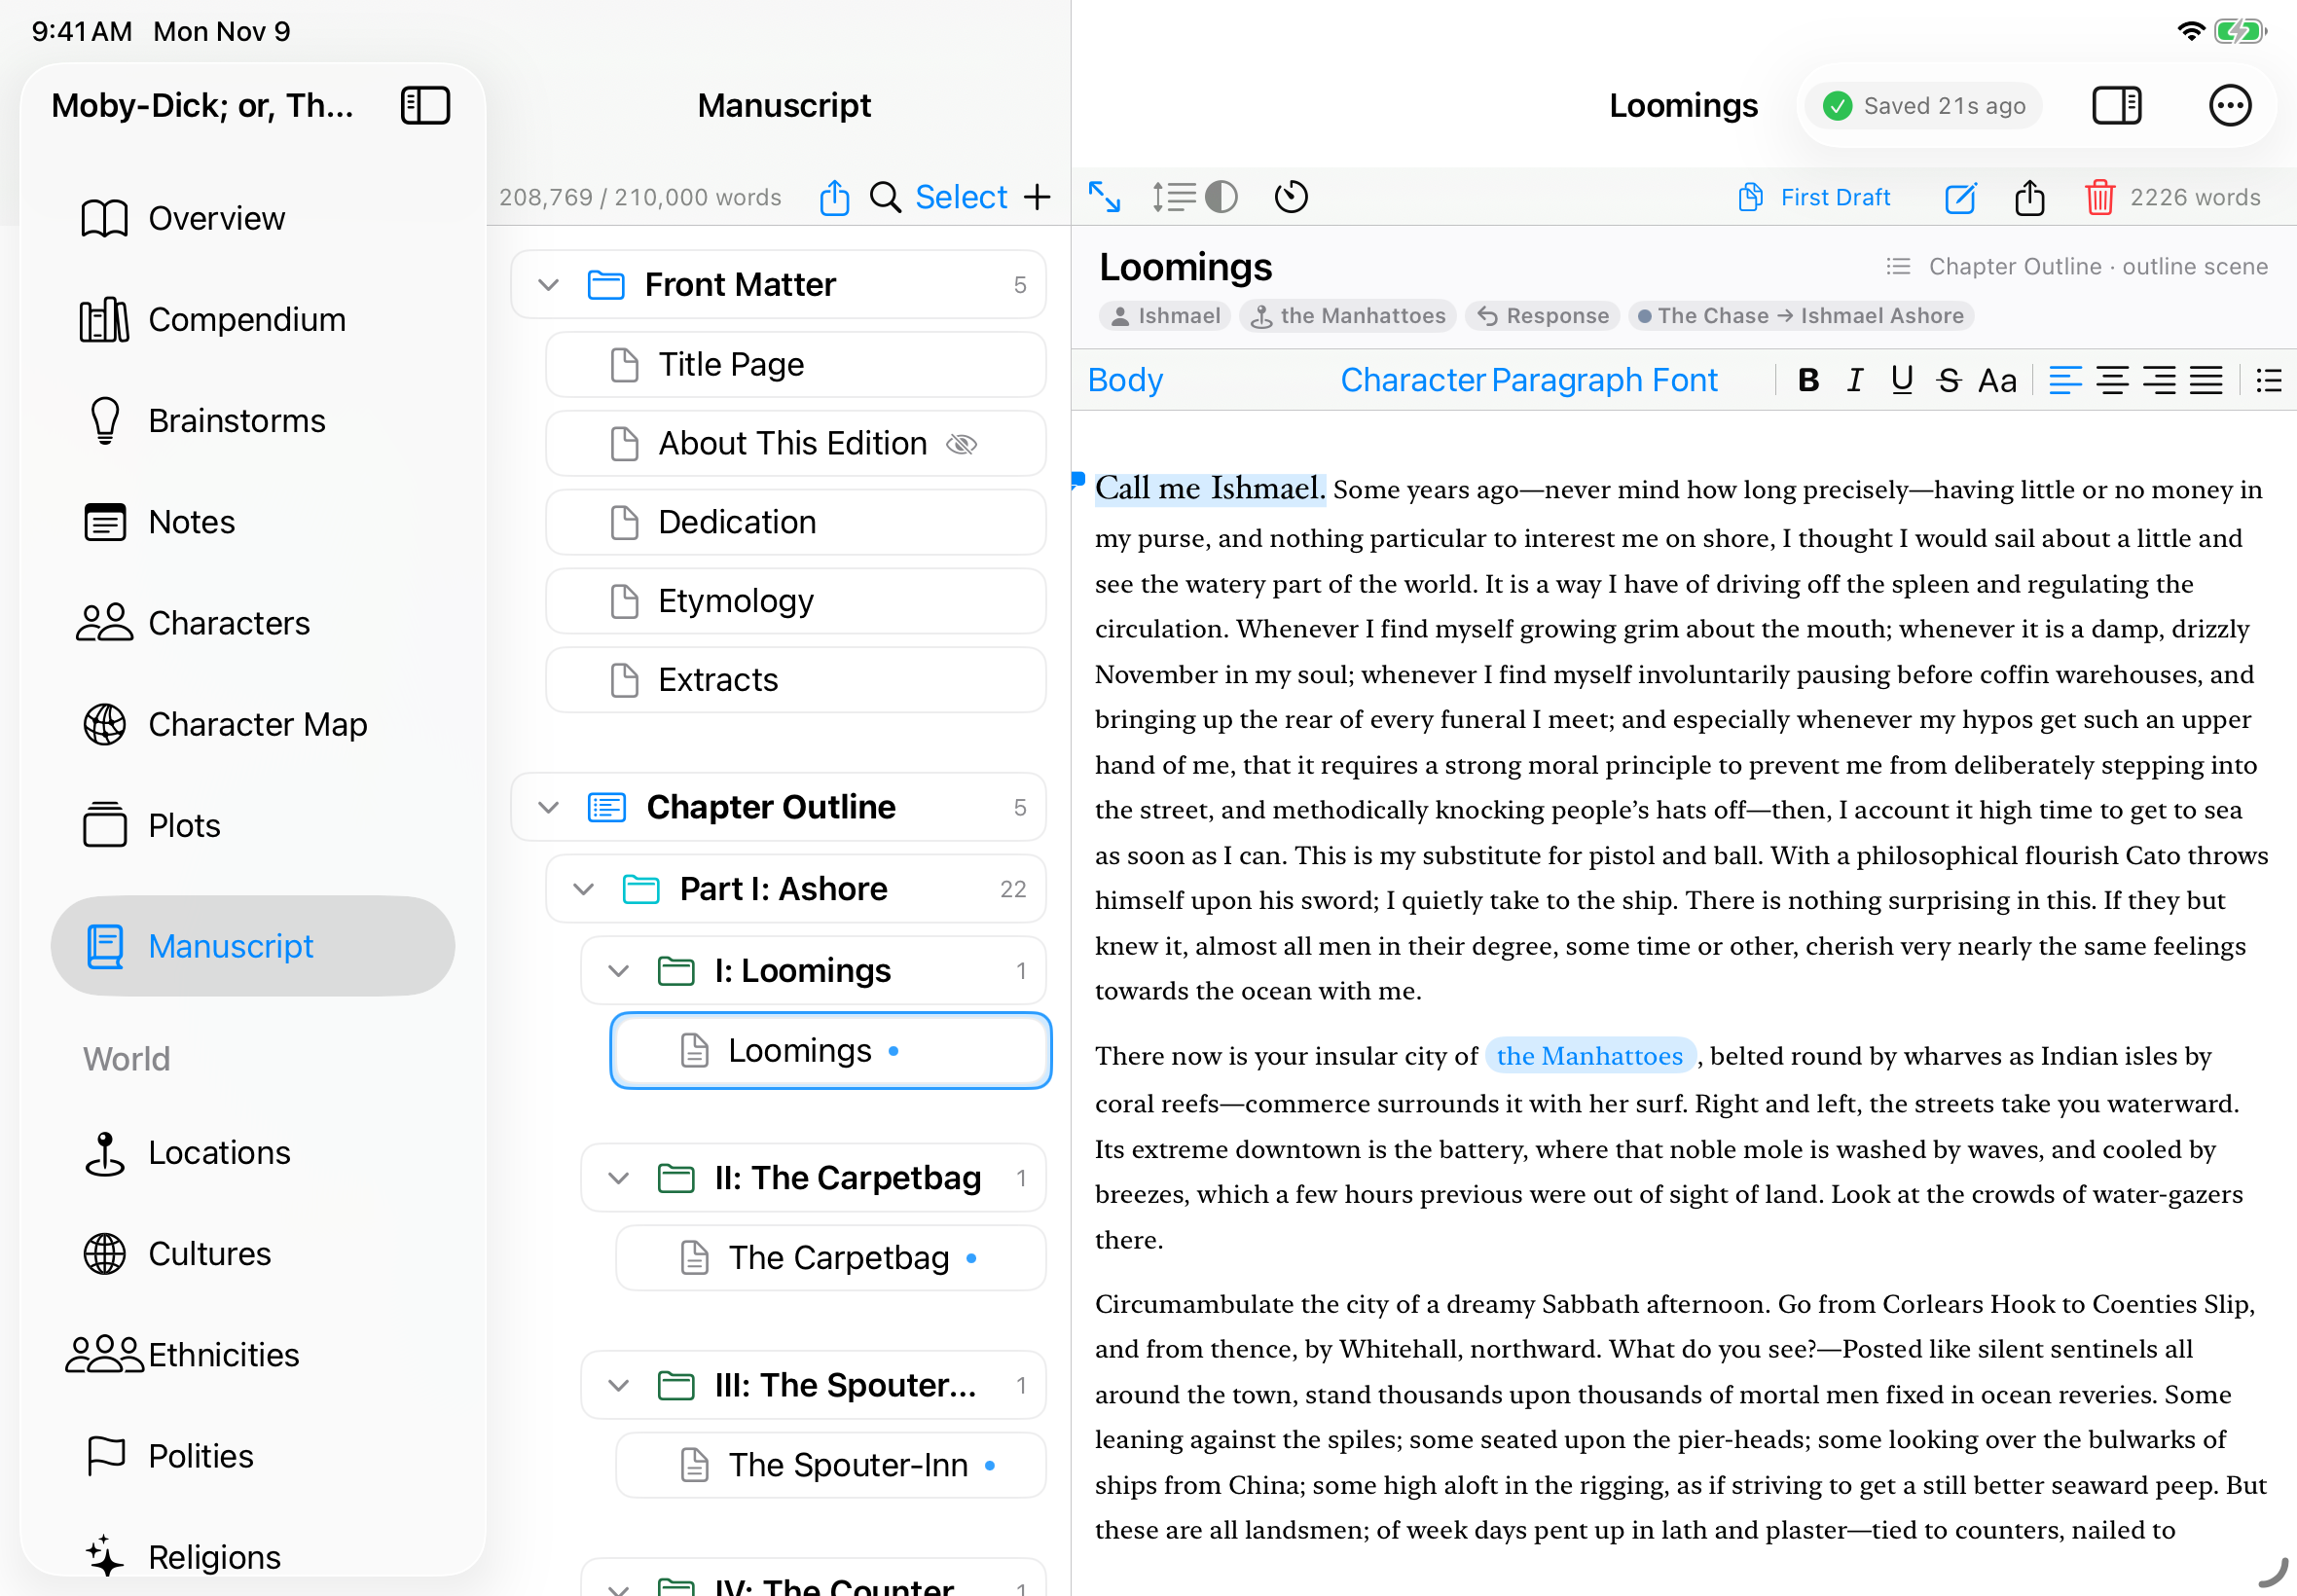
Norn runs on iPad too, with iPadOS 26.4 or later. It's the same Norn: the same Library, the same panes and editors, the same Writer's Kit, and with Sync with iCloud on, the same books as your other devices. Everything earlier in this guide holds on an iPad unless this chapter says otherwise. What changes is how you reach things: an iPad has no right-click, its menu bar hides, and it has no Quit and no Finder.
Windows and the Library
The Library is a window of its own, as on the Mac. Tap a book to open it in its own window; open it again and Norn brings that window forward. Three tabs sit at the top left: Writer's Kit, Books and Trash, in the same place whichever is showing. The Library opens on Books, and each Library window comes back on the tab you left it on. Along the top right of Books are New Book, Import Book… and a "…" menu with Import Manuscript… (see Bringing in a manuscript), Norn User's Guide, Learn Norn (see Learn Norn), Tip of the Day… (see Tip of the Day), Back Up Now and Settings….
The Writer's Kit tab is the whole Writer's Kit, in the Library window rather than a window of its own: its panes down the side (in a narrow window, a list you tap into), and Undo, Redo and Restore Built-ins… in the pane's bar. Leaving the tab closes the Kit, as closing its window does on the Mac: what you were typing is saved, or kept and offered back as Not saved if it couldn't be, and the Kit's Undo starts afresh. Anything the Writer's Kit has to tell you shows at the top of Books and Trash too.
With two Library windows open, the Writer's Kit shows in one of them at a time. The other's Writer's Kit tab offers Show That Window, or Show It Here, which closes the Kit in the first window (keeping what was typed) and opens it in this one.
Where Syncing with iCloud says the Writer's Kit window closes — a change of Apple Account, moving a Library in — on an iPad it's the Writer's Kit tab: when the account changes, the Library window stays and its Kit closes with your typing saved; to move a Library in that replaces your Kit, leave the Writer's Kit first by choosing Books.
Touch and hold a book for the menu a right-click gives on the Mac: Open, Rename…, Duplicate, Export Archive… and Move to Trash. In the Trash, touch and hold for Restore to Library and Delete Permanently….
A book's window has its own "…" menu, top right — see The "…" menus. Its last item, Close Book, saves the book, closes it at once and brings the Library forward. Use it when you're done with a book. This guide opens in one window of its own. Writer's Kit…, in a book's "…" menu or the menu bar, brings forward the Library window showing the Writer's Kit tab.
Touch instead of right-click, ⌘-click and dragging
Nothing in Norn needs a pointer or a keyboard. Where the Mac uses one, the iPad has a touch way:
| On the Mac | On the iPad |
|---|---|
| Right-click (or Control-click) | Touch and hold. The same menu appears |
| ⌘-click to add to a selection | Tap Select in the pane's header, then tap items to add or remove them. Tap Done when you're finished. In Contents, the plot board and Brainstorms |
| Drag to move something | Dragging works with a finger, and every drag that moves something also has Move to… in its touch-and-hold menu: pick where it goes from a list. On the plot board, Move to… asks for a Lane and a Column, then Move |
| Drag to reorder a list in the Writer's Kit | Each row's menu has Move Up and Move Down |
| Return and Tab in a Brainstorm | Touch and hold a node for Add Child and Add Sibling. Double-tap a node to edit its text; pinch to zoom. The ? button shows every touch and key |
| Edit ▸ Undo and Redo in the editor | Undo and Redo buttons on the editor's formatting bar |
| Control-click text for Character Style | Select the words, then choose Character Style in the menu that appears over them |
| Hover for a tooltip | Tooltips appear only with a trackpad or mouse |
| Clicking an image tile | Tap it, then choose Photo Library… or Choose File… |
| Edit ▸ Find ▸ Find in Manuscript… (⇧⌘F) | The magnifying glass in the header above Contents, or in the Notes list's |
| Edit ▸ Find ▸ Find… (⌘F) on a stitched chapter | The magnifying glass in the stitched editor's header opens its find bar. With a keyboard, ⌘F, ⌥⌘F, ⌘G, ⇧⌘G and ⌘E work as on the Mac; a single scene keeps the iPad's own find bar |
| Right-click ▸ Add Comment in the editor | Select the words and choose Add Comment from the menu above them |
| View ▸ Zoom In and Zoom Out in the editor | Pinch the text with two fingers. It moves to the nearest step when you let go |
Contents and Unplotted Scenes on the iPad
Contents works as on the Mac, by touch:
- Touch and hold a scene row for Insert Scene Before, Insert Scene After, Remove from Manuscript…, Reveal in Plot, Move to… and the rest of the Mac's right-click menu. Move to… and the Move Up / Down items are hand moves, so they stop a row following its card, as a drag does.
- The "…" menu above Contents, in its header, holds the same items for the row you've selected — tap a row, then "…" — so nothing needs a long press. For a row in Not in Manuscript it offers Restore to Manuscript, so you never need to drag one back. The + menu sits beside it, as on the Mac.
- Tap a chip in a scene's header for what it means, and any Ordering Issues, in a popover; there's no hover.
Unplotted Scenes is a grid, as on the Mac; double-tap a card to open it, and Place on Lane… opens as a sheet. The new-scene switch, Insert into Manuscript in Timeline Order (or Insert into Manuscript for a card), works the same. With a keyboard, ⌘8 opens Unplotted Scenes.
The "…" menus
The menu bar is hidden until you call it up (below), so every command a book needs is also in the book window's "…" menu:
- Duplicate Book… and Restore from Snapshot…
- Print… and Export…
- The writing timer's start, pause or resume, and End Session
- Show Pages (in a manuscript editor) and Use Navigator Layout
- Insert from File…, into the editor you're typing in
- Manage Beats…, Add Beat Sheet as Scenes… (while a plot is open), Manage Custom Traits… and Curl Straight Quotes…
- Add This Book's Styles to Writer's Kit, when the book uses character styles your Kit lacks
- Export World Data… and Import World Data…
- Settings… and Writer's Kit…
- Close Book
Keyboard, pointer and the menu bar
With a hardware keyboard, the shortcuts in chapter 18 work as they do on the Mac: ⌘1–⌘9 to move between sections, ⌘S, ⌘P, ⇧⌘E, ⌥⌘T, ⌘B and the rest. ⌘W closes the book in front (Close Book). Hold down ⌘ to see the list of shortcuts iPadOS offers. In an editor, ⇧⌘., ⇧⌘, and ⇧⌘0 zoom in, zoom out and go back to actual size (Zooming the editor), and they're in that list too. In the editor, Paste and Match Style is ⌥⇧⌘V, and ⌘K (not in the Manuscript), ⌃⌘+ and ⌃⌘− add a link, superscript and subscript. Touch and hold in a link for Open Link, Edit Link…, Copy Link and Remove Link (in the Manuscript, no Edit Link…); with words selected the menu offers Add Link… (not in the Manuscript), and Make Links from Markdown when they hold a Markdown link. Tapping a link puts the caret there.
The menu bar of chapter 19 is on the iPad too, but iPadOS keeps it hidden until you move the pointer — from a trackpad or mouse — to the top of the screen. It holds the Mac's menus, with these differences:
- Norn has About Norn, Settings… and Writer's Kit…. There's no Quit, Hide or Services.
- File ▸ Close Book (⌘W) closes the book in front; with the Library or the guide in front it reads Close.
- Back Up Now is in the Library's “…” menu, not the File menu.
- View has Zoom In, Zoom Out and Actual Size, as on the Mac. Pinching the text does the same without a keyboard.
- Edit and the rest are iPadOS's own.
Everything in the menu bar is also somewhere you can reach by touch: the "…" menus, a pane's header, or a touch-and-hold menu.
With a trackpad or mouse and a keyboard, ⇧-click and ⌘-click extend and change a selection as on the Mac.
Pages on the iPad
Pages works as on the Mac, from the Pages button in the formatting bar or "…" ▸ Show Pages (and ⌥⌘P with a keyboard). Scroll through the pages, pinch to zoom, and double-tap to fit the width again. Tap a page to select it, then tap Edit Here over it to go back to its words — a tap alone never leaves the pages, so scrolling can't throw you out. With a trackpad or mouse, a double-click is Edit Here, as on the Mac. Print… uses iPadOS's print panel, and Export PDF… asks where to save the PDF. When the pane is narrow, the bar shows 37 / 1,842 and puts Paper, Font, Go to Page…, Print… and Export PDF… in its own "…" menu.
Saving without Quit
An iPad has no Quit, and iPadOS may close an app in the background without warning. So Norn saves without being asked: every few seconds while you work, and whenever Norn leaves the screen — going home, switching apps, a call. Before Norn goes into the background it saves every open book completely, and keeps what you're typing in the Writer's Kit. The save status chip works as on the Mac.
You don't need to close books before leaving Norn. Close Book is there when you're done with one.
Files, exports and snapshots
Your Library lives in Norn's own storage on the iPad, out of sight, for the same reason it stays out of iCloud Drive on the Mac (Where books live). The Files app shows one folder of Norn's: On My iPad › Norn › Snapshots (On My iPhone on an iPhone), your book snapshots. You can copy a snapshot off the iPad from there. A snapshot deleted in Files is gone from this iPad; it was only a copy, and your book is untouched.
- Restore from Snapshot… lists a book's snapshots, with Open (it arrives as a separate book, as on the Mac) and Show in Files in place of Show in Finder.
- Export… offers the Mac's Export sheet. When the export is written, iPadOS asks where to put it: On My iPad, iCloud Drive or another place in Files. Export Archive… in the Library works the same way.
- Import Book… opens the Files picker; you can pick several books at once. Opening a
.nornfile from Files, Mail or AirDrop brings it into your Library the same way, with the usual question first. The file you opened is never changed. - Print… asks for paper and font, then shows iPadOS's print panel.
- Settings ▸ Snapshots has no folder to choose: snapshots are always kept on this iPad, in Norn's folder. The other snapshot settings are the Mac's.
- The Writer's Kit's snapshots are listed in its Snapshots pane as on the Mac, with Show in Files. Deleting a set-aside Kit or a kept snapshot there deletes it for good — an iPad has no Trash for Norn's files — and Norn says so before you choose Delete Permanently.
Backups on the iPad
Settings ▸ Backups works as on the Mac (Backups), with these differences:
- Choose Folder… opens the Files picker: On My iPad, iCloud Drive, or another app's place in Files, such as Dropbox. The folder shows the way Files shows it, for example On My iPad › Backups. There's no Show in Finder.
- Old backups past the number kept are deleted, since an iPad has no Trash for Norn's files.
- A scheduled backup runs when you next open Norn, not at the exact time. Going to the background, Norn finishes a backup already under way; anything else due waits until Norn is in front again.
- Back Up Now is in the Library's "…" menu, and at the foot of Settings ▸ Backups.
- The notice when a backup has stopped shows at the top of the Library, with Backups Settings… and OK.
- The file names carry iPad and a short code for this iPad, since iPadOS calls every iPad "iPad".
Settings on the iPad
Settings… (in either "…" menu, or ⌘,) opens as a sheet with the Mac's seven panes. Two things differ: there's no grammar checking to turn on, and with Smart Typography on, Norn uses iPadOS's own smart quotes and dashes. Settings ▸ Editor adds Use System Text Size, on unless you turn it off: the editor's text then follows Settings ▸ Display & Brightness ▸ Text Size (at the standard size nothing changes), the Size slider shows the size that gives and waits, and the larger accessibility sizes go past its 24 pt. Turn it off to set Norn's own size with the slider again. Zoom works on top of either: the text is the size this gives, times the zoom. At the largest accessibility sizes, zooming in may stop making the text bigger before 200 percent. Tap Font for the list of fonts. Spelling knows your book here too: while a book is open its names are known words — in every app on the device, since iPadOS and iOS keep them in the device's own dictionary — until you close the book (or, if Norn stopped with the book open, until Norn next starts); words you had taught the device yourself are never removed. Selecting a name in the manuscript, flagged or not, offers Add to… in the edit menu, holding Add to Lexicon, Add to Characters… and Add to Locations…, which make chips as they do on the Mac. The notes-from-elsewhere source editor follows Check spelling while typing; with it off, autocorrect is off there too. In Settings ▸ iCloud, the button for other Apple Accounts' Libraries is Libraries on This iPad….
Sync and pushes
Sync works as chapter 22 describes, with the same one switch in Settings ▸ iCloud. The words say "this iPad" where the Mac says "this Mac". Both say "your other devices" for the rest, since they may be Macs, iPads or iPhones.
- When something changes on another device, iCloud tells your iPad, and Norn wakes for a moment in the background to fetch it. It doesn't need your permission for this and shows no notification.
- When Norn comes to the front, it checks with iCloud straight away, and every minute while it's on screen. Under the switch, Last checked gives the time of the last check.
- Your changes are sent a few seconds after you stop typing, when you close a book, and as Norn goes into the background. iPadOS gives an app about half a minute there; anything not sent by then goes the next time you open Norn. Nothing is lost meanwhile.
- An open book takes changes in by itself while its window is in front (chapter 22). While Norn is in the background, or the app switcher or Control Center is over it, changes are fetched but wait; they come in as soon as the book is in front again, and your cursor and page stay where they were.
- A conflict copy from an iPad is labelled with the time as well as the date — First Draft from iPad, Oct 19, 3:40 PM — because iPadOS calls every iPad "iPad".
Low Power Mode
With Low Power Mode on, or with Background App Refresh turned off for Norn in iPadOS's Settings, iPadOS doesn't wake Norn in the background. Changes from your other devices then wait in iCloud until you open Norn, which checks as soon as it comes to the front. Nothing is lost; it's only later.
iCloud Backup and restoring an iPad
Everything Norn keeps on your iPad — your books, the Writer's Kit, snapshots and Norn's record of what has synced — is part of the iPad's backup, whether that's iCloud Backup or a backup to your Mac. So a book that's only on this iPad survives a lost or replaced iPad.
- Restoring onto a new iPad: Norn finds your books as they were and carries on syncing them.
- Restoring the same iPad from its backup: Norn won't let a restored copy replace newer work in iCloud. Books that sync may pause with replaced by an older copy (from a backup of this iPad). Resume Sync… offers Use the Copy in iCloud, which brings back the copy in iCloud and keeps the restored copy as a separate book. Nothing is sent until you choose, and the Writer's Kit catches up by itself.
An iCloud Backup counts against the same iCloud storage as Norn's sync. Snapshots are usually most of what Norn adds to it.
24. Norn on iPhone
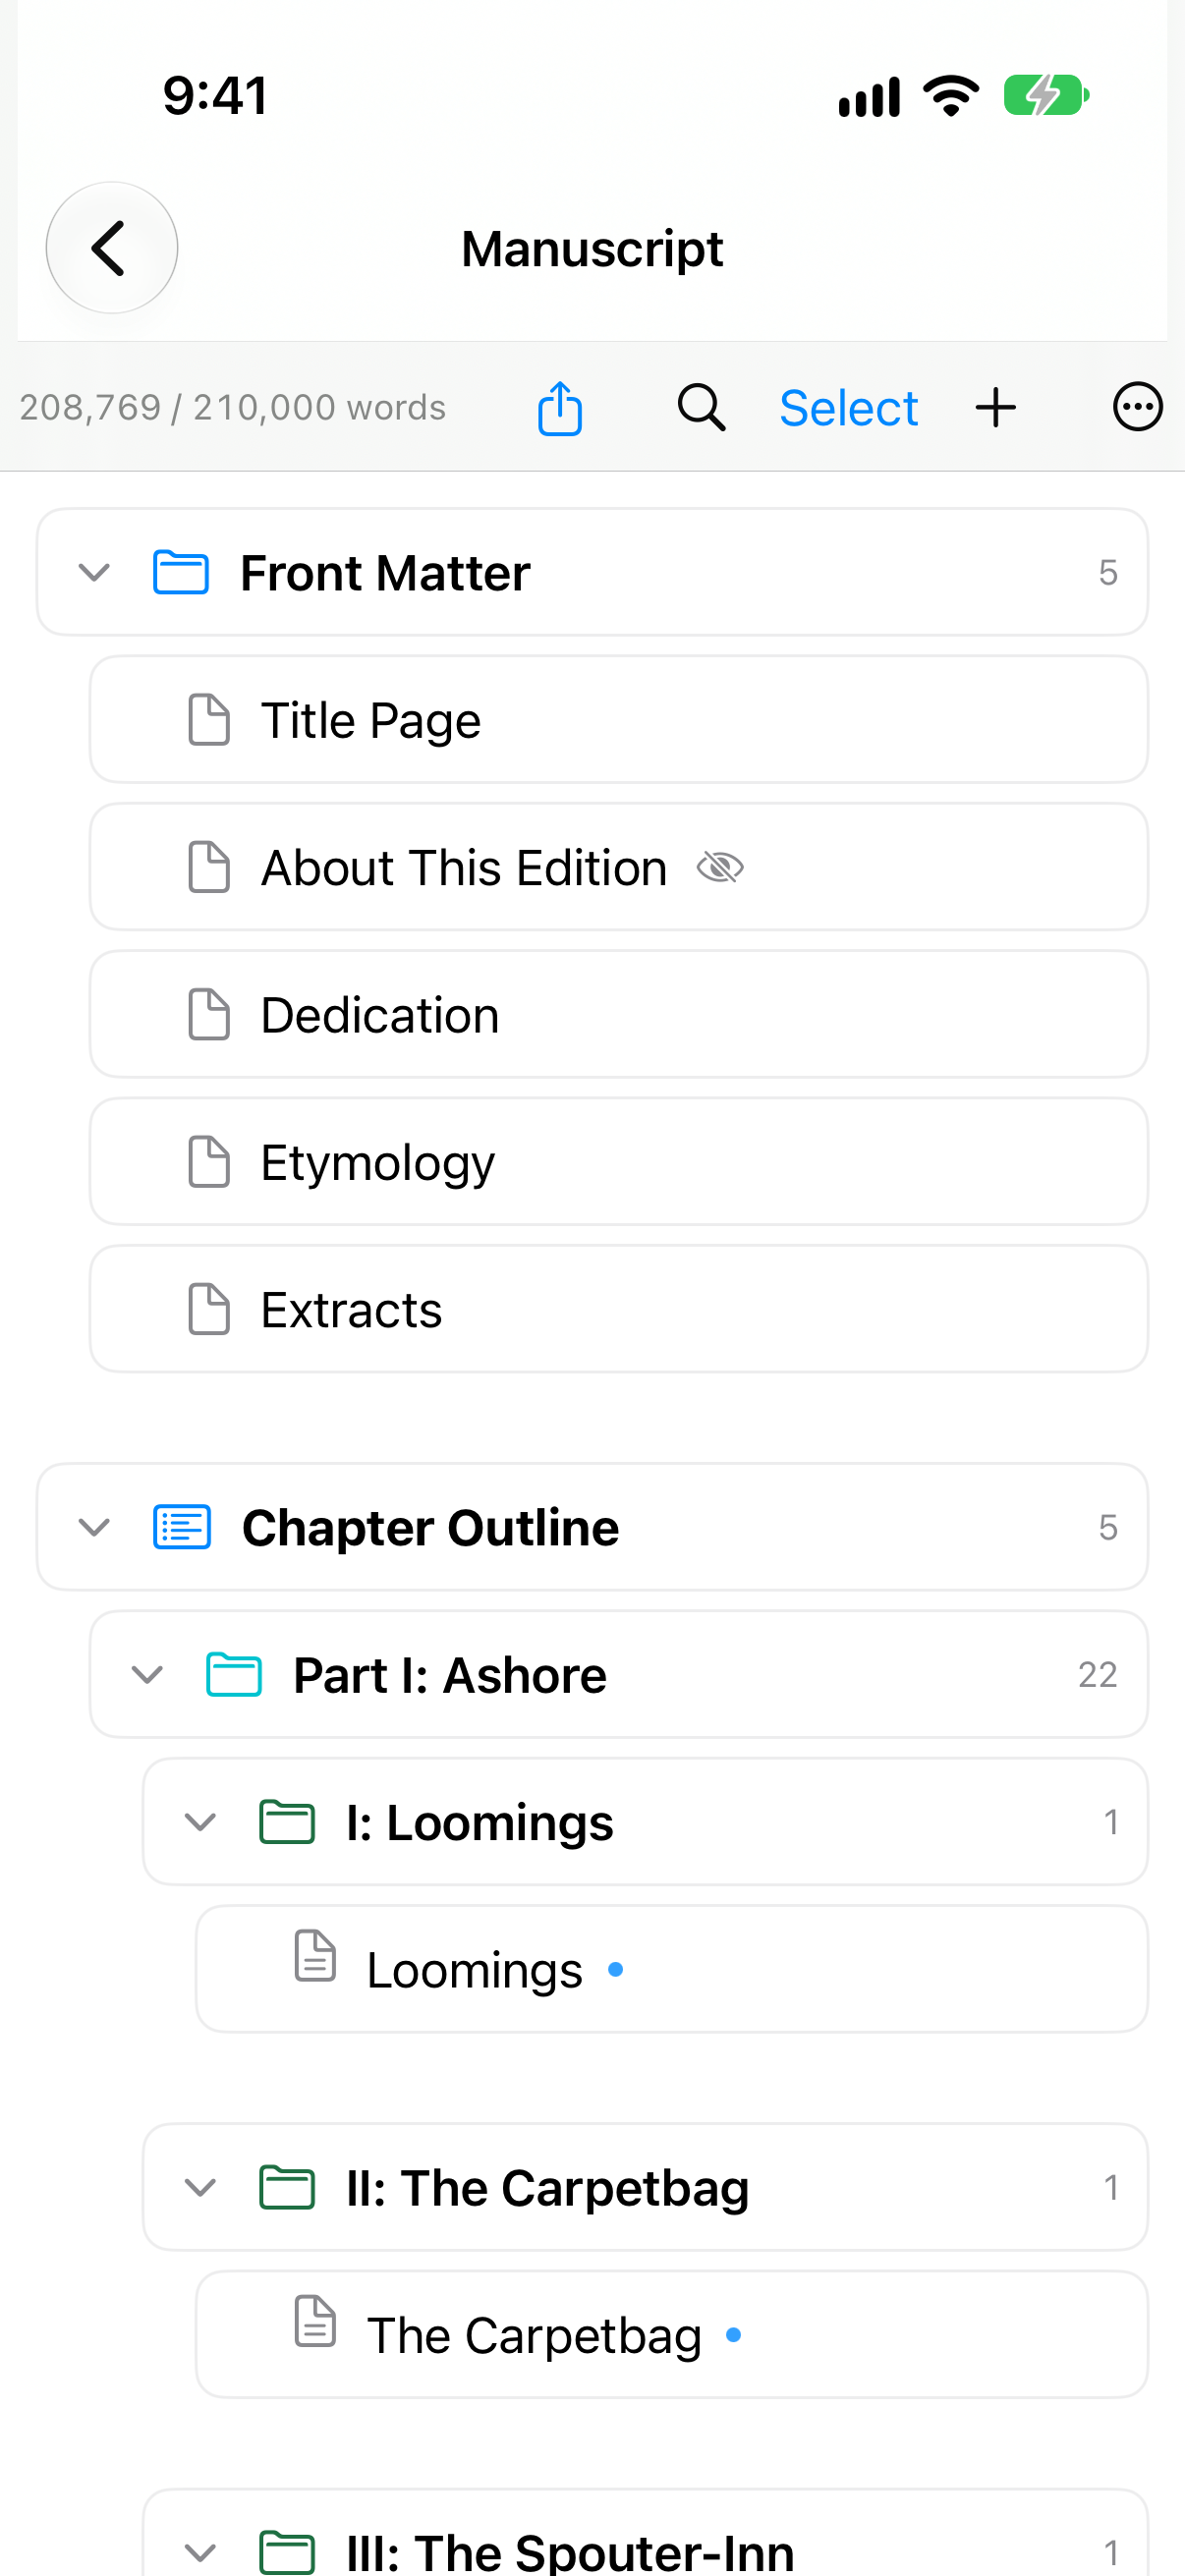
Norn runs on iPhone too, with iOS 26.4 or later. It's the same app as on the iPad, bought once for Mac, iPad and iPhone, and chapter 23 holds on an iPhone too: touch and hold for menus, Select and Move to…, saving without Quit, Files, sync. This chapter covers what the smaller screen changes.
One book at a time
An iPhone shows one thing at a time: the Library, one book, the Writer's Kit or this guide. Tap a book and it takes the Library's place. Opening another book closes the first, saved, as Close Book does. Each book keeps its place while Norn is running, so going back to it finds the same pane, item and writing timer.
The Library's tabs, Writer's Kit, Books and Trash, sit at the top left. Choosing Writer's Kit shows the Kit on its own screen. Along the top right of Books are New Book, Import Book… and the "…" menu.
Back and Library
A book opens on its list of sections. Tap one for its list, then an item; each step slides in over the last, and the back button (‹) at the top left returns. On a book's list of sections, the top left says Library: it closes the book and goes back to the Library. The Writer's Kit and this guide have Library there too.
The "…" menu is the menu bar
An iPhone has no menu bar, so the "…" menus hold its commands. A book's "…" menu, at the top right of its list of sections beside the save status, is the iPad's (see The "…" menus) with Save added at the top, and without Use Navigator Layout, which is for the iPad and the Mac. Norn saves by itself within seconds; Save does it now. Just above Settings… is Learn Norn, which shows the lessons of Learn Norn over the book. The Library's "…" menu has Norn User's Guide, Learn Norn, Tip of the Day… (from there only: an iPhone shows no tips at launch), Back Up Now and Settings…, and also About Norn, Norn Support and Privacy Policy, which live in the menu bar elsewhere.
Writing: the formatting bar above the keyboard
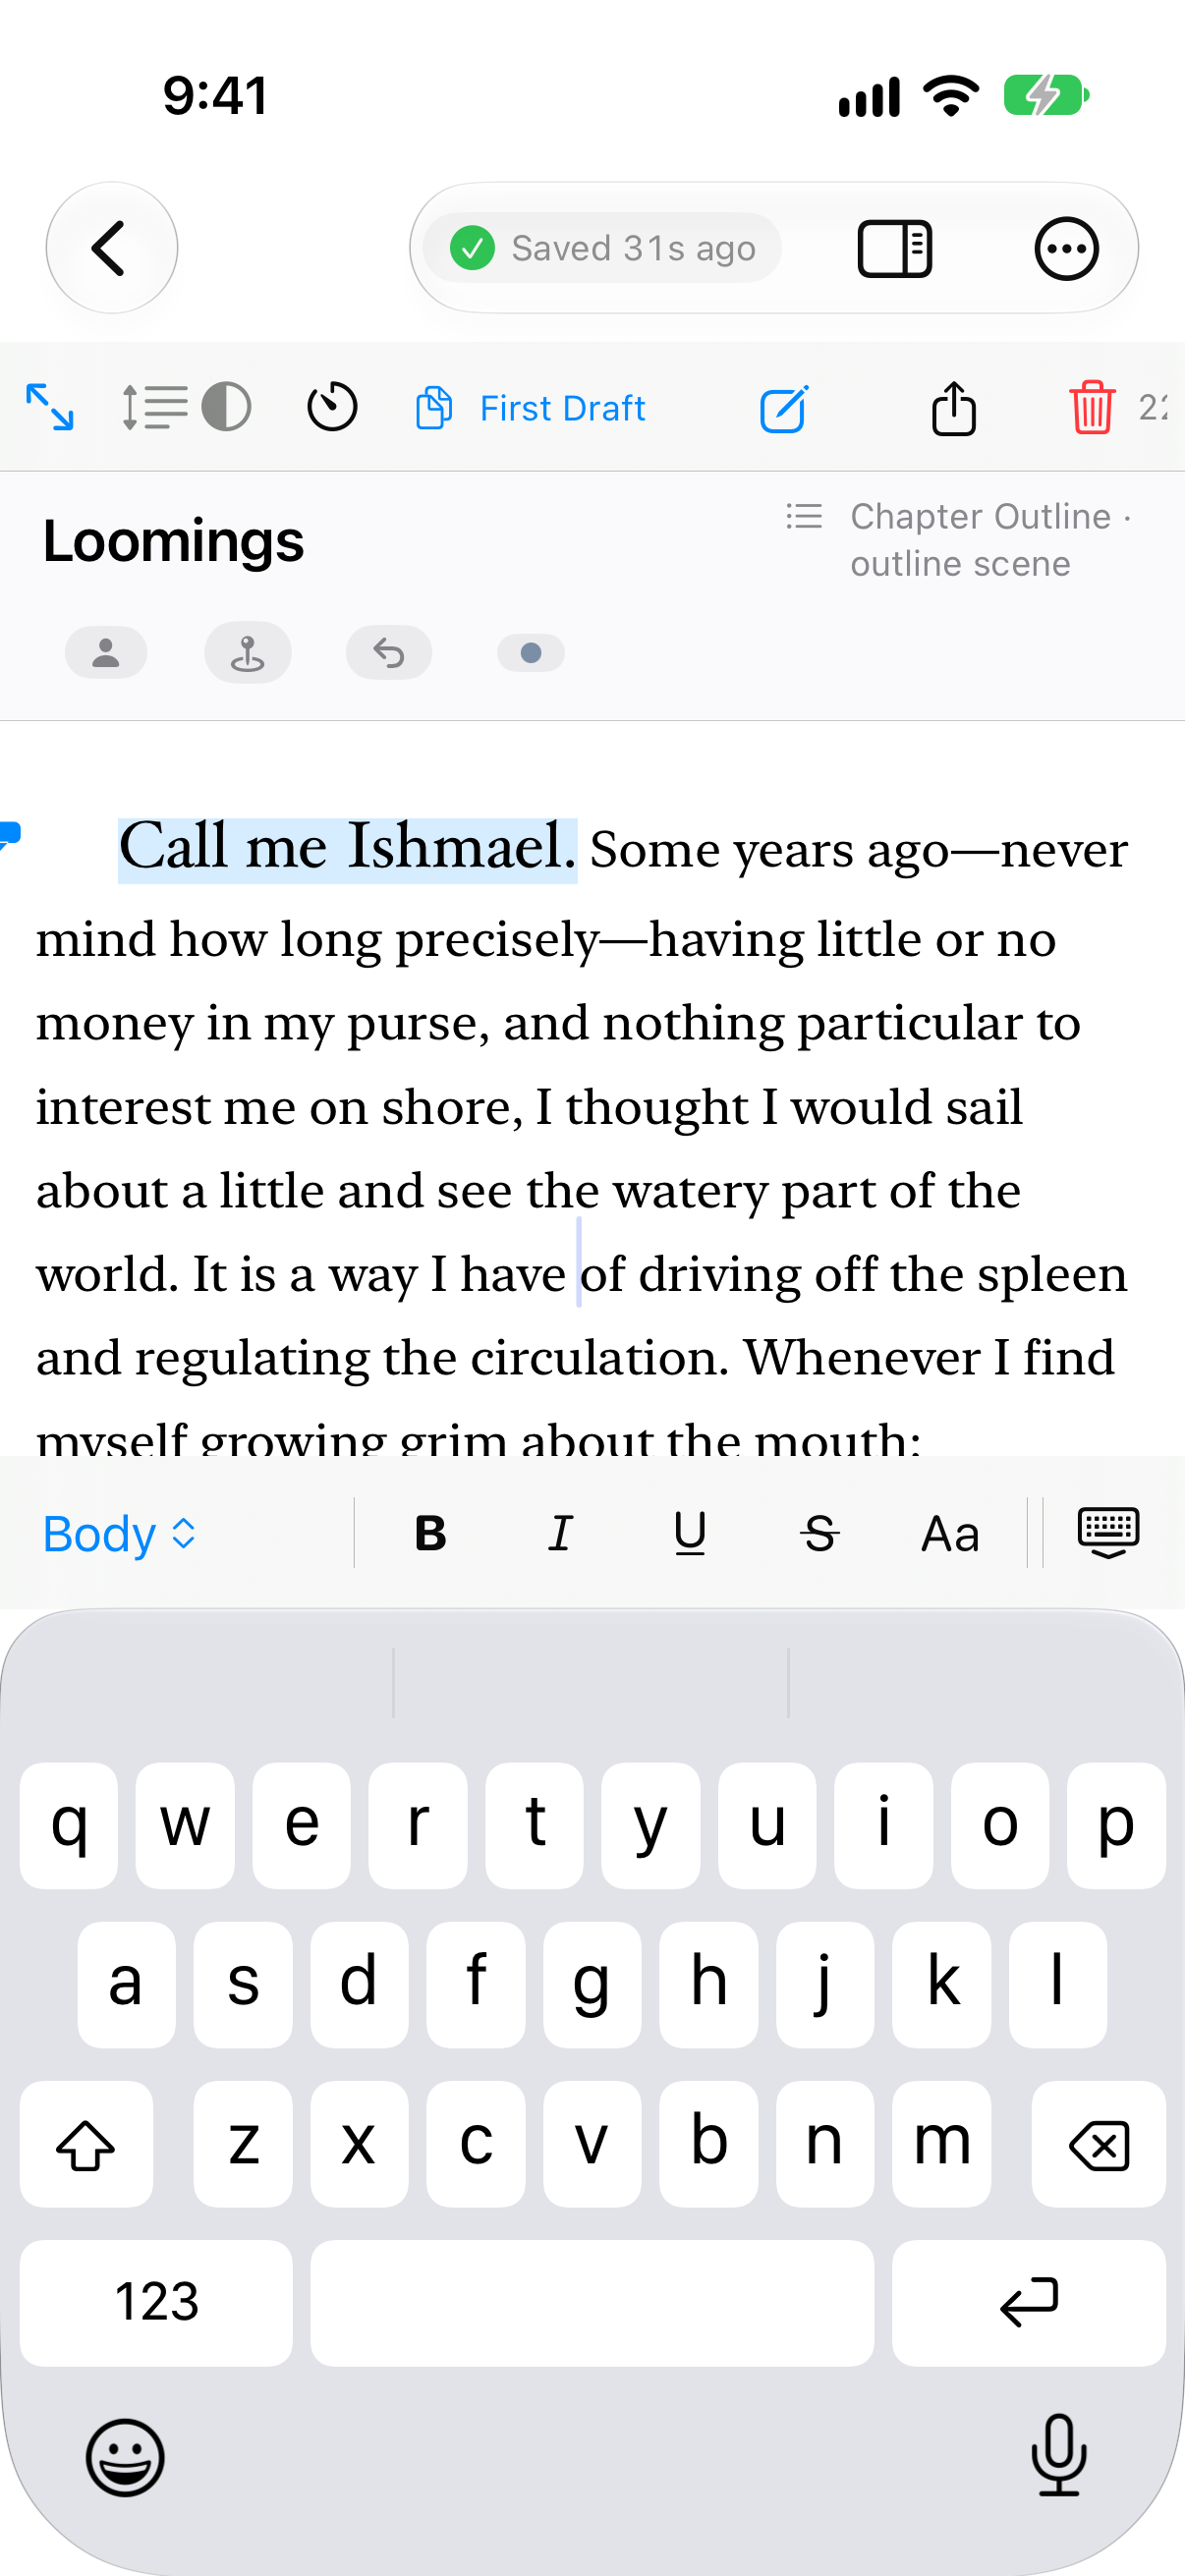
Above the text the editor has two rows. The top one has its tools: the expand button for writing distraction-free, Keep Line Centered and focus dimming, the writing timer, then Edit Scene…, Export and the trash. The second has the version menu (and Compare with: once there is a version to compare), the writing timer's clock while it runs, and the word count. A row that still doesn't fit, at the largest text sizes, swipes sideways.
In the editor, the formatting ribbon becomes a bar above the keyboard: the paragraph style (with Make Scene Break, Insert from File…, and the character styles under Character in the same menu), bold, italic, underline, strikethrough, Link (not in the Manuscript), More Formatting (Small Caps, Superscript, Subscript), the two lists, Scene Break, alignment, Add Comment, Comments, Undo and Redo. Swipe it sideways if it doesn't all fit. Link opens a sheet for the address (and the text, with nothing selected); in a link it edits the link. Open, copy and remove a link from the menu you get by touching and holding it. The keyboard stays up while you scroll; the button at the bar's right end, Hide Keyboard, puts it away. Tap the text to bring it back. Unless you've chosen a size in Settings, the text is 17 points, the iPhone's own reading size. To make the text bigger or smaller on screen only, pinch it: see Zooming the editor. The bar has no zoom button, and there's no zoom in the "…" menu.
Contents and Unplotted Scenes on the iPhone
A scene's header chips show as icons only; tap one for a sheet with the names and any Ordering Issues. The "…" menu above Contents works as on the iPad: the selected row's actions, and Restore to Manuscript for a row in Not in Manuscript. The + menu sits beside it.
Unplotted Scenes is a list on the iPhone. Tap a card to open it. Swipe from the left for Place on Lane… (once the book has a plot), from the right for Delete Scene, or touch and hold for the full menu. Drag a card to reorder.
Comments on the iPhone
Comments work as on the Mac, with the list in a sheet instead of beside the text: Comments on the bar above the keyboard opens it, and Done closes it. Select words and choose Add Comment from the menu above them (or from the bar) and the sheet opens with a new card. Tap commented words and choose Show Comment to open the sheet at that comment.
Pages on the iPhone
"…" ▸ Show Pages in a manuscript editor shows the Pages full screen, each page fitted to the width (pinch to zoom in; a US Letter page reads at about two-thirds size). The bar shows 37 / 1,842, a "…" menu with Paper, Font, Go to Page…, Print… and Export PDF…, and Done. Tap a page, then Edit Here, to go back to its words.
Finding in the manuscript
The magnifying glass in the header above Contents opens Find in Manuscript in place of Contents. Tap a match and its scene slides in with the words selected; the back button returns to the list, just where you left it. Replace and Replace All work as on the Mac.
In a stitched chapter, act or manuscript, the magnifying glass in the editor's header opens the stitch's find bar at the top of the editor, out of the keyboard's way: the field, "3 of 41", ‹ › and Done. Match Case, Whole Words, Ignore Accents and Replace are in its ⋯ menu. A match in a chapter far down may land a little off at first, while Norn measures the chapters it hasn't shown yet, and settles on the words as they appear.
Sheets
Settings… and Norn's other dialogs open as sheets the width of the screen. Panels that sit beside a pane on a larger screen open as sheets on an iPhone: the Character Map's controls, and a Brainstorm's legend and notes. Drag one up to see more of it, and tap Done to close it. An iPhone shows no tooltips.
Turning the iPhone
Norn turns with the iPhone to portrait or either landscape, but not upside down.
Sync and pushes on the iPhone
Sync works as on the iPad (Sync and pushes): changes from your other devices arrive by a push while Norn is in the background, it checks every minute while it's on screen, and your changes go a few seconds after you stop typing and as Norn leaves the screen. Norn's words say "this iPhone", Settings ▸ iCloud has Libraries on This iPhone…, and a conflict copy from an iPhone reads First Draft from iPhone with the date and time. Low Power Mode and the iPhone's backups work as on the iPad. Backups work as on the iPad (Backups on the iPad); the folder shows as On My iPhone › ….
25. Learn Norn
This chapter goes with the Learn Norn book, which the Norn app makes for you. Read on the web, it's a walkthrough of Norn.
Help ▸ Learn Norn (on an iPad or iPhone, the Library's "…" menu) makes a book called Learn Norn, full of examples, and opens it beside this chapter. Making it changed nothing else: not your other books, not your Writer's Kit. A few menus these lessons show you can change your Writer's Kit; where they do, the lesson says so.
Some of what you'll try is a setting on this device. Each lesson asks you to put it back.
Lessons 1–6 are the core, about half an hour. The rest are for when you have time.
To remove the book, right-click it in the Library and choose Move to Trash (on an iPad or iPhone, touch and hold it). With Sync with iCloud on, it syncs like any book, and Move to Trash moves it on your other devices too. If you've set up Automatic Backups for all books, Learn Norn is backed up too.
If your Learn Norn book was made by an earlier Norn, its Overview says so. Start a fresh copy from Help ▸ Learn Norn.
On a Mac, put this window beside the book's. On an iPad, use Split View. On an iPhone, choose Learn Norn in the book's "…" menu: the lesson opens over the book.
Each step names the Mac way first, then the touch way in brackets.
Lesson 1: Finding Your Way
Moving between sections. On a Mac, ⌘1 to ⌘9 move between the sections in the sidebar, and ⌘8 opens Unplotted Scenes, at the top of Plots. (On an iPad or iPhone, tap a section in the book's list; Unplotted Scenes is the first row in Plots. With a keyboard, ⌘1 to ⌘9 work on an iPad too.)
Layouts. Turn on View ▸ Use Navigator Layout: the sidebar becomes rows of icons with the section's list beneath. Then turn on View ▸ Mini Rail (⌥⌘M), which narrows it to a strip of titles. Put both back as they were. (On an iPad, the book's "…" menu ▸ Use Navigator Layout.)
The Reference Inspector. Press ⌘9 for the Manuscript and click "Lamps at Dusk" in Contents. Click the panel button at the top right of the window, the Reference Inspector, and choose its Information tab: the scene's card, with its POV, cast, setting and beat. Type a line in its Outline Note, such as "Hard cut from the stair." (On an iPad or iPhone, tap "Lamps at Dusk", then the panel button at the top. On an iPhone the inspector is a sheet: swipe it down to close it.)
Lesson 2: Writing in the Manuscript
Open the Manuscript, then "Lamps at Dusk" in the chapter "Lamplight".
Bold and italic. Double-click "dusk" and press ⌘B, then ⌘I. (On an iPad or iPhone, double-tap it, then Bold and Italic on the formatting bar.) Typing *stars* stays as stars: Norn never turns typed marks into formatting.
Paragraph styles. With the caret in a paragraph, open the style menu at the left of the formatting bar, the one that reads Body, and choose Chapter Heading, then Body again. (On an iPhone it's the bar's first button.)
Character styles. Select The Harbour Almanac and choose Character ▸ Title of a Work (the Character menu beside the style menu). On an iPad, choose Character Style in the menu over the selection; on an iPhone, the character styles are in the style menu on the bar. The words show in the style's italics. If you've renamed Title of a Work, it's the third style in the list.
- ⚠ Kit: Edit Character Styles…, at the foot of the Character menu, and Format ▸ Character Style ▸ Add This Book’s Styles to Writer’s Kit change your Writer's Kit. Leave them for now.
Scene breaks. Click the empty line before "She went down the stair" and choose Make Scene Break from the style menu. Three spaced stars take the line's place.
Comments. A comment is pinned to "the ninth lamp". Click its mark in the margin: the inspector opens at Comments, with the comment's card. In the card's "…" menu, choose Resolve. (On an iPad or iPhone, tap the words, then Show Comment in the menu above them; on an iPhone the comments open as a sheet, and Done closes it.) To add your own, select some words and press ⇧⌘K, or choose Add Comment in the menu over the selection.
Footnotes. Click the small raised 1 after "glass." to open its footnote, and press Esc to close it. (Tap it on an iPad or iPhone; on an iPhone the note opens as a sheet, and Done closes it.) To add one, put the caret where it goes and choose Format ▸ Insert Footnote (⌥⌘N). On an iPad, it's in the menu over the text; on an iPhone, in the style menu on the bar.
Chips. At the end of the last line, type {, then "Osr", and press Return (or tap Osric Vane in the list). The name drops in as a chip. Now rename Osric in Characters (⌘5) and the chip follows. Rename him back.
Adding a name to a list. Select the Saltgate, right-click it and choose Add to Locations…. (On an iPad or iPhone, choose Add to… ▸ Add to Locations… in the menu over the selection; on an iPhone, tap the arrow at the menu's end to find it.) Norn adds the place to Locations and turns the words into a chip for it; if the name appears elsewhere in your scenes, Norn lists those places, ticked, so you can turn them into chips too. Norn no longer marks the name as misspelled. Do the same with glassfall and Add to Lexicon: on a Mac, because glassfall is marked as misspelled, the item comes after the spelling suggestions.
Distraction-free. Click the expand button at the left of the editor's header, two arrows pointing apart. Hold ⌥⌘ to peek at the inspector, and let go to hide it (Settings ▸ Editor can change the keys). Press Esc to come back. On an iPad or iPhone, tap the same button; the inspector's button sits at the top, and the button beside it, two arrows pointing together, brings you back.
Lesson 3: Contents Is Your Outline
A chapter on one page. In Contents, click the chapter "Lamplight": its three scenes show as one page, each under its own heading.
Chapter numbers. The second chapter has no title, so Norn numbers it. It reads "Chapter 1", because "Lamplight" has a title of its own and isn't counted. Click it, type a title in place of "Chapter 1", then clear it again: the number comes back.
Ordering Issues. "The Ninth Lamp" and "The Clock Stops" carry orange marks. Hover over one to read why: "The Clock Stops" causes "The Ninth Lamp" but comes after it, and the plot board has them the other way round. (On an iPad or iPhone, open the chapter and tap the chips beside a scene's heading.) Drag "The Clock Stops" above "The Ninth Lamp" (on an iPad or iPhone, touch and hold it ▸ Move Up), and both marks go.
Not in Manuscript. At the foot of Contents, open Not in Manuscript (4). Right-click "The Harbour Wall" and choose Restore to Manuscript (on an iPad or iPhone, touch and hold it). It goes back by the board's timeline, after "A Ledger by Candle".
Include in Book. "Research Notes" has a crossed-out eye beside it: it's left out of the book, so it never prints or exports with the manuscript. Right-click it (touch and hold) to see Include in Book, unticked. Leave it as it is.
Find in Manuscript. Choose Edit ▸ Find ▸ Find in Manuscript… (⇧⌘F; on an iPad or iPhone, the magnifying glass above Contents) and search for "lamp". Every match is listed under its scene, Research Notes too: Find searches what the book leaves out. Close it with its ×.
Lesson 4: Plots, Timeline and Cards
Open Plots (⌘7), then "Try Me".
Cards. Above the board, switch from Timeline to Cards. Click "The Clock Stops"' summary and type, then press Tab to move to the card's next field. Move a card by the small handle at its top left (on an iPad or iPhone, the card's ⋯ menu ▸ Move Earlier or Move Later). Select a card and choose New, the +: a card appears right after it, its title ready to type over.
Resolve overlaps. Switch back to Timeline. "Gears in the Rain" and "Gears Again" share a cell. Click the button showing a stack of rectangles with a minus badge: they spread into a column each, and the button goes, since nothing is stacked any more. On an iPhone, swipe the row of buttons left to reach it.
The funnel. Open the funnel menu, choose Wren Hale, then Show Scene Type Fields: Osric's cards dim, and every card grows taller. Put them back: choose Show All, then Show Scene Type Fields again.
Threads. Open the threads menu, the three dots joined by a dotted line: "The missing key — Unresolved". On the board it's drawn dashed from "Lamps at Dusk" through "A Ledger by Candle" and back to "The Clock Stops", ending in an open ring, because it has no end yet. Choose The missing key ▸ Edit…: its Linking Scenes are in the order they were picked, not the board's. Click Sort by Timeline Column and "The Clock Stops" moves to the top. Choose Cancel to leave the thread as it was.
Lesson 5: Unplotted Scenes
Placing a card. Press ⌘8 for Unplotted Scenes. Right-click "The Watchman's Round" and choose Place on Lane…, then Plot Try Me, Lane Osric, Column After the last card, and Place. (On an iPhone, swipe it from the left for Place on Lane…; on an iPad, touch and hold it.)
The row above the board. In Try Me's Timeline, click Show Unplotted Scenes, the button showing a panel with its top third filled. Drag "Salt on the Steps" from the row onto an empty cell. (On an iPhone, swipe the row of buttons left to reach it, then touch and hold the card ▸ Place on Lane….) Click the button again to hide the row.
Taking a card off its lane. Right-click "Salt on the Steps" on the board (touch and hold it) and choose Move to Unplotted Scenes. Norn asks first, and says what changes and what doesn't. Choose Move to Unplotted Scenes.
Following the board.
- Click an empty cell on Wren's lane and type a title, such as "The Locked Door".
- Leave Insert into Manuscript in Timeline Order on, and choose Done.
- Open the Manuscript: the new row sits in timeline order, with a small glyph that says it follows its card.
- Back in Try Me, drag the card two columns right (on an iPad or iPhone, touch and hold it ▸ Move to…, and raise Column by two).
- In the Manuscript, the row has moved to match.
- Now drag the row yourself (touch and hold ▸ Move Up). The glyph goes: it stays where you put it from now on, and an orange mark says it's out of timeline order.
Lesson 6: Beats
The beats manager. Choose Book ▸ Manage Beats…, under the Beats heading. (On an iPad or iPhone, the book's "…" menu ▸ Manage Beats….) The book has three beats, Opening, Turn and Close, and their names are in the board's column ruler.
Presets. Add from Preset… lists the beat sheets; choosing one adds its beats to this book only. Close the list without choosing one, then choose Done.
- ⚠ Kit: Save as Beat Sheet…, in the same window, copies these beats into your Writer's Kit. Leave it for now.
A beat sheet as scenes. In Plots ▸ Try Me, open the board's metronome menu and choose Add Beat Sheet as Scenes…. It's also in Book ▸ Add Beat Sheet as Scenes… while a plot is open (on an iPad or iPhone, the book's "…" menu), and in each lane's ⋯ menu.
- Pick Three-Act Structure and the lane Osric, then choose Create.
- Each beat becomes a scene, after Osric's last card, titled with the beat's name. The beats the book didn't have are added, and each scene joins the manuscript in timeline order.
- Now choose Edit ▸ Undo (⌘Z) once. The scenes, their rows in Contents and the added beats all go. (On an iPhone, or an iPad with no keyboard, open any scene in the Manuscript, tap its text, and tap Undo on the formatting bar.)
- This reads your Writer's Kit's beat sheets and changes nothing in it.
Lesson 7: Characters and the World (optional)
Open Characters (⌘5), then Wren Hale.
Inherited traits. Choose the Traits tab. Under Inherited Traits (on an iPad or iPhone, tap it to open it), Watchful comes from The Lamplighters' Guild, because Wren is in its inner circle. Click the eye beside it: Watchful moves to Suppressed Inherited Traits, struck through, for Wren only. Click the eye again to bring it back.
- ⚠ Kit: under Four Selves, each self's + opens Add Trait. At its foot, Add & Pick makes a new trait with Also add to Writer’s Kit ticked, so the trait goes into your Writer's Kit too. Leave it for now.
Affinity. Choose Profile and scroll down to World. Under Factions, The Lamplighters' Guild reads Inner circle. Click it and choose Lapsed. On the Traits tab, Watchful has gone: the Guild gives it only to its inner circle and its active members. Set it back to Inner circle.
Arcs. Choose Psychology, then Add Character Arc, and pick a preset, such as Flat Arc. Its parts appear, each with a hint in grey. Delete the arc with the trash button beside its title. (On an iPad or iPhone, tap Character Arcs to open it if it's closed, then the + under it.) The presets come from your Writer's Kit; picking one changes nothing there.
Character Map. Open the Character Map (⌘6). In its controls, at the right, find Group by facet and choose Add facet group: a ring is drawn round each culture. Click Cultures and choose Factions: now the Guild's ring pulls in Wren and Marta and leaves Osric out. Remove the group with its trash button. (On an iPhone, tap a name for the map, then the sliders button at the top right for the controls; Done closes them.)
Compendium. Open the Compendium (⌘2), then Locations ▸ The Lantern Stair. Under Referenced by, "Lamps at Dusk" is listed twice: the scene is set there, and its prose names the place.
The rest of the world. In the sidebar, under World, open Creatures and the glimmer moth, then Lexicon and lumenwright. Both show as chips in "Lamps at Dusk".
Lesson 8: Brainstorm (optional)
Open Brainstorms (⌘3), then "Try Me". If Welcome to Brainstorm appears, choose Got It.
Adding ideas. Click "the night watchman?" and press Return: a new idea appears under it, ready to type. Type "Marta saw him" and press Return. Then press Tab for an idea beside it, type "or a cat" and press Return. (On an iPad or iPhone, touch and hold an idea and choose Add Child or Add Sibling; tap the keyboard's return key to finish.)
Converting an idea. Right-click "the night watchman?" and choose Convert to ▸ Character (on an iPad or iPhone, touch and hold it). Norn makes a character called "the night watchman?", and the idea gains a small badge; it stays on the map. On a Mac, right-click it again: the menu ends with Show Character, which opens the new character.
Lesson 9: Notes, Goals and the Timer (optional)
Notes. Open Notes (⌘4). Under My notes, open "Try Me: a note". Your own notes are written in the same editor as the manuscript.
Goals. Open the Overview (⌘1) and choose Set Goals…. Type 500 under Words per day, then choose Done. Writing Goals now shows today's words against 500, and the button reads Edit Goals…. Goals belong to this book only.
The timer. Open "Lamps at Dusk" in the Manuscript and press ⌥⌘T (on an iPad or iPhone, the book's "…" menu ▸ Start Writing Timer). The timer button at the top of the editor, a stopwatch, opens the timer's controls; on a Mac the running clock also shows at the right of the editor's header. To stop, choose File ▸ End Session (on an iPad or iPhone, the book's "…" menu ▸ End Session).
Lesson 10: Getting Your Work Out (optional)
Export. Choose File ▸ Export… (⇧⌘E; on an iPad or iPhone, the book's "…" menu ▸ Export…). Choose The whole manuscript and Manuscript Format (PDF), then Export…, and pick a folder. Open the PDF: "Research Notes" isn't in it, because Include in Book is off.
Pages. With "Lamps at Dusk" open, choose View ▸ Show Pages (⌥⌘P; on an iPad or iPhone, the book's "…" menu ▸ Show Pages). The manuscript shows as printed pages, open at the scene. Choose Done to go back.
Snapshots. Choose File ▸ Restore from Snapshot… (on an iPad or iPhone, the book's "…" menu): the copies of this book Norn has taken as you worked. Look only: Open would make another book, and with sync on, that copy syncs too. Choose Close.
An archive. Choose File ▸ Export… again, then The whole book and Book Archive (.norn), and Export…. The archive is the whole book in one file; Import Book… in the Library brings it back as a separate book.
Lesson 11: Your Writer's Kit and iCloud (optional)
The Writer's Kit. Choose Norn ▸ Writer’s Kit… (on an iPad or iPhone, Writer’s Kit at the top left of the Library). It opens on New Books (on an iPhone, its panes are listed, New Books first). Look only: anything you change there changes your own Kit.
iCloud. Choose Norn ▸ Settings… (on an iPad or iPhone, the Library's "…" menu ▸ Settings…), then iCloud. Sync with iCloud is one switch for the Kit and every book. Work on one device at a time.
If the Kit needs you. If the Library shows a line about your Writer's Kit with Decide…, settle it first: see If something is wrong with the Kit.
Lesson 12: Revising a Scene (optional)
Open the Manuscript, then "Lamps at Dusk".
A new version. The version menu at the top of the editor reads First Draft. Open it and choose Revise…, then Revise, keeping the name Revision 1. First Draft is locked now, and you're writing in Revision 1. (On an iPhone, the version menu sits with the other controls at the top of the editor.)
A change. At the end of the last line, after "find him.", type " The stair was wet."
Compare. Open Compare with:, beside the version menu, and choose First Draft. Your new words show on a green highlight. Choose None to go back to writing.
The older version. Choose First Draft in the version menu. It opens read-only, with a lock and "First Draft is locked. Revise and edit the newest version." above the text. Choose Revision 1 to go back to it.
Lesson 13: Backups (optional)
Choose Norn ▸ Settings… (on an iPad or iPhone, the Library's "…" menu ▸ Settings…), then Backups. Here you can set up to three backups: copies of your books that Norn writes as ordinary files into a folder you choose, on a schedule, as you write, or when you meet a goal. Look only: Add Backup makes a backup that writes files into a folder. Back Up Now, at the foot of the tab and in the File menu (on an iPad or iPhone, the Library's "…" menu), stays greyed out until a backup is set up. Everything about backups is in Backups.
Finish
The rest of Norn is in the chapters above. Move the Learn Norn book to the Trash when you're done.